Apple
Large-sized fruits of paradise without damage to the peel are better suited for slicing:
- Cut the apple in half and remove the core. Thinly chop one half into circles. Set aside the top piece with the peel, and cut the remaining pieces in the middle, not reaching the end by a few millimeters.
- Move the halves of the pieces apart: the lower the tier, the wider the distance between the halves should be. Cover the top of the resulting pyramid with the cut off top and peel.
- Cut the reserved half of the apple into two equal parts. Cut out the profile of a swan’s neck from a rectangular piece, and a tail from a rounded piece. All that remains is to connect everything using small skewers or toothpicks.
Another simple option is crab:
- Divide the apple into two parts, remove seeds.
- Cut the top off one of the halves and cut the rest into thin slices.
- Lay them out like a fan on both sides, and cover the top of the fruit with a cut cap with eyes made of dried cloves.
- The crab is almost ready to go to the table, you just need to take care of the claws. To do this, cut a round slice from the second part, divide it in half and cut a zigzag shape on each.
Please note that the apple quickly darkens when cut, but there is a way out: just grease the cut with lemon juice diluted with water.
Pear
Fruits of different varieties come in oblong and round shapes. Pears of the first type can easily turn into hedgehogs! Peel the oblong part of the fruit, and decorate the half with the peel with toothpick needles with grapes. Make the nose in the same way, and use cloves for the eyes.
A rounded fruit can become a peacock if you add some sliced fruit that you have on hand:
- Cut the pear in half and place (skin side up) in the center of the plate. The body of the bird is already ready.
- Boiled carrots are an excellent material for a peacock's beak and legs, and dried cloves are an excellent material for the eyes. Although carrots are completely replaceable, for example, with a peach or an apple.
- The tail is the dignity and pride of the bird. It is replete with different colors and patterns. Therefore, use any fruit (strawberries, grapes, plums, peach) to replicate this beauty. Try to cut fruits (especially those with seeds) into small equal slices.
Choose firmer pears. Too soft ones will not hold their shape well, and you won’t be able to make beautiful cuts out of them.
Citrus
Oranges, grapefruits, lemons, cut into thin slices, unlike other sweet fruits, can be bent without fear of breaking them. These fruits will make a gorgeous rose!
- Without peeling the citrus, thinly cut into half rings and place in rows on a plate.
- Prepare a transparent plastic bottle (you can also use a colored one, but then it will stand out). It's good if it has narrowing in the middle part. If not, then take two containers of different diameters. Cut out two rings a couple of centimeters high, one of which will be slightly larger in circumference. Place the small mold inside the larger one in the center of the cut.
- Insert the remaining slices cut side down into the pan, starting with the smaller circle. The overlapping pieces look beautiful.
That's all: a magnificent fragrant rose will become a worthy decoration for your holiday table.
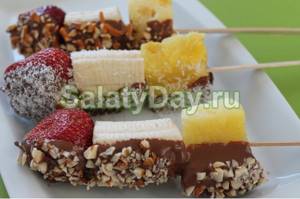
Fruit canapes in chocolate
It’s not at all difficult to please your guests with such a snack, but it’s very pleasant. The bitter taste of chocolate harmonizes especially well with banana.
Ingredients:
- Strawberries – 200 g
- Banana – 1 pc.
- Pineapple – 1/3 part
- Almonds – 150 g
- Coconut flakes – 100 g
- Chocolate – 100 g
Preparation:
Chop the nuts.
Wash the strawberries and cut them into cubes.
Peel the banana and pineapple and also cut into cubes.
Melt the chocolate in a water bath.
If you need to melt a large amount of chocolate, do not use it all at once. Start with a small portion and gradually add the remaining chocolate.
We put pineapple, banana and strawberries on a skewer. Then dip in melted chocolate and roll in chopped almonds or coconut.
Now you can surprise your family and friends!
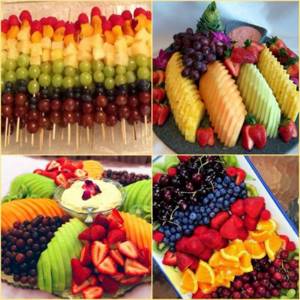
Rainbow mix
If you don’t have enough time to process fruits, but want something special, don’t despair and prepare as many products as possible for slicing.
First, open a photo of a rainbow to remember the sequence of colors:
- red (strawberry, watermelon, apple, raspberry);
- orange (orange, apricot, persimmon, tangerine);
- yellow (lemon, pineapple, banana, apple);
- green (kiwi, apple, lime, grapes);
- blue (alas, nature did not create any fruits or berries of this color);
- blue (plum, blueberry, blueberry);
- purple (grapes, plums, figs).
Cut the fruits into slices - not too small so that they are easy to take, and arrange them in the correct color sequence. If you want, give the rainbow a semicircular shape or stretch food foil across the entire table on which to place a fruit rainbow.
Do you want to serve fruit slices beautifully? Don’t know how to cut fruit for the holiday table and make an original fruit plate? We have selected for you more than 50 ideas on how to beautifully cut fruit and decorate fruit slices in an original way.
Fruits themselves have an appetizing appearance; multi-colored, juicy and bright fruits and fruit slices always attract special attention from guests and will always be appropriate on any holiday table.
To beautifully decorate fruit slices, you don’t have to be a professional and learn carving. Just cut the fruit into convenient slices, slices, mugs and arrange them beautifully on a plate.
Fruits on a plate can be arranged according to color, you will get an original rainbow fruit cut, or according to shape, since most fruits are cut either into slices or round slices.
Fruit slices can be decorated with berries or green twigs, as well as fresh flowers. On top, fruit plates can be sprinkled with powdered sugar; this simple action will transform your fruit slices.
Recommendations for preparation
It is better not to prepare sliced fruit in advance, as these products tend to dry out quickly, especially when cut.
The first stage of preparation includes mandatory and thorough washing of the fruits in warm water. Then it is better to place them on a napkin and let them dry naturally so as not to crush the fragile fruits.
Depending on the characteristics of the selected fruit, the second stage is carried out: the seeds are removed (relevant for apples, pears, melons, etc.), the peel is removed (relevant for banana, coconut, pitahaya, mango, pineapple and others), the tails are pinched off (relevant for berries) .
Sliced fruit in the form of fruit canapés on skewers
Sliced fruits in the form of canapés will be original and convenient for guests. Portioned fruit platters in the form of canapés or chopped fruits on skewers are easy to make with your own hands.
Choose your favorite fruits and berries, cut the fruits into relatively uniform pieces, slices, circles or using pastry cutters, and stick the fruits on skewers in the form of small canapés.
You can beautifully serve sliced fruit in the form of fruit skewers on large skewers, which can be placed on a plate in the shape of a rainbow. A photo of fruit slices in the shape of a rainbow confirms the originality of this idea of fruit slices.
Watermelon and pineapple canapes
These canapes are as bright and juicy as summer. Even the most capricious little gourmets will like the bright presentation, especially if you focus on unusual skewers.

Ingredients:
- Natural yogurt without additives – 150 g
- Cream cheese - 2 tbsp. l.
- Watermelon – 1/6 part
- Pineapple – 1/4 part
- Raspberries – 200 g
Preparation:
Beat yogurt with cream cheese until smooth. Transfer the finished cream into a pastry bag.
Separate the watermelon from the rind, remove the seeds and cut into slices.
Peel the pineapple and also cut into slices.
First, we put a watermelon on a skewer, then we squeeze out a little cream from a pastry bag, on top of a piece of pineapple, cream, a slice of watermelon and again cream. We decorate each canape with delicious raspberries.
Dessert can be served!
Children's fruit cutting - how to cut fruit for a children's party
Fruits are the best and most delicious vitamins for children. However, kids don’t always want to eat fruits and berries; in this case, you can not only eat them, but also sliced fruits.
Decorating children's fruit plates is especially important for a children's holiday table. Children will be interested in trying something unusual in the form of original fruit slices. Kids love fruit on skewers, so why not take advantage of this and design assorted fruit on skewers in the form of animals or characters.
On a children's holiday table, it would be appropriate to cut fruit in the form of a fruit bouquet or a fruit basket.
Surprise your guests by decorating fruit slices in an unusual and creative way. See a selection of photos of cut fruits, use your imagination, and you can create your own masterpiece composition of fruits.
Beautiful fruit cutting with your own hands, photo of how to cut fruit - fruit plate, fruit basket, fruit bouquet photo, fruit on skewers, children's fruit cutting photo
You can see how to arrange fruits and make beautiful fruit slices for the holiday table in photo examples collected for your inspiration in our gallery.
Here you will find original and simple ideas on how to beautifully cut fruit and decorate a fruit plate photo, because a beautiful fruit slice is always appropriate on a holiday table.
S
Juicy and bright orange slices are a wonderful vitamin decoration for any table. In order to present these citrus fruits on a plate, there are several standard ways to cut them.
Take a medium-length knife that is convenient for slicing an orange. It must be well sharpened so as not to crush the pulp of the fruit when slicing and to retain as much juice as possible in the orange. Wash the orange in clean water and dry with a towel. Place the orange on its side. Using a knife, carefully cut the peel along the orange, being careful not to touch the juicy pulp. Then, following from the stalk, cut orange slices perpendicular to the slices, approximately 5-10 mm thick. Thanks to the cut made, it will be convenient and easy to “open” the circle and eat the orange pulp, holding it by the skin. Make a cut on the peeled mug, cutting the slice down to about the middle of the orange. An orange cut in this way is suitable for decorating various cocktails and drinks. Score the peel on the orange rounds, cutting out small pieces in a circle, approximately every 10mm. You will get wonderful orange suns to decorate a fruit plate or other dish. Cut the peeled circle in half or crosswise to create semicircles and orange quarters. Place a whole orange on its side, cut the peel down to the pulp from the stem side and the other end. Place the orange on one of the cut sides and begin to carefully cut away the peel, removing it along with the white inner membrane. When the fruit is peeled, place it on its side and cut into thin circles. You can also cut these circles into quarters and cubes and use them for fruit salads. Cut the orange into slices with peel. To do this, place the orange on its side and cut it in half lengthwise. Then cut the halves in half along the length of the slices, and again, depending on the desired thickness. Prepare a kind of orange fillet, completely ridding the fruit of the inner white films. Peel the orange with a knife as described in point No. 6. Take an orange in your hand and begin to cut out orange slices along its original segments, avoiding the film. This orange fillet is perfect for salads, as it will give a lot of juice and will practically melt in your mouth. Slice an orange for a fun and colorful table centerpiece. Cut several strips on the peel on both sides of the orange. Then attach a slice prepared in advance to the top of this orange. Decorate the resulting figurine with peels and a few orange seeds to get this funny cat.
There are no strict rules or prohibitions on how to cut an orange. You can completely rely on your imagination when cutting this healthy citrus fruit so that it will please you and your guests on the table.
Figured slicing and carving of vegetables and fruits “Delicious floral fantasy.”
Simple cutting of vegetables and fruits step by step with photos
Ksenia Aleksandrovna Gest, physical education teacher, Municipal Educational Institution “School No. 53”, Oktyabrsky village, Lyubertsy district, Moscow region.
Goal and objectives: - development of creative abilities, imagination; - to form aesthetic taste; - cultivate accuracy in performing work, caution; — learn to cut vegetables using the carving technique. Purpose: This master class is intended for high school children, teachers, parents and creative people. This design of dishes is suitable for any holiday, banquet and, simply, to improve the perception of food and good mood. For decoration we will need:
Tomato, cucumber, lemon, orange, pear, apple, kiwi, onion, cutting board, 2 knives (large and small with teeth), 2 flat plates, towel.
Progress.
Carving
(from the English carving -
“carving”
) is the art of artistic cutting of vegetables and fruits, as well as wood, ice and stones.
Tips for a beginning “carving”
Not every fruit or vegetable is suitable for carving. So, for example, radishes should be large and bright, carrots should be even and smooth, oranges should be very fresh. It is better to take apples with smooth skin, cucumbers - smooth and with dark skin, pumpkins with rough skin have denser and easier-to-work with flesh. Decorations should match the dish in color, as well as taste. It is better to decorate meat dishes with cucumbers, tomatoes, carrots, and seafood with lemons. Fruits will serve as an excellent decoration for dessert or as a delicacy in their own right. When choosing combinations of products, give preference to contrasting colors - the compositions will be more enchanting. Red, green, yellow are favorites. Fruits and vegetables for carving must be clean and dry. There must be a golden mean in everything. You should not over-decorate dishes - moderation is important in everything.
1) The first vegetable we’ll start with is the tomato. Cut it in half and cut off the unnecessary part.
2) Then use a sharp knife to thinly slice one of the tomato halves. If it is small, then you can combine two chopped halves into one. As in the photo. 3) After this, we “stretch” the tomato as thin as possible and begin to twist it into flowers. 4) To carefully transfer the finished flower to a plate, you need to grab it with both hands, pressing it on all sides. Ready! You can put a lettuce leaf on the bottom of the plate. 5) Our flower is missing something. You can add parsley or make cucumber bells. To do this, place a cucumber on your palm. Using a sharp small knife, pointing it towards yourself, we cut the cucumber in the shape of a petal, plunging the knife blade to the middle. Then, turning it, we cut two more petals. 6) You should get a bell with three petals. To separate the flower from the cucumber, you need to turn it slightly and it will fall off on its own. Then you can continue in the same order until the cucumber runs out. You can add strips of pepper or olives to the middle of the bells. 7) You can also cut thin strips of cucumber and fold them in half without breaking them to complement our dish. Gradually we move on to the bow. What can be made from onions? We can make it into a water lily. To do this, you need to peel the onion and soak it in cold water so that we don’t cry. Then you need to cut it evenly with cloves, plunging the knife only to the middle. When finished, it will easily separate into two halves. All parts of the onion must be removed and assembled to form a flower. 9) Our decoration for the dish is ready and you can add chopped vegetables or assorted sausages. If you want to treat your guests to sandwiches, you can use the middle for a tomato flower. 10) The vegetable decoration is ready. Now you can start decorating the fruit plate. To do this, we need to cut half an orange as described above. 11) We do the same with lemon. By the way, lemon flower goes very well with fish products. 12) Next, cut the kiwi, as in the photo. You can decorate a plate or place it like this on top of fruit. 13) Right now it’s my favorite. Apple and pear wings. We will need halves of fruit. Visually divide the apple in half. I cut out a strip for you, for clarity. On one of the halves we find the middle and immerse the knife, slightly deepening it. To make it easier to imagine, we seem to be cutting off the peel. You need to get half a petal. Then on the other side we do the same thing, but cut exactly to the corners made. You need to be careful not to cut off excess. The result was a leaf. Stepping back from the cut 2-3mm, cut out the next leaf. We cut until we reach our “border” of the apple. Now we connect all the parts and move them apart so that we get a wing. 14) These wings look like petals, so they can be used in cooking to decorate any dishes. To prevent the apple from darkening, you need to sprinkle it with lemon or dip it in acidified water.
If you decide to surprise your guests with fruit slices, prepare carefully.
- Buy some fruit. They should be fresh, smooth, without dents or black spots. Take into account the characteristics of the fruit: it is better to take hard oranges, but kiwi should be easily pressed with your fingers.
- Carefully fruit. Don't forget that sometimes they are impregnated with paraffin for a glossy shine. Wash fruit immediately before slicing under cold running water with soap and a brush. A hot shower won't harm citrus fruits. After washing, wipe the fruit dry with a paper towel.
- Use sharp knives. It is more convenient to cut some fruits with a thin long blade, others with a cutter, and others with a saw blade. Prepare several tools of different calibers. AliExpress has special fruit knives. For example, a spoon-knife, which is convenient for making notches on fruits and balls of pulp. The main thing is that the tool is sharp. Otherwise nothing will work.
- Prepare a large flat dish, skewers and napkins to make it easy to eat the chopped fruit. Toothpicks may be needed for some fruit arrangements.
- Slice fruit just before serving. Try to remove all the seeds from watermelon and melon; be sure to remove the kernels from peaches and apricots. To prevent the slices from turning black ahead of time, sprinkle them with lemon juice. The finished composition can also be sprinkled with powdered sugar, coconut or grated chocolate.
When everything is ready, you can start creating.
How to cut a melon beautifully for the table. 1 Cut the melon into slices
- 1
Wash and scrape the melon. Place the melon under running water and scrub the surface thoroughly with a vegetable washing brush. It is necessary to wash the melon well: after all, it grew on the ground, and harmful microorganisms, such as salmonella, could remain on it.
- It is not necessary to wash all fruits and vegetables with soap or other detergent, and some do not recommend doing so. Simply place the melon under clean running water and scrub thoroughly to remove dirt and germs from its surface.
2
Cut the melon in half. Place the melon on a cutting board or hard, flat surface. Hold the melon in place and cut it in half with a sharp knife. You don’t have to peel the melon before doing this.
- The melon has an inedible skin, but if you cut it into manageable wedges, you can eat the flesh and leave the skin on.
3
Remove the seeds. Place the melon halves, flesh side up. Take a spoon and scoop out the seeds from the middle of each half. Try to remove as little orange pulp as possible along with the seeds - it is the most juicy and sweet in the middle.
- Toss the seeds in the trash or scoop them out and roast them like you would pumpkin seeds for a delicious, nutritious treat.
4
Cut each half into wedges. Turn the melon halves over, flesh side down, and cut them in half. As a result, you will have four pieces. Carefully cut them in half lengthwise again so you have eight thin slices.
- If you want to cut the melon thinner or serve it to a large crowd, cut the wedges in half again so you have 16 pieces.
5
Serve the melon with the skin on. After you cut the melon into slices, you can serve it. These slices are easy to eat: hold them by the peel and bite off the pulp from the middle. Do not eat the greenish pulp near the peel.
- Discard the peel when there is no orange pulp left.
How to cut apples beautifully
From a simple apple you can create a real work of art. For example, an elegant flower.
Take a red or green apple. Cut it into two parts, leaving about 1 cm from the middle. Cut the smaller half into slices 1–2 mm thick and secure them with a toothpick, as shown in the video. Cut a ball or cube from the second half of the apple - this will serve as a stand. Insert a toothpick with strung apple slices into it and spread them in a circle like a fan. The resulting flower can be crowned with a berry.
Using the same principle, you can make a flower from a whole apple.
Swans made from apples look even more elegant. Making them is easier than it seems. Two identical table knives will serve as assistants. Cut the apple into two parts, remove the seeds. First, place one half of the apple between the knives and cut a smaller slice from it, as shown in the video. Repeat with each subsequent slice until a very small piece remains.
Then do the same with the second half of the apple. This is how you get wings.
The head is cut from another apple.
How to cut Cheese

The main rule: do not cut cheeses into cubes - this is a sign of a lack of cheese consumption culture.
Hard aged cheeses
Italian Parmesan and Grano, Swiss Sbrinz, French Mimolette need to be pricked, not sliced. At home, you can chop cheeses with a utility knife.
Castelmagno cheese must be cut so that each piece combines all three types of texture - grainy, soft and hard. Cut the cheese cylinder into two halves, dividing each into triangles.
Soft cheeses
Brie and camembert need to be cut with a special knife with holes or use a knife with a thin blade, such as a utility knife. A lot of cheese sticks to the wide blade, making cutting so inconvenient.
The heads should be cut so that each piece contains the same amount of peel and cheese - in triangular pieces from the center, and not in parallel strips or cubes.
Mozzarella balls are torn or sliced.
Italian gorgonzola dolce is best divided into portioned triangular pieces, and then scooped with a spoon and spread on bread.
How to beautifully cut oranges and tangerines
Working with an orange is a little more difficult: it produces a lot of juice. And yet you can make a beautiful lotus from the fruit.
To do this, cut the orange in half. Using a sharp thin blade, make longitudinal cuts along the lines of the orange segments on one of the halves. Cut each sector so that you get a pointed petal. Separate the pulp from the peel on the petals. Bend it back and straighten the flower.
A similar flower can be made with strawberries.
An orange can also be turned into a luxurious aster. Cut the zest so that you get petals. Straighten them and make curly cuts. It is important that the orange core does not separate from the peel.
The same can be done with tangerines.
Canapes with mango
The fantastic taste of these canapés will take you to hot countries. It will appeal to both children and their parents, and is suitable as a dessert for evening gatherings with friends.

Ingredients:
- Banana – 1 pc.
- Mango – 1 pc.
- Canned pineapples -200 g
- Honey - 3 tbsp. l.
- Lemon juice – 2 tbsp. l.
Preparation:
Cut the mango in half. Turn both parts in different directions and remove the bone. This way you can carefully separate the pulp without damaging the fruit. Then cut the mango halves into cubes.
Peel the banana. Cut it into circles. Cut the pineapple rings in half. Sprinkle everything with lemon juice and put it in the freezer for a couple of hours.
To prevent bananas from turning black quickly, cover them with cling film.
First we string mango pieces onto skewers, then banana and pineapple.
Exotic canapés are ready!
How to cut strawberries beautifully
In skillful hands, strawberries grow into beautiful roses. They are perfect for both fruit plates and...
Strawberry rose can be made in two ways. In the first case, large berries are needed. Place the strawberries on a fork and make shallow cuts into them. Move in a spiral, protruding each petal.
In the second case, smaller strawberries are taken, and the rose is more voluminous. Separate the stem of the fruit, cut off a small piece on the side to make it easier to cut. Roll thinly sliced strawberries into a spiral.
For a children's holiday table, you can make butterflies from strawberries.
How to cut bananas beautifully
The original presentation of bananas is mainly associated with animals. Therefore, such compositions are often made for children's parties.
So, you can make the cutest dolphin out of a banana.
Funny octopus.
Or ducks.
Another variation of the duck is with plumage made from berries and grapes. Take a banana and attach a duck head made from carrots to the stem. Stick toothpicks with berries and grapes strung on them into a banana. This will be the plumage of a fruit duck.
And if you use a pear instead of a banana, you get a hedgehog.
Fruit canapés and kebabs
Portioned snacks are good. They are convenient to take from the table. And if it’s canapés or small fruit kebabs, it’s doubly enjoyable to enjoy such a treat. You can serve the assortment on thin skewers for canapés (or kebab). The cutting is arbitrary. You can even use curly notches. Thread the fruit pieces onto a skewer and place or place on a plate. Add berries if desired. This way the composition will only look more interesting. There is no need to be afraid of experimenting with berries and fruits in this case.