History of pedicure
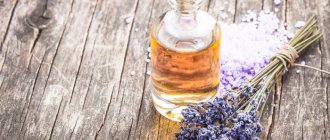
The enormous importance of massage and aromatic foot baths was recognized in Ancient Egypt and China and ancient Greece and Rome, noting the relationship between these procedures and the activity of internal organs.
Thus, noble Egyptians paid great attention to caring for their feet, which were literally an object of worship, since instead of hands, aristocrats kissed their feet. Cleopatra also appreciated the benefits of well-groomed legs, whose servants massaged this beautiful part of her body with aromatic oils and fanned her with a peacock fan until it dried. By painting your feet, palms and nails with expensive dyes, you could emphasize your class. Moreover, the brightness of the dye was directly proportional to the position in society. After the fading of interest in the culture of pedicure in the Middle Ages, it flared up with renewed vigor during the Renaissance and since then, without losing popularity, has undergone many changes, becoming a real art.
HOW HARDWARE MANICURE AND PEDICURE APPEARED
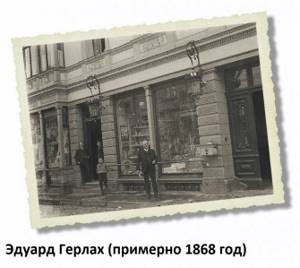
Despite the fact that hardware manicure is a relatively new service in Russia, coming from Europe in the early 2000s, to find out its history, you will have to go back to the distant past. And yellowed photographs from the late nineteenth century with the image of a gray-haired man, Eduard Gerlach, will help us.
The owner of a pharmacy, a pharmacist by training, who lived in the small town of Lubbeck (Germany), Eduard Gerlach, became the founder of the Gehwol brand, currently one of the leaders in the field of foot care cosmetics.
How did it all begin and what were the first years of the future industry leader like? Events developed like this.
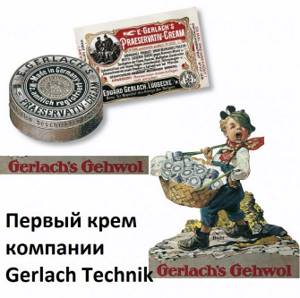
Eduard G. developed a foot cream that had healing properties, a unique formulation and an affordable price, which very quickly gained popularity among the German population, which made it possible to organize production on a huge scale for that time and brought the Gerlach company to a new level. Even before the end of the 19th century, the Gehwol brand was on the pedestal of the world cosmetics arena.
And Eduard Gerlach had a son, Eduard Gerlach... who was engaged in a little-known, even today, area of medicine - podology (treatment and care of the feet, another name for podiatry), who, after the death of his father in 1910, headed the company.
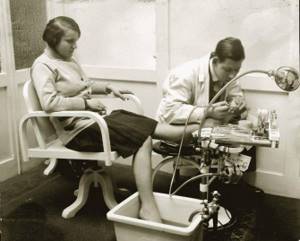
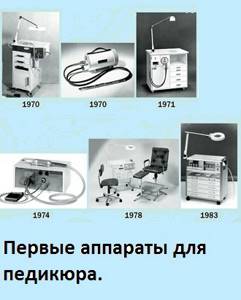
It was at his suggestion that in 1966, Gerlach began developing a device for medical pedicure (removal of calluses, treatment of ingrown and problematic nails). And already in 1969, the first device appeared, the basis for which was dental technology. In the photo, a medical hardware pedicure procedure is performed by a man, a specialist podiatrist (or podiatrist).
In 1970, a pedicure cabinet with a built-in device was produced. Since then only progress and development!
A dust suction system was added, motor power and speed increased, vibration in the handle decreased, and various options for grinding attachments, cutters and burs appeared. Hardware pedicure has been retrained from a purely medical one to a hygienic one and acquired a parallel direction - hardware manicure.
Why was all this necessary and for what reason was it started?
The first feature of the hardware effect is that the dermis and cuticle are polished, getting rid of dead particles. This approach does not provoke further coarsening, since it does not injure living cells. The result is more delicate and well-groomed skin that does not require re-treatment earlier than after 14 days. The second is speed. The device, in the hands of a professionally trained technician, can significantly reduce the procedure time while maintaining high quality services. Third. Gel coatings and acrylics adhere better to the nail plate that has not been steamed or moistened immediately before application. In this case, a hardware manicure is the ideal way to prepare your nails for further manipulation.
Any improvement begins with a small but decisive step forward. A German pharmacist of the nineteenth century made it and now we have a high-quality and comfortable hygienic procedure.
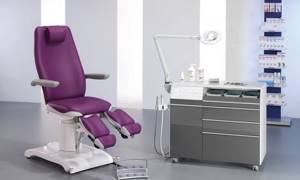
And the company Gerlach Technik to this day continues to produce excellent Gehwol foot care cosmetics. And professional equipment for hardware manicure and pedicure, significantly expanding the scope of its developments.

Zrinka Chaetskaya
Nail Kit - chain of nail cosmetics stores
Types of pedicure
A classic
“edging” pedicure is performed using cutting instruments, which effectively remove corns, calluses and eliminate the problem of cracks.
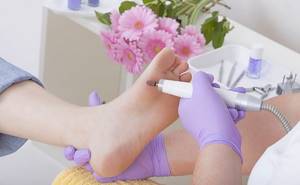
Hardware
(medical) pedicure is distinguished not only by an aesthetic result, but also by health improvement aimed at specific skin and nail problems. Using chemical softeners instead of baths protects against the transmission of fungi and infections. And the cutters used as processing tools prevent injury and make the procedure for deep removal of the stratum corneum painless, quick and more effective.
Book: All about manicure and pedicure. Beauty and health of your nails
Fungal nail infection
Fungal infections occur due to parasitic plant organisms entering the nail area. Fungal diseases are dangerous because they are very easily transmitted from one person to another. An infection can occur on one nail and spread to other healthy ones. A fungal infection causes discoloration of the nails. Spots appear, spreading towards the cuticle, and the disease becomes more pronounced the deeper the fungus affects the nail.
One type of fungal infection is mold. It develops when moisture accumulates between an improperly treated nail and the cosmetic coating on top. Under the layer of varnish there is a space under which diaper rash occurs. Mold can also develop under improperly extended or glued artificial nails made of gel or acrylic.
The appearance of mold can be easily recognized at an early stage by a yellowish-green spot that gradually darkens and first acquires a greenish tint, and becomes black as the disease continues for a long time.
To treat skin diseases, it is recommended to use creams containing vitamin A, since even when applied externally, it is well absorbed into the skin.
Fungal infections of the nails are included in the group of superficial mycoses. The most common fungal nail infection is onychomycosis, better known as ringworm. This disease is caused by a fungus of plant origin and manifests itself in the form of white plaques on the surface of the nail, which are difficult to separate, and long yellowish stripes inside the nail plate. Such formations spread from the free edge of the nail to the root, while the nail thickens and its color changes. At the next stage of the disease, the infection spreads to the deeper layers, while the surface layer becomes uneven and thin. This disease is dangerous because there is a high probability of rejection of dead nail tissue and exposure of damaged areas of the nail bed.
If a fungal infection is not treated in a timely manner, the nail disease may become chronic. For prevention and more successful treatment, it is necessary that the feet are always dry and clean.
Onychomycosis in most cases affects the feet; on the hands, this disease occurs 6–7 times less often. The main causative agent of onychomycosis is the fungus T. rubrum.
In some cases (25%), nail infections are caused by mold or yeast. The latter are especially resistant to a number of antifungal agents and are therefore difficult to treat.
Onychomycosis is treated with both local and systemic therapy. Local therapy helps only in case of superficial damage to the nail or during the initial stage of the disease, as well as when one nail is affected.
Treatment of fungal diseases of nails and skin can only be carried out under the supervision of a dermatologist!
Warts
Warts are a disease of viral origin. It is quite common, as it is transmitted through direct contact (even during a simple handshake) and through objects. There are several types of warts: vulgar (common), plantar and juvenile. Vulgar warts look like dense, painless gray nodules with a keratinized, uneven surface. They can appear single or multiple. Sometimes multiple warts, growing over time, merge into one very large one.
Juvenile warts rise little above the surface of the skin, which is why they are also called flat. They are light gray in color, and keratinization is less pronounced than with vulgar warts. The first and second types of warts are most often observed in children and young people. Typically, such warts appear on the hands and feet.
Flat, keratinized warts of a yellowish color, bordered by a ridge, form on the soles. Their appearance can be triggered by regular irritation of the skin, its friction against the edges of tight shoes. The appearance of such warts is accompanied by acute pain in the affected area.
Sometimes warts disappear on their own, for no apparent reason, but the disease should not be left to chance, as the infection can spread to new areas of the skin. The timing of taking the medication must be respected, since the effect of the cure depends on it. If any type of wart appears, it is recommended to consult a dermatologist. Flat warts are the fastest to treat.
The following remedies can be used to treat warts:
– red cabbage juice. It should be mixed in equal quantities with honey, then generously moisten a clean napkin in the resulting mixture and apply it to the area of multiple warts, then cover the area with compress paper and bandage it, leaving it overnight. The skin surrounding the affected area must be pre-treated with Vaseline or zinc ointment. Such compresses need to be done daily until complete healing;
– onion juice. It needs to be mixed half and half with liquid honey and prepare a compress by moistening a gauze cloth in the mixture. Apply the compress to the area affected by the warts, bandage it, lubricate the surrounding skin with Vaseline or zinc ointment, and leave the compress overnight. Apply daily. Instead of the onion-honey mixture, you can use gruel made only from onions;
– juniper berries. Select black fruits, chop, mix in equal proportions with vegetable oil, place in a water bath for 1 hour, then strain. Apply the resulting mixture to the affected area daily, rubbing in for 10–15 minutes. After application, apply an adhesive plaster and leave overnight. Course of treatment – 2 months;
Cossack juniper berries are very poisonous, so they cannot be used to prepare a medicinal product. Their surface differs from the fruits of common juniper in the presence of tubercles. In addition, poisonous berries have an unpleasant, pungent odor.
- large sedum leaves. Wash the leaves of the plant, grind into a paste, mix with a small amount of honey, apply to the warts, cover with an adhesive plaster and leave overnight. The procedure must be repeated daily until complete recovery;
– roots and rhizomes of Podophyllum thyroid. Prepare a tincture from them using a 70% alcohol solution in a ratio of 1: 3 or vodka (1: 2). Apply the resulting mixture to the warts 2 times a day, rubbing in for 2–3 minutes. The plant is poisonous, so it is not recommended to use it during pregnancy or for treating children;
- herb wormwood tauride. Mix crushed dry herbs with vodka in a ratio of 1:5, leave in a dark place for 1 week, then strain. Apply this tincture to warts 3 times a day, vigorously rubbing in and pre-protecting the surrounding skin. The procedure must be carried out daily until the warts are completely rejected. The plant is poisonous, so care must be taken when collecting and during drying;
– juice of the sundew herb. Apply the juice to the affected areas daily 3 times a day. At night, it is advisable to additionally stick patches on the greased areas. The course of treatment is 2–3 weeks. If rejection does not occur during this period, it is not advisable to use the product in the future;
- thuja occidentalis. Prepare an alcohol tincture from fresh leaves of the plant in a ratio of 1:5. Apply this product to the warts daily, 2 times a day for 2–3 weeks;
- garlic. Prepare a paste from peeled garlic cloves, mix with a small amount of honey and apply a thick layer to the affected areas. Leave overnight, covering the top with a band-aid. Repeat the procedures daily until cured;
– Greater celandine herb. Squeeze juice from fresh herbs. Apply the resulting product to the affected areas 2-3 times a day for 3 weeks. To enhance the effect of the juice, the treated wart can be covered with a band-aid at night.
It is best to treat warts with medicinal plants and herbs in the summer, since at this time of year the plants are most saturated with healing substances. For multiple warts, treatment should begin with the largest of them, which in medicine is called the maternal wart. After its rejection, spontaneous disappearance of the rest is often observed.
Plantar warts are less susceptible to treatment with medicinal plants. You can get rid of such warts using a non-herbal remedy. To do this, you need to mix perhydrol (30%) with lanolin and petroleum jelly in a ratio of 1: 1.5: 1.5. Rub the resulting product into the affected area for 10 minutes 2 times a day. After rubbing, you can wash off the product only after 1 hour. The course of treatment is no more than 3 weeks.
Calluses
Calluses are limited thickenings of the stratum corneum of non-infectious origin. They appear on the feet as a result of wearing tight shoes, on the hands as a result of prolonged pressure or friction (during many hours of physical labor, etc.).
Treatment of calluses is best done after hot baths, which help soften the stratum corneum. To do this, use hot baths for 10–15 minutes. For 500 ml of water you will need 5 g of baking soda and 10 g of toilet soap. After the bath, you need to carefully scrape off the horny mass from the surface of the skin, trying not to injure it. After this, you can proceed directly to treatment procedures. Medicinal plants and herbs are used as auxiliary agents, approximately the same as those used in the treatment of warts. The method of their use remains the same.
You can eliminate calluses using the following remedies.
Oak bark decoction mask
This is an old recipe for a mask to treat calluses. It has been used for many centuries and has proven its effectiveness many times. To prepare, pour boiling water over oak bark in a ratio of 1:5, heat for 10 minutes, then strain. Moisten a clean napkin in the resulting broth. Apply the compress to the affected area, bandage it tightly and wrap it with woolen cloth on top and leave it overnight.
Mask made from spruce or fir needles
To prepare, grind the pine needles into a paste, apply to the affected area, secure with an adhesive plaster and leave overnight. The procedure must be repeated once daily until complete healing.
Red clover mask
Grind the inflorescences with leaves, pour boiling water in a ratio of 1: 3, heat in a water bath for 5 minutes, strain. When using dry raw materials, ratio 1:5, heat for 10 minutes. Apply the compress to the callus and secure with an adhesive plaster or bandage and leave overnight. Repeat the procedure daily.
Mask from coltsfoot
Prepare a paste from fresh plants, then apply it to the steamed callus, secure with a bandage and, insulating it with a blanket, leave overnight. You can add a little honey to the paste. If dried herb is used for cooking, it must first be boiled in water for 3-4 minutes.
Compress with propolis
To prepare, place propolis in a clay cup and place in a preheated oven, heat until melted. After this, drain the wax and filter the hot propolis. After taking a hot bath, you need to apply a piece of propolis heated to the point of plasticity on the steamed callus. Secure it with a plaster or bandage, pressing the propolis tightly to the skin. Leave the compress for 3 days. If necessary, repeat the procedure several more times until the callus is completely rejected.
The skin around the callus does not need to be protected before applying the compress, since the effect of propolis is harmless.
Garlic mask
Bake the garlic in the oven, cool slightly, and then apply to the steamed callus. Secure with a bandage and leave overnight. Sometimes it is enough to carry out 2-3 such procedures for a complete cure.
Onion mask
Take a medium-sized onion, peel, cut into rings and soak in a small amount of vinegar for 8 hours. Apply the onion to the callus every 20-30 minutes several times a day.
Aloe mask
Cut several large leaves from the aloe trunk, chop them and squeeze out the juice. Soak a cotton swab with the resulting juice and apply it to the callus. Such a tampon can be bandaged to the callus and left overnight.
Lemon peel mask
Grind the zest of one lemon, place it on gauze and tie it to the steamed callus overnight. The course of treatment is 6–7 days.
Heel spurs
Heel spurs are painful growths that form on the heels. Usually they are removed surgically, but when the disease is not advanced, you can try to get rid of them using folk remedies.
Potato mask
To prepare, take a medium-sized potato tuber and grate it. Place the resulting mass on gauze and apply to the sore spot overnight. Repeat the procedure for 6–7 days.
Lilac tincture
Pour 2 tablespoons of dried lilac flowers into 1 glass of vodka, place in a dark place and leave for 1 week. Take tincture 20 drops 4 times a day. At night, apply compresses with nourishing cream and the same tincture to the heel spur, mixing them in a 1:1 ratio.
Skin cracks on the palms and backs of the hands and on the soles of the feet
As the skin loses its elasticity, cracks form. Superficial cracks are more often observed, which heal faster and leave no marks. But without treatment, they become deep and painful, and after healing, scars remain on the skin. Cracks in the skin of the hands cause discomfort while working, and cracks in the soles of the feet cause pain when walking.
Cracks appear in dry or thickened skin. Before starting treatment, you should first consult a dermatologist to see if the cracks are the result of an infectious infection. Cracks in the palms and soles can occur due to eczema. If the appearance of cracks is accompanied by itching, you should consult a doctor.
Cracks on hands occur as a result of frequent use of chemicals in everyday life, therefore, to prevent unpleasant consequences, you need to work with rubber gloves when washing, washing dishes, etc. The skin of your hands must be regularly cared for.
Cracks on the feet
As a result of wearing uncomfortable, tight shoes, a thickened stratum corneum appears on the skin of the feet, especially in the heel area, then this layer cracks, and deep and painful cracks appear.
To treat cracks, you can use infusions and decoctions of medicinal plants. Before the procedures, you should steam the skin of your feet using a hot bath. Then you need to carefully remove the stratum corneum and after that apply the medicine to the skin.
To treat cracks in the skin of the feet and hands, you can use a pharmacy tincture of calendula. Lotions from this product should be left for 1.5 hours. The procedures are carried out daily until complete recovery.
The most commonly used plants to treat cracked skin are the following:
– scepter-shaped mullein. Dried flowers of the plant should be crushed and mixed with butter (unsalted) or with nourishing cream for dry skin in a ratio of 1: 2. Use the resulting product to lubricate the cracks on the hands and feet and, after applying a bandage, leave overnight. Repeat the procedure daily;
– rhizomes of Potentilla erecta. They should be crushed and mixed with butter in a ratio of 1:40 (if using a dried plant) or 1:12 (if the plant is fresh). Place the mixture in a water bath for 1 hour, then strain. Instead of butter, you can use olive oil. Rub into the skin of the hands and feet every night until completely cured;
- honey It can be used in its pure form or mixed with raw lard in a ratio of 2: 1. Honey cakes should be applied to the affected areas, apply a bandage, and leave for 1 hour. Carry out the procedures daily or every other day;
- calendula flowers. Pour dried calendula flowers with vegetable oil in a ratio of 1:10 and leave for 12 hours, then heat in a water bath for 30 minutes, strain. Make a lotion from the resulting infusion, put it on the affected area of the skin, apply a bandage and leave for 3 hours;
Caution should be exercised when using comfrey roots as the plant is poisonous. Not recommended for use in children.
– roots of comfrey. They should be crushed and filled with water in a ratio of 1:50. Place in a water bath for 30 minutes, then strain thoroughly. To prepare a compress, moisten a napkin in the hot infusion and apply it to the affected areas of the skin, leave for 2 hours. Carry out this procedure daily until the cracks are completely healed;
– wheat bran. Fill them with water in a ratio of 1:5, heat in a water bath for 1 hour, strain twice. From the resulting infusion you can make hot baths for your hands and feet every day, the duration of the procedures is 15–20 minutes. As it cools, hot broth should be added to the bath.
- Sophora japonica. Make a vodka tincture from the fruits of the plant in a ratio of 1:5. You can use a pharmacy-prepared tincture. Make lotions from the tincture 2 times daily;
To treat cracks, there are various creams with herbal additives.
- apple lotions. To prepare, you need to take a whole apple, boil it in milk or water, then grate it on a fine grater. Cool the resulting mass slightly, apply a thick layer to the damaged areas of the skin, cover with a napkin or apply a bandage, and leave for 30–40 minutes. Carry out the procedure daily until the cracks are completely healed. After removing the mask, the damaged areas should be lubricated with a cream for dry skin.
Nail diagnostics
Some diseases of internal organs can lead to pathological changes in the nails, although it can be quite difficult to establish the real cause of such phenomena, since they can arise as a result of diseases of the nails themselves. Among the skin diseases that affect nail growth are lichen planus, neurodermatitis, etc.
Thus, the appearance of various dots or arcuate lines on the nail plate or splitting of the plate may indicate an inflammatory or infectious disease, and may also be the result of poisoning or dysfunction of the endocrine glands. In addition, such deviations can be caused by psoriasis (squamosus), in which pinpoint depressions first appear on the nail plate, then the nail completely peels off from the bed and falls off.
A fairly common complaint is peeling nails. You should know that peeling nail plates indicate damage to the nail bed at the molecular level. A single coating of medicated varnish, masks and baths can only slightly improve the structure of the nails, but not cure them.
Healthy nails are usually pink, with the free edge white. There are no dents, irregularities, grooves or stains on such nails.
After carefully examining your nails, you can draw the following conclusions about your overall health:
– complete loss of a nail can be a consequence of injury, dermatitis or sexually transmitted diseases;
– mobility of the nail plate can occur due to injury, nail psoriasis, fungal or bacterial infection, individual reaction to medications, chemotherapy, thyroid disease or lupus;
– thickening of the nail plate may be evidence of poor blood circulation, fungal infection, hereditary characteristics and permanent injury to the nail;
– dull nails and a decrease in their size can cause injury or damage to the matrix;
– uneven surface of nails or yellow-brown spots often indicate psoriasis or eczema;
– very soft nail plates can be caused by contact with alkaline substances, poor nutrition, diseases of the endocrine system, chronic arthritis;
– if the nail curls down around the tip of the finger, this may be a consequence of respiratory diseases, cardiovascular diseases or cirrhosis of the liver;
– concave nails indicate iron deficiency and problems with the thyroid gland;
– horizontal ridges on the nail plates occur due to injuries, infections and poor nutrition:
– longitudinal ridges indicate aging of the body, poor absorption of vitamins and minerals, thyroid disease or kidney failure;
– if the nails have a reddish tint, the fingers are swollen, there is suppuration, this is a clear sign of a bacterial or fungal infection;
– brittleness, dryness and splitting of nails often occur due to frequent contact with detergents, solvents and other irritants, as well as due to improperly performed manicure or pedicure or due to silicon deficiency. Peeling, split or excessively soft ends of the nails may also indicate inflammation of the ovaries. If the nails peel on the right side, it means that the activity of the right ovary is impaired, if on the left side, then the activity of the left one;
– too large sockets indicate insufficient activity of the thyroid gland or are a consequence of injury;
If any changes are observed on the nails, you should definitely consult a dermatologist or therapist for advice.
– reddish or dark pink nails may be a consequence of insufficient blood circulation in the peripheral vessels;
– colorless nails that look much paler than the periungual ridges are a clear sign of anemia;
– nails often have a bluish tint due to insufficient oxygen supply to the blood. Possible causes may also be diseases of the respiratory or cardiovascular system. Blue discoloration can also occur as a result of contact with certain dyes or chemicals;
– white soft nails are the result of a fungal infection, which further leads to thickening of the nails and the appearance of ribbing. Such an infection may begin at the free edge and move down toward the socket;
– nails very often acquire a yellowish tint as a result of excessive use of colored varnishes and enamels, as well as due to the use of decorative cosmetics of poor quality. Yellowing of the nails can also occur after taking tetracycline. In addition, this may be a signal of a fungal infection, diabetes or psoriasis;
– small white spots on the nails can appear in adolescence due to hormonal changes, but can also be a sign of damage to the nail matrix or appear due to a lack of zinc.
In medicine, diagnosis and treatment of nails is called “su-jok therapy” (“su” - “hand”, “jok” - “foot”). It is known that every millimeter of the nail contains a large number of active points, by influencing which you can achieve rapid healing of the entire body.
Spa pedicure
Spa pedicure, which has gained popularity in recent years, is distinguished by particularly gentle and smooth heels as a result. This is achieved through resurfacing using products that soften and dissolve dead skin layers, separating them from the “living” skin. In addition, this type of pedicure is accompanied by all kinds of massages with natural aromatic oils, masks and peelings, delivering “heavenly pleasure” and winning the hearts of salon clients. Some salons are trying to combine spa pedicure with hardware, despite the divergence of expert opinions on this issue. But, in any case, this is not only pleasure for the soul and body, but also the most effective type of pedicure.
Which pedicure is the safest?
Let's start with this main question. After all, if you initially choose the right type of pedicure, this will increase your chances of having perfect heels significantly. At the moment, types of pedicure can be divided into 2 main groups:
Classic trim pedicure.
This is when the pre-steamed, rough skin of the feet is trimmed using special machines with a blade (scraper). After the procedure, the heels immediately become smooth and soft, but the skin grows back very quickly. And if the cut was not even and not very professional, then the growth will be a la “rags,” but that’s half the trouble. Each time the time between pedicures will decrease, because roughness will appear faster and faster. It’s hard to imagine why some girls prefer a trimmed pedicure, because a foot of any complexity and condition can be saved without circumcision, believe me! But, if someone still decides to have a classic pedicure, then it would be better to seek the help of a pedicurist, having first purchased the necessary professional tools. Then you will come to the specialist’s appointment with your own sterile accompanying materials.
European unedged pedicure.
This is a type of pedicure in which rough skin of the feet, corns and cracks are eliminated using special graters, milling cutters, scrubs, gels and other pedicure products. This pedicure can be done both in a beauty salon and at home.
It’s worth signing up for a pedicure office if you decide to get a hardware pedicure.
. This is when the rough skin is removed from the foot using special milling attachments that rotate very quickly. It's safe, but not suitable for everyone. Many girls find the very feeling of the cutter “going” along their leg unpleasant; it is difficult for them to endure, although this procedure cannot be called painful. This is rather an individual question.
But a regular unedged European pedicure
suits absolutely everyone. Let me immediately note that even the roughest and hardest heels can be saved with the help of a grater and gel for removing corns! The most important thing here will be the correct selection of a grater for the top and pedicure products.
European unedged pedicure is the safest type of pedicure!
You don't cut anything, which means you won't get hurt. There is no chance of getting foot fungus or any other disease. And also, the body does not perceive this place (foot) as a wound (this is exactly what happens during circumcision) and does not try to heal it faster, causing a rapid growth of new tissue. And thanks to the fact that you “rub” the foot, or in other words, “file down”, the skin becomes thinner over time and grows less.
So, if you want to improve your knowledge and skills in the field of pedicure and take care of your feet yourself, then for this you need:
- determine your foot type;
- purchase professional pedicure tools and products that are right for you;
- start using them.
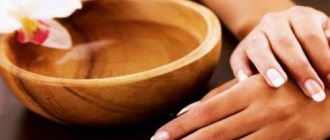
Pedicure at home
First, you need to properly prepare your legs.
To do this, they should be kept for 10-15 minutes in a bath of warm water with the addition of sea salt. After the skin has softened, the feet are treated with a pedicure grinder, applying any scrub to it. Calluses and corns require more time and patience. After washing off the excess cream, you can begin to treat your nails. The cuticle is moved to the edge with a wooden stick, and the nail file is used to shape the nail, while avoiding rounding the free edge to avoid the problem of ingrown toenails. Then you can rinse your feet and dry them with a towel. Now they are ready for nourishing masks, wraps and massage. The massage is performed using any oil or cream and lasts at least 10 minutes for greater effect. At the end of the procedures, you can wear socks made from natural materials or cover your nails with varnish.
Home pedicure. Expert advice
Many women regularly visit beauty salons, where specialists provide them with pedicure services. Such procedures, as a rule, include not only the treatment of nail plates, but also procedures for caring for the skin of the feet. However, for many reasons, a situation arises where pedicures have to be done at home. Of course, a home pedicure cannot replace a salon one. But, according to many experts, a home pedicure procedure may well be effective and of high quality.
Before performing a home pedicure, you need to purchase and prepare high-quality tools and materials, which can currently be found in almost all specialized stores.
You will need
- Nail scissors or special pliers - knipsers. Nippers for processing cuticles and hangnails.
- Files of various hardnesses for processing nails and giving them shape.
- An orange stick or pusher to push back the cuticle.
- Pedicure grater or pumice stone for treating the skin of the feet.
- A bath or just a small basin for steaming your feet.
- Nutritious cream.
- Cotton pads and nail polish remover (if your nails were covered with varnish).
At home, the most convenient and affordable option will be a classic pedicure with foot steaming. This pedicure takes place in the following sequence.
- remove nail polish with nail polish remover.
- make a foot bath. Sea salt, herbal extracts or a special concentrate are added to warm water to soften the skin. Soak your feet in this bath for fifteen to twenty minutes.
- Dry your nails thoroughly with a dry cotton towel; you can apply a special softener to the cuticles. After about five minutes, the cuticle from the surface of the nail can be moved using a wooden stick. It is better to use an orange stick for these purposes, which has antiseptic properties.
- Soak your feet in the bath again for a couple of minutes, dry them again and begin to process the nail plates to give them the desired shape and length. However, cutting your nails short is not recommended. Leave 1-2 mm of free edge. Cut your nails in a straight line. Then use a stiffer file to process the edge of the nail, leveling it. Use a softer file to complete the shape and polish the nail plate.
- Then we proceed to the skin of the feet. Apply peeling agent to this area and massage lightly, paying special attention to problem areas such as the outer edge of the foot, heel, and base of the toes.
- At the end of this massage, the peeling agent should be washed off and the feet should be dried with a towel. Take a pumice stone or a double-sided foot grater, this item will help you completely remove dead skin. Treat only the heels and top of the foot, but also the toes to the very tips.
- Wash and dry your feet. Apply a moisturizing cream to your feet, or a nourishing cream if your skin is dry.
- If the skin on your feet is characterized by increased sweating, it is recommended to use a deodorant cream. If your legs feel tired, you can apply a special product to the skin that has a tonic effect.
- At the end of the pedicure, you can apply a special strengthening oil to your nails.
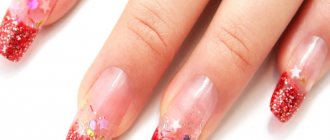
- Finish the manicure with nail polish. This can be a restorative coating or just a clear varnish. If you want brightness, use your favorite color. To make applying varnish easier, use special finger separators.
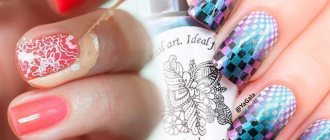
Choosing a beautiful shape
Basic shapes that will make your toenails more aesthetically pleasing and well-groomed:
- Square - short length and even cut with straight corners, the most popular among the rest.
- The circle is short in length, the edges are smooth, softly rounded.
- Oval - resembles a circle, but the plate is longer, with rounded edges.
- Rectangle - the shape is similar to a square, has the same cut at a right angle, but the length is slightly longer.
- The triangle is the rarest shape that can be found in pedicures, and it is also the most complex in terms of technique.