Types of patches
Varieties of patches are presented in a large number of options. Before you put a patch on, you need to work out what it could be. Based on their properties, they are divided into several groups.
| Type of patches | Peculiarities | What is it used for? |
| Such decorative products can have absolutely any shape. They are sewn on the front of the product. | Patches allow you not only to deal with fabric damage, but also to simply decorate your favorite piece of clothing. You can use set-in patches to restore the area between your legs. But to achieve aesthetics, you need to sew patches in several more places on the trousers. | |
| Double sided | The patch is represented by two parts that are identical in shape, but slightly different in size. First, the smaller element is sewn on the back side, and then the larger one on the front side. In this case, hand-blind stitches are used so that the patches serve a decorative function. | These patches are designed to repair worn knees and elbows on garments. |
| Invoices | This is an extremely simple type of patch, which is also considered not very reliable. If sewn correctly, the product will be invisible, but its service life is very limited. | Patches can be used to repair fabric damage anywhere on any garment. |
| Domestic | Such a patch must be sewn from the inside of the material along the contour. Also, in some cases, it is possible to sew the product on the outside using a zigzag stitch. | Internal linings are used in cases where the fabric begins to tear from the inside. |
| Functional | They are needed to strengthen certain parts of clothing so that they look beautiful. A patch can be created specifically on a new product to accentuate attention. | Typically, patches are placed on the elbows and knees of garments to further strengthen them. |
| Decorative | They are presented in bright colors of fabrics. They are found on any item of clothing, not always taking into account functionality. | Decorative patches can be sewn anywhere on a garment to attract attention. |
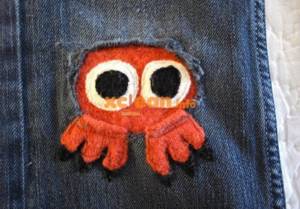
| Artistic | They can be presented in the form of animals, flowers, logos and other unusual shapes. Such products can play both a functional and decorative role. | Patches are in demand on any area of clothing where there is a need for it. |
Important! It is necessary to sew on a material that differs from the fabric of the product in a wet state. This will prevent the product from deforming during the washing process.
How to sew on a patch by hand?
It is not difficult to sew on the patch correctly. The first thing that is necessary is to prepare the necessary tools and materials. Among them are the following:
- scissors;
- threads to match the selected piece of fabric;
- a scrap that will become a patch, or a finished product;
- set of safety pins.
It is also worth making sure that the item of clothing on which the patch will be sewn is clean and dry. To do this, the item needs to be washed, dried and ironed. The patch itself must also be clean. This will allow you to achieve comfort while working.
There are several ways to sew a patch by hand. It is worth choosing the most suitable one in a particular case. Among the main ones it is worth highlighting the following:
- Blind seam. It will not be visible from the outside, so the patch will look “in its place.” To do this, the edges of the tear are folded inward by 0.5-0.7 cm, secured with pins or ironed and hemmed.
- Seam using bright threads, beads, sequins. It will become a bright accent on a piece of clothing.
- Rough hand stitch. Additionally, you can fray the edges of the patch. This will ensure that the item of clothing matches the grunge style.
- Regular seam for backing patches. In this case, the hole remains, but it is covered from the inside with bright fabric, possibly with additional decorative elements.
You can sew on a patch using a sewing machine. The operating algorithm in this case is as follows:
- You need to cut a patch from a suitable material or purchase a finished product.
- The item where the patch is to be sewn should be turned inside out. If the fabric allows, it is recommended to iron the damaged area for the convenience of further work.
- Now you should place the patch on the torn area and secure it using running stitches (this is done by hand). If you don't want to make stitches, you can simply attach the patch to the fabric using glue web or pins.
- Turn your sweater or jeans inside out.
- Choose a zigzag or straight stitch on your machine. Don’t worry if it doesn’t coincide with the grain direction of the fabric when sewing.
- Sew the damaged area so that the machine stitch is located approximately 0.8-1 cm beyond it. Don't forget to fix the patch while sewing.
- Iron the patch on both sides.
- Remove pins or basting stitch.
Using this method, you can sew a patch on any product: a jacket, a shirt, a sweater, jeans, sweatpants, and even an ordinary sheet. It is important to consider the material of clothing or linen and patches. Thus, it is possible to restore, for example, torn jeans.
Attention! Keep in mind that any patch should be 2-2.5 cm larger than the hole.
Not all holes can be mended by hand. Horizontal cuts are suitable. To do this, sew with dense and small stitches. There is no need to rush in this matter. Try to make stitches evenly, leaving a minimum distance between stitches.
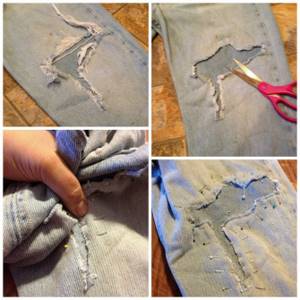
To mend jeans by hand at the knee, use the Sashiko technique.
Prepare everything you need.
- Special thread for “sashiko” (if you don’t have it, use floss).
- Scraps from old clothes.
- A thimble or a special ring.
- Pins, chalk, ruler, marker.
Select pieces of fabric, cut to the size of the hole, adding 3 centimeters. Insert inside the pant leg.
Make sure the patch fits exactly under the hole. Keep in mind that the patch should sag a little so that you can bend your knee. Secure with pins and then baste. Use a ruler and marker if you want to make a specific stitch or pattern.
Use a needle with a wide eye, as the embroidery thread will easily pass through it.
Keep your stitches short on the right side and long on the back.
Having gathered the fabric onto the needle like an accordion, pull the fabric further.
The next line goes in the opposite direction.
A thimble or a special ring will help push the needle.
Make stitches on the other side of the patch.
For originality, you can sew on a piece of fabric.
There are a lot of options for decorating knees. You just need to use your imagination
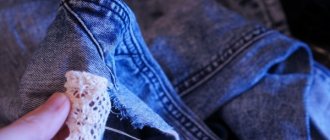
Patches placed on the inside and sewn by hand.
Lace patches are suitable for a young girl. They are applied from the inside. You can use adhesive tape. A seam is laid along the edge, using threads to match the jeans.
Using a sewing machine to mend a hole in a knee is not so easy. To do this, you need to rip the trouser leg along the seam (it is advisable that the seam is not finished with decorated stitching).
- On the machine, set the stitch to a straight line.
- Bring the two cut edges together, close together, and stitch.
- Steam with an iron (this will make the darning less noticeable).
- Overlay seams parallel, close to each other.
- Start stitching one centimeter from the hole.
- Place seams back and forth, turning the stitching in reverse or turning the product over.
- Continue stitching until the hole is sealed.
Patches placed on the front side using adhesive fabric. To sew such a patch on the knees, rip both pant legs on one side. We sew the edges on the machine from the front side.
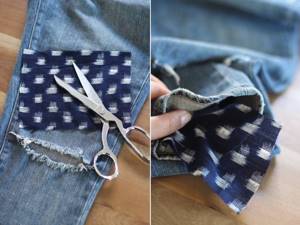
Patch with “mohra”
- Prepare a piece of denim that should be two centimeters larger than the hole, on all sides. place it on the area where the fabric is torn (above).
- Place adhesive fabric on top, even larger than the patch.
- Place another piece of thin fabric on the adhesive fabric, spray with water and iron.
- Take threads to match the jeans and sew with a zigzag on the front side.
- Cut off the remaining protruding threads.
Any place on jeans can be disguised using applique...
- To make the stitching less noticeable, you need to choose the right thread. This can be done at a sewing store, taking the jeans with you.
- Choose the following thread numbers - from 35 to 45.
- To prevent the fabric from stretching when darning, when sewing on a machine, do not stretch the fabric too much.
- If you can't find the right fabric for the patch, use the space under your pocket. To do this, open the pocket, cut the desired size of fabric and sew the pocket in place.
- If your machine does not have a reverse stitch, after finishing the stitch, turn the fabric over in a circle.
- Select the fabric for the patch, depending on the thickness of the fabric. Thick material is not suitable for thin summer jeans.
- Steam the patch using the iron function - cotton steam.
- Don't throw away your old jeans, you'll need them for patching your favorite things.
- Lace decor on women's jeans - black is suitable for dark pants, white for light ones.
- The “Retro” style can be created using patches made of checkered fabric.
We suggest you familiarize yourself with How to remove a stain on clothes with Domestos: removing traces of fat, sweat, blood, fruit, wine, grass
Another type of patch for jeans is leather. They are very practical and look impressive. Old leather jackets, gloves and even boots can serve as material for a leather patch. In this case, you can cut out any shape in the form of a flower or geometric figure. Eco-leather patches are sold in sewing stores and online stores.
They have special holes to make it convenient to sew them on by hand. Use leather patches on your knees or other places, they are quite durable and will last a long time. The location of such a patch can be at your discretion, the main thing is that it covers the hole and there is a margin of at least one centimeter.
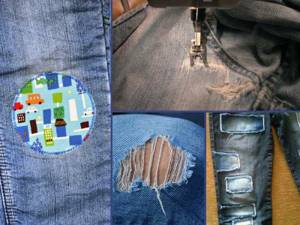
It happens that the damaged area of fabric cannot be simply mended, in this case they resort to patches. At the same time, the entire variety of patches can be divided into two main types: decorative and functional. At the same time, functionality does not always exclude decorativeness, but a decorative patch can even be applied to a product without any damage. By the way, such a patch can hide not only holes, but also old stains.
Such patches look especially good on children's things; they can be deliberately highlighted with finishing seams, braid or cords. Knitted patches look good, especially if they represent separate elements - cars, teddy bears, clouds. In this case, they already resemble appliques, and therefore few will guess that they are hiding a worn knee or an unwashed grass stain.
To hide damage to the fabric, you can put a ready-made applique on top, which is sold in almost any fabric store. Depending on the manufacturing method, it will need to be either sewn along the edge or glued with an iron.
Since such patches should be as inconspicuous as possible, they are made from the same fabric as the product itself, or at least a very similar material. Before cutting a part of the appropriate size, the material must be washed and steamed so that the fabric shrinks. If you use unprepared material, it may shrink later and pull off the product.
When applying a patch, be sure to ensure that its grain thread coincides in direction with the grain thread of the product. If the item is torn near a seam, this seam must be undone and the edge of the patch must be inserted into the resulting hole, then the patch must be sewn on and the undone seam must be sewn up.
When repairing items made from bright fabrics with clear patterns, patches are applied to the front side of the product, making sure that the new fragment matches the pattern with the surface of the fabric.
Cut out the part for the patch, making it 7-9 mm larger than the hole in the fabric, and place it on the product, evenly closing the hole. Baste the patch, lay a blanket stitch along the edge of the hole, and do not forget to make notches in the corners so that the seam does not pull the fabric. Next, securely sew the patch with small stitches of the “forward needle” seam (Fig.).
Rice. Patch with stitching
Patch over the edge
Cut out the part for the patch, making it 10 mm larger than the hole in the fabric, and place it on the product, evenly covering the hole. Make 5 mm notches in the corners of the hole in the fabric and on the patch, bend them to the wrong side. The patch and the hole in the fabric should now be the same size. Carefully sew the patch into the hole, using small stitches across the edge. Treat open sections with an overcast stitch after installing the patch or in advance, depending on how much the fabric frays (Fig.).
Woven patch
How to sew up a hole in trousers
Even the most beloved and durable clothes have the unpleasant property of tearing. Pants in this sense are the most vulnerable part of the wardrobe. They can be torn on a sharp object, rubbed underneath and between the legs, or burned by accidentally falling ashes. You shouldn't throw away your favorite pants right away. Very often they can be put in order.
A lot depends on what kind of trousers you are dealing with. If they are part of a business suit and you want to continue wearing them as such, look at where the hole is located, how it was made and how much the edges can be brought together. The only thing beyond repair is the large frayed hole in the most visible place. In this case, you will have to abandon the trousers or radically update them.
If your business trousers have split at the seam, turn them inside out. Stitch the gap, starting a little closer to the gap and ending a few centimeters further. Process the seam allowances in the same way as on the other seams. In hard-to-reach places, you can join the seam manually. For strength, stitch it 2-3 times.
It is better to seal a small hole, the edges of which can be aligned. Cut out a piece of adhesive interlining. It should be slightly larger than the hole. Baste it from the wrong side so that the adhesive layer is in contact with the fabric. Carefully align the edges of the hole; you can baste them to the non-woven fabric so that they do not diverge. Iron the gasket. This operation is most conveniently performed on the ironing board module intended for the sleeve. This method is acceptable if the hole is in a not very visible place - for example, between the legs or at the bottom of the trouser leg.
A hole in the most visible place will certainly not decorate smart or business trousers. But the appearance of such a flaw does not mean that you will have to part with your trousers or at least transfer them to another part of your wardrobe. Look at what you are used to wearing them with. It is very possible that with a jacket or vest of the same color, on which there are some bright decorative elements. It's best if it's embroidered. In this case, nothing will prevent you from carefully repairing the hole on the thigh or on the leg, and then covering the repair site with the same decorative element. Embroidery is quite appropriate on women's trousers. You can perform several more such elements on them.
Most often, jeans tear, but their life can be extended in almost any case. Darning, patches, leather appliqué on them are quite appropriate. Select a piece of fabric. It’s better if it comes from the same jeans, but you can take another material, it will still end up under the threads.
Cut out the patch. It should be slightly larger in size than the hole. Align the front side of the patch with the back of the jeans. Baste it along the edge.
Place the embroidery foot on the machine. Set the switch to “Embroidery” mode. The most important thing with this repair method is to choose the right threads. They must exactly match the color of the pants.
Sew the hole, changing the sewing direction so that the stitching coincides with the direction of the threads. Sew in one direction, then in the opposite direction. Make cross stitches in the same way. If the threads fit, and you managed to choose the direction accurately, the patch can only be seen with a very careful inspection.
You can get by with a regular patch. Sometimes it even looks stylish on jeans. Cut out a piece of denim. The patch should be slightly larger than the hole. Fold the allowances to the wrong side and iron. Baste the patch to the front of the jeans and stitch.
Patches on jeans can come in many different shapes. They can be designed as an applique. Cut out a flower, a star, a leaf from fabric - whatever your imagination tells you. In this case, it is not necessary to bend the allowances; you can omit them at all. Baste the patch in exactly the same way as in the previous method. You can sew it on with a zigzag. You can overlock the cuts and then simply stitch them together.
Source
Flap materials
The materials of the flaps that are used as patches may be different. They depend on the type of patch, its purpose and some other factors. The most commonly chosen materials are:
- natural or artificial leather, which is highly resistant to wear;
- the main material of the garment where the patch is needed, or as similar as possible to it;
- any textured types of fabrics, for example, suede or velvet;
- decorative thermal applications;
- ready-made patches that are decorated with drawings or ornaments.
- a patch of a certain type;
- interlining or dublerin;
- sewing machine;
- needles for hand sewing;
- tailor's pins;
- scissors.
To get updated, fashionable jeans, you can use the proposed step-by-step algorithms. Even beginners and inexperienced craftswomen will cope with the work quickly and accurately.
Types of patches
The main types of patches can be divided by the method of connection with the product and by purpose.
- Invoices. The part is applied to the front side of the damage and fastened to the product by hand or using a machine stitch. The main fabric can be sealed with additional inner fabric or adhesive material.
- Internal. In this case, the fabric is placed under the gap on the wrong side of the main fabric. The damage is carefully hemmed along the contour or, conversely, stitched on the front side with a strong zigzag stitch
- Functional. Their task is to beautifully strengthen certain areas of clothing. Such a patch is created on a obviously new product in order to accentuate the knees, elbows, and add texture or color.
- Decorative. In sports, trendy, and children's models, decorative patches are made of bright, eye-catching fabrics, which are applied to the front side of the clothing in a variety of, not always functional, places. The “grunge” fashion has brought its own adjustments, and now shabby clothes, with breaks and deliberately placed patches, are a sign of a certain style and serve to attract attention.
- The main material of the product or as similar as possible.
- Wear-resistant natural and artificial leather.
- Textured materials such as suede or velvet.
- Ready-made stripes with ornaments and designs.
- Decorative thermal applications.

Depending on the type of product and its purpose, various materials are used for patches.

Repairing holes in jeans at the knees manually and using a machine
Master class: how to fix a hole in jeans using a leather patch
- Trim the excess threads and sew the hole edges using a buttonhole stitch by hand, overlock or zigzag.
- Prepare a leather patch of the chosen shape.
- Place it at any angle and sweep it.
- Sew with a machine artistic stitch along the edge of the patch or make a stitch.
In order for the applique to have an aesthetic appearance, its sections can be processed with zigzag scissors.
Video on the topic
Master class: how to fix a hole in jeans using ethnic style
- Give the hole a certain shape. Cut off any protruding threads or make a fringe along the edge.
- Choose a colored piece of cotton or linen fabric for a patch on the knee.
- Cut the fabric patch 1-1.5 cm larger than the hole.
- Baste from the wrong side so that the front side of the patch is visible through the cut.
- Sew the patch along the contour using a machine stitch or sew it on by hand.
- Around the outline of the patch, lay several rows of embroidered stitches with a Bulgarian cross, which looks like a snowflake.
Select the thread for the cross to match the color of the patch. For embroidery, it is better to use acrylic threads or floss.
Master class: how to repair a hole in jeans with factory-made iron-on appliqué
- Choose a sticker and interlining larger than the cut in the product.
- Flatten the cut. Glue the non-woven fabric on the inside with an iron so that the adhesive layer is on the front side of the product.
- Apply a sticker to the problem area.
- Baste with thread or pin it with tailor's pins.
- Apply a damp cloth to the thermo-application and iron on the patch.
- Iron the napkin until completely dry.
- Give the sticker time to cool.
- The product is ready!
You can use parchment paper instead of a wet wipe. To prevent the sticker from coming off and the product losing its aesthetic appearance, it is advisable to sew it along the edge to the jeans.
Beginning craftswomen are interested in the question: how to sew a patch beautifully so that it is invisible. To do this, you need to decide on the patch that will be located on the wrong side of the product. This can be a factory patch with an adhesive base or a piece of thin fabric to match the jeans. For darning you need to use polyester thread No. 60.
Rip in jeans between legs
Master class: invisible patch on jeans
- Select a textile patch of a certain size.
- Baste a fabric patch or glue a factory patch on the wrong side. Glue the adhesive-based patch using an iron and a damp cloth.
- From the front side, straighten the threads on the cut and iron.
- Adjust machine stitching. It should not be wide – 0.1-0.2 cm.
- Lay the lines perpendicular to the cut, extending beyond it by less than 0.7-1.2 cm. To do this, you need to use the forward and reverse function in the machine, which will form a zigzag. The distance between them should be 0.1-0.2 cm.
- Sew the entire cut with parallel stitches.
- Expand the work. Place parallel lines along the cut.
- The product is ready!
We suggest you read How to make something a size larger
Seamstresses recommend using this method to seal holes between the legs on trouser legs. Correctly selected thread color will make the patch unnoticeable, without any discomfort.
No matter how you fill the holes, they will make the product trendy and decorate your wardrobe. You can combine several hole repair options in one product. To give the trousers a glamorous look, the patches can be decorated with rhinestones or beads.
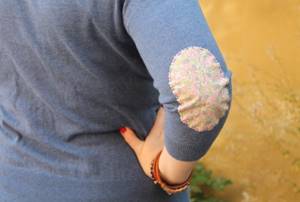
A neat patch on the elbows will allow you to restore the damaged area of the fabric. To give a textile item an original look, you can use the so-called woolen heel. This will look especially interesting on a light sweater, which is sewn from dense material, or on a sweatshirt. The algorithm of actions is not very complicated:
- Prepare everything you need. You need to take a damaged item of clothing, a sponge made of thick fabric, any shape (for example, a pastry shop), felting needles, tape and wool of the selected shade.
- Now you need to mark the places where the stripes will be applied. To do this, you need to put on a sweater and stick pieces of tape on your elbows at a distance of 2-3 cm from the fold. This will ensure the patches are positioned perfectly.
- You need to take off your sweater and put a sponge in the torn sleeve. You need to place the form on it so that its lower edge is located on the tape.
- You need to lay out colored wool on top of the form.
- Now you need to felt the wool in the usual way, piercing it with a needle, which is located at a right angle. You need to work until you get a dense layer of wool without any fluffiness.
- Remove the mold and secure the patch by steaming with an iron.
You can decorate the second sleeve in the same way. A product with two decorative elements will look much more harmonious and interesting. If the work was done correctly and in accordance with the algorithm, the patches do not require any special care. They will delight you for a long time.
Patch with “mohra”
There are several patch options:
- double-sided patch - will help hide holes in the knees, scuffs on the elbows in denim jackets, dresses, shirts. The patch consists of two pieces of fabric, identical in shape, but different in size. First, a smaller piece is sewn from the reverse side in the place that needs restoration. After this, a larger part is sewn on the front side. Often a blind hand stitch is used for double patches because the machine stitching will be obvious;
- set-in patches are used to decorate any places on jeans, even between the legs;
- overhead pieces of material serve rather as a decorative element due to unreliability. The overlay piece of fabric is sewn on the front side with a hidden seam. Decorative patches for jeans are often made from fabric that differs in color.
Manually
Let's look at how to make a patch, using jeans as an example, where you need to hide a hole in the knee. How to make knee patches on jeans by hand:
- It is better to choose a knee patch from a denser material. Handicraft stores sell ready-made patches of various shapes, colors and textures. If you want to make it yourself, you first need to prepare a template from thick paper, then transfer it to a piece of fabric and carefully cut the patch to shape;
- the edges of the patch can be overcast or a small fringe can be made;
- the color of the threads can be absolutely any: contrasting with jeans or in the same range;
- first, baste the patch, iron the fabric using a hot iron;
- then carefully sew the patch to the knee using small stitches;
- You can sew the same patch to another leg, after which the jeans are washed and laid out to dry.
Typewriter
If you have a sewing machine, sewing a patch on jeans is not difficult. Functional patches, just like decorative patches, are attached to the front side of the product. The edge is fixed with a straight stitch or with a zigzag. If you want to hide a worn place on the fabric under a patch, give preference to machine stitching, since this way you can fix the patch more reliably. Decorative patches can be stitched with threads that differ in color from the main color scheme.
When worn regularly, trousers quickly wear out in the area between the legs due to constant friction. Most often, jeans made from natural fabric suffer from this. For the restorative procedure, it is better for beginners not to experiment with different materials and simply take scraps of material that might have remained after shortening the legs. You can sew on the elements manually, but only if your needle skills are at a high level.
The event itself looks like this:
- First, jeans need to be washed, dried and ironed. We do the same with scraps of fabric from which we will cut out patches.
- Work with the area between the legs should be carried out in a mirror manner, even if only one side is damaged. To do this, we disassemble the connecting seams, iron the fabric, and remove excess threads. We mark with chalk the lines along which we will cut the material, leaving space for the seams.
- We cut out patches from the material, making sure to leave seam allowances. In the process of creating patterns, you need to use the mirror principle, otherwise one of the legs may become skewed.
- Next, we sew the patches onto the jeans using a connecting stitch. The threads must match those that were used to sew the product. If you don’t have the appropriate skills, it’s better to use machine stitching (zigzag or overlock).
After the manipulation, you need to make sure that the length of the trouser legs is not affected, and that there is no discomfort in the area between the legs.
To restore the sleeve in the elbow area, you can use any of the listed types of patches. If you want to not only repair an item, but also give it a unique appearance, then you should try the option of using a kind of woolen heel. This move will look best on a thick or light sweater or sweatshirt.
The manipulation looks like this:
- We prepare everything you need. In addition to the sweater, we will need a thick rectangular sponge, a mold (profile or confectionery), colored wool, felting needles and tape.
- We put on a sweater, bend our elbows and glue pieces of tape at a distance of 2-3 cm from the fold. Thanks to the marks, everything will be done smoothly.
- After this, we pull the sleeve over the sponge, apply the form, focusing the bottom edge on the tape, and line the form with wool.
- Then we felt the wool using the traditional method, piercing it with a needle located at a right angle. We act until the fluffy wool turns into a dense layer.
- We remove the form and fix the work by steaming with an iron. This way you can decorate one sleeve, but the product will look more harmonious with two similar patches.
If everything was done correctly initially, the patches will not require special care. They will last for a long time, maintaining their original neat appearance.
Patch sewing technology
Decorative and functional patches are applied to the front side of the main part of the product. In this case, the edge is fixed on the machine using a straight stitch or zigzag. To restore the fabric, the patch part is hidden and sewn with hidden stitches. When choosing a method to reinforce a frayed area, choose machine stitching - it provides a stronger hold than hand stitches.
Method 1
If jeans or trousers are frayed along the crotch seam, they can be restored as follows.
- Choose thick fabric or similar denim. Cut a piece into a shape slightly larger than the damaged area. It is enough to increase the area along the contour by 1.5-2.0 cm.
- Turn the pants inside out and straighten the fabric, ironing it to make it more even and smooth.
- Apply a patch to the jeans, secure with hand running stitches, pins or glue web.

Method 2
If you do not have a sewing machine, it is recommended to secure the patch manually using another method. When using manual attachment technology, the part will be visible from the front side. Therefore, it is recommended to choose a fabric to match the main one or find a similar density. The advantage of this method is that it can block the break, and not just hide the fibers destroyed as a result of wear.
- Select the fabric to match the main one, cut out a patch 1.0-2.0 cm larger than the contour of the hole. The directions of the lobar two tissues must coincide.
- Place a piece of fabric with the wrong side on the wrong side of the product, first secure with pins.
- Align the patch, working from the front side.
- Fold the edges of the tear inward by 0.5-0.7 cm, securing them with pins. At this stage, the edges can be fixed with an iron.
- Hem the edges with blind stitches by hand using matching thread.
- Iron the resulting finished surface of the part.
Method 3
Decorative and functional patches are sewn on in a different way. They are not hidden, but are customized along the front surface.
- Select a chevron or patch in accordance with the style of the product. This can be an adhesive-based applique. Ready-made oval pads are suitable for elbows. Another option is to cut them yourself from dense material.
- Place a clothing model on a figure or mannequin. Pin the patch on the front side in accordance with the idea and proportions.
- Remove the product and place it on the table.
- Pin or baste a patch.
- Sew the decorative trim onto the edge of the piece using a straight or zigzag stitch.
- Carefully iron the resulting patch on both sides.
Based on these three methods of how to sew a patch, you can create your own optimal option for a specific request. For example, it makes sense to patch a torn knitted sweater using a knitted patch with an elastic stitch or by hand. A torn leather product is first glued from the wrong side, then the tear is closed from the face. Children's items or clothes in the "babydoll" style can be decorated with beautiful thermal appliqué, which is fixed with an iron and does not require the use of a needle or sewing machine.

The fashion for rock, grunge and alternative as a contrast to gloss and luxury suggests stylish negligence and is perfectly emphasized by torn, seemingly worn edges and elements. Decorative, ostentatious patches are a great way to enhance a fashionable look and make a statement. Some designers build collection lines based on the principle of applying patches.
Installing patches on jeans between the legs
Every person may need a patch on jeans between the legs, since any trousers and trousers tend to wear out due to constant friction. Jeans or trousers made from natural fabrics are especially susceptible to this problem. To eliminate scuffs, it is best to use the same material from which the pants themselves are made.
The work is as follows:
- disassemble the connecting seams;
- iron the material;
- get rid of unnecessary lines;
- mark the lines along which the fabric will be cut using chalk, leaving an area for seams;
- open the patches (don’t forget about the seam allowances), following the mirror principle;
- Sew the patches using connecting seams (this can be done by hand or using a sewing machine).
If you need to sew a patch on a piece of clothing, you can follow any of the methods described above. Pay attention to the material of the garment, the type of patch, its suitability to the problem, and your preferences. The result is restoration of the item of clothing, elimination of holes and abrasions, and giving an aesthetic appearance.
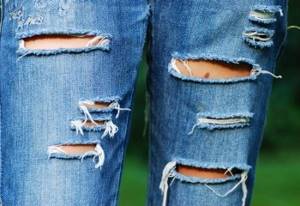
For many of us, jeans are a second skin. They are irreplaceable in the wardrobe of a woman, man and even a child. But all things wear out, scuffs or holes appear on them, in the most noticeable place. But there is no reason to be upset, you can learn to put patches and darn in such a way that it will not be noticeable.
We suggest you read How to remove pencil from canvas
Patches are placed in different ways, it all depends on the quality of the material, the place where the patch is placed, and the design idea. You can disguise a scuff or hole by hand or using a sewing machine. When preparing to work, prepare threads that are close in color to the tone of the fabric. The exception is if you want to decorate with colored threads. The thickness of the threads also matters; thin threads are not suitable for denim.
Choose a needle special for denim or number 100.
What patches can be made from:
- From the material of the product (if, after purchase, you cut off the bottom of the legs according to your height, do not throw away the cut material). You can use fabric cut from another denim item.
2. Made from adhesive fabric (sold in sewing stores)
3. Textured patch
4. Thermal stickers (attached in a visible place).
5. Fabric applique.
6. DIY applique.
Scraps from old clothes - freedom for creativity.
Types of patches:
- internal (from the inside)
- external (from the front side)
- functional
- decorative
Sequencing:
- Select a darning method.
- Trim any loose threads at the break point.
3. Apply the patch to the tear in the fabric, cut to size, one centimeter larger than the hole, along the contour.
4. If it is adhesive tape, iron it onto the fabric.
5. Hand baste the selected piece of fabric with a needle.
6. Select the desired seam - zigzag. In this case, No. 5 will do,
7. Sew up the tear tightly, line by line.
8. Attach a thermal sticker or applique in a visible place.
This option is possible - a patch sewn on a machine on the front side.
In the crotch seam area, jeans tear quite often. But you shouldn’t send your jeans to a landfill; they can be restored quite successfully.
The buttocks are the place that attracts attention. Several patches are placed here, even in places where there are no holes. Since one patch suggests that it was placed specifically to close the hole. Appliques or embroidery made from thick threads are used. Place the patches randomly, so the jeans will look creative.
There are several options for fixing holes. You can make the patch by hand or using a sewing machine. It can be either an invoice or a lining.
- Cut off any loose threads from the hole.
- Use a buttonhole stitch to stitch the hole to give it a neat look.
- Choose the material of the desired color.
- Cut a flap of a certain shape, which should be larger than the size of the hole.
- Tuck the cuts in it by 1 cm.
- Baste the prepared patch from the front side.
- Sew on the patch using a sewing machine.
The hole can be treated with a patch, which is decorated with fringe on all sides.
- Cut a patch of a certain shape, larger than the size of the hole.
- Baste it from the wrong side with the right side facing up.
- Select threads of a certain color and zigzag along the hole several times. The selected color of thread will make the patch on the jeans between the legs invisible.
You can also bend the cut edges of the hole to the wrong side. Sew from the right side of the folded edge of the product.
Read more: how to sew pants between your legs and prevent the formation of new holes.
Patch for jeans
Often such products become family and are never parted with. Even if holes appear, they continue to be worn. This becomes possible if you carefully place patches on your jeans.
Clothing repairs are also carried out in the studio. But it often happens that it costs more than the cost of the item.
Therefore, it makes sense to do this work yourself.
If, when purchasing jeans, you need to shorten them, you should store scraps of fabric for patches.
However, you don’t have to try to make them inconspicuous. Often, areas can be advantageously decorated by treating the area, for example, with a large zigzag or in the form of a long mustache. You can come up with as many unique solutions as you like, limited only by your imagination. Often it is almost impossible to find the same fabric. But there are many other methods.
Options for patches made of leather, corduroy or other fabric may be interesting.
If you add the same fabric to the belt, you get a truly unique outfit.
Japanese technique "Boro"
- To repair damage to jeans, choose thin denim, cotton or linen fabric.
- To work, choose a flap of any shape. The seam allowance should be 3-4 cm.
- Finish the outline of the cut or hole with forward stitches using a needle. In this case, the damage will not stretch further.
- Parallel to the outline of the hole, use a washable felt-tip pen to draw parallel lines for future embroidery. The distance between them can be 0.6-0.8 cm.
- From the wrong side, baste the prepared patch.
- Apply smooth stitches along the marked lines, which should be longer on the front side than on the back side.
- You need to turn the stitch onto the next row from the wrong side. Continue embroidering in the opposite direction.
- Make several rows of stitches on the bottom and top of the patch of different lengths, as well as on the sides.
The cuts on the flap can be slightly frayed if the flap is sewn on the front side of the product. To add style to the patch, you need to choose different stitch lengths and thread colors.
Video about Boro technique
Hole in jeans, how to sew up jeans without a patch
Manual darning of jeans is suitable if the tear is along one line or at a right angle (other types of darning are suitable for other types of fabric damage). To do this, you need to choose a thread color that is as close as possible to the color of the fabric.
- We lay the stitches from one side to the other.
2. Through the stitches that are stitched, we direct the needle and thread, perpendicularly, passing through the already stitched threads from above and below.
3. This is what it should look like