As soon as you have a baby, be sure to make your own hand and foot prints! Time flies very quickly and the imprint of a baby’s hand will never be repeated! Try to make a panel with prints in the very first days of the baby’s life, because babies sleep much more soundly at first and have a little more free time.
Below is my
master class with photos on how to make prints of a baby’s hands and feet three-dimensional
, and now I’ll tell you about all the other methods known to me.
It is best to make handprints of a baby while you sleep, and then wipe your hands with wet wipes.
The easiest way to make prints of your baby's hands and feet is with paint. The “healthiest” thing, that is, completely harmless for the baby’s delicate skin, is to make prints on salt dough. How to make prints of baby's feet and hands on salt dough
Although this is the easiest method, it is also the least durable. Keep in mind that over time you will have to throw away the dough, as it may deteriorate, for example, soften from humidity. A good layer of varnish will help the salt dough pen imprint retain its appearance, but it certainly won’t survive to reach your grandchildren.
Salt dough recipe for fingerprints:
Salted fingerprint dough is made in the most primitive way! Take the finest salt and mix it with flour 1 to 1, for example, a glass of flour to a glass of salt. And add a little water, kneading a stiff dough. If it's too much, add flour. Next, you can take a plastic container, place a piece of dough there, make an imprint, if necessary, cut a circle around it and put it in a dry place. There is no need to bake, as is said in many master classes on casts of arms and legs made from salt dough! The dough will change its shape and the print will become deformed. After a few days, the print can be covered with acrylic paint and varnish on any surface (varnish is sold in hardware stores).
How to make plaster prints with your own hands
I made these with my eldest daughter, but I didn’t really like the result, because they are quite heavy and then there is nowhere to put them. To make plaster prints of a child’s hands and feet, buy plaster at a hardware store (20 rubles a pack), dilute it according to the instructions on the package. Pour into a beautifully shaped container - a round cup, for example, previously covered with cling film. Touch with your finger - after a few minutes, when the plaster begins to harden and becomes denser, make an imprint with the child’s hand and foot, smeared with sunflower oil or very rich cream. Remove from mold. Ideally use silicone molds.
And now I’m sharing my experience, How to make three-dimensional casts of a baby’s arms and legs
at home!
It so happened that I made my children’s handprints from salt dough when my youngest son was born. Then I left them to harden on the windowsill and happily forgot about them for several months. When I remembered my desire to make voluminous little hands, the size of the little ones’ hands was no longer the same! But I took out the dough pieces and... discovered that they had almost spoiled - some had become soft, some had completely softened, others were somehow holding on with all their strength (here it is - minus the salt dough!). It was urgent to save the situation. And I remembered that I had the cheapest self-hardening plastic lying around for six months, bought for training in sculpting doll heads.
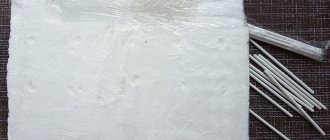
Here it is in the photo, the pack was a kilogram (365 rubles), enough prints for 10. I bought it in Gostinka (St. Petersburg), in the department on the first floor with brushes, paints, etc. Those who live in another city will be able to order self-hardening plastic on the Internet or buy it in large cities in stores with goods for artists. Stores with goods for making dolls will have better plastic and four times more expensive. Also in the photo - in the same department I bought the cheapest acrylic paints for any surface (92 rubles for the whole set. Enough for 10 years if my daughter doesn’t get it).
And now about how to make a three-dimensional cast of a baby’s legs and arms from plastic
.
First, make imprints from the salt dough and leave them to harden. In general, you can varnish them, wash them after work and then give them as a souvenir to your grandparents. I read on the Internet that I recommend making the base for impressions from the same plastic. But, firstly, it is not very soft, and secondly, it does not smell very pleasant, so I didn’t want to touch the baby’s skin with it.
She drained the oil, crushed the pancake of plastic and pressed it into the print. That is, I pressed it in there thoroughly with my fingers so that it took the shape of a child’s hand. To prevent it from breaking later, I added pieces of plastic to the dented one. My surface is not very smooth, since this plastic also sat in my not very well closed package for more than nine months, so it was not very plastic and crumbled. Your print should repeat all the smallest folds of the baby’s arms and legs.
I took out the print, it comes out easily after the oil.
Since my dough was already soft, I removed the crumbs with a cotton swab and oil. If you have a fresh print, and even coated with varnish, you won’t need to do this.
I cut it out with a regular knife and left it to dry on a flat surface for several days.
You can also involve the little ones in covering children’s casts of arms and legs with paint; they will be happy to help!
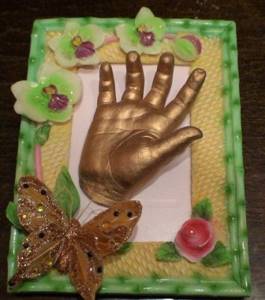
Then I covered the plastic casts with two more layers of gold paint.
It is not necessary to coat acrylic on any surface with varnish. All that remains is to make a beautiful panel! You can glue not only casts of arms and legs, but also photographs of children, some memorabilia, first socks and a pacifier...
Ideally, glue it using a hot gun (small one in construction stores, for example in Ob I saw about 150 rubles). You can use glue moment. For the background, take very thick cardboard, or it is better to paint the thick base of the frame itself.
I don’t yet know what kind of panel I want, I made a rough sketch for you. But, of course, I want to use scrap paper, frames, etc. - in general, there is still a lot of work, but the result is worth it! And if you want to make three-dimensional casts of a child’s hands and feet as souvenirs that will remain intact until your old age, it is best to use a deep frame for three-dimensional panels, in which the distance from the substrate to the glass is about 3 cm.
Happy creativity! Even more master classes for children, with children and for yourself - in the Creativity section! And delicious master classes in the section
Do you want to make your baby's childhood memories even more amazing and vivid? Kits for making children's three-dimensional casts and prints will help parents with this. The little hands and heels of newborns are so appetizing and beautiful that you want to remember them in the smallest detail.
Hands and feet of babies, we have already told you. Now let's talk about how you can design them in an original way.
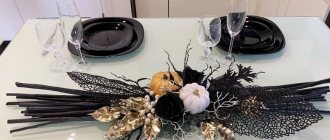
Framed
Framing casts of children's hands and feet is a classic of the genre, but this in no way detracts from the charm of the manufactured souvenirs. There are single, double and triple frames on sale, with or without photos - it all depends on your wishes. You can make a frame with your own hands. In addition, you can add a frame with a cast or print in a variety of ways.
Use rhinestones, flowers, butterflies and other decorative delights.
Add a pacifier, socks, booties or other keepsakes.
Color the prints in any shade - pink, blue, gold, silver, bronze.
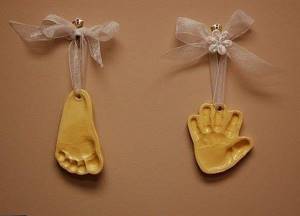
Pendants
When making casts or prints of palms and heels, if you make a small hole in them and thread a satin or lace ribbon through it, you can get an elegant pendant. This decor will look great in a children's room, living room or parents' office.
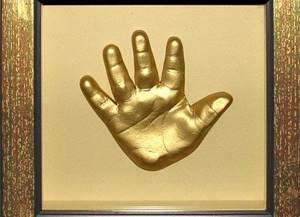
Figurines
To make a cute figurine, you just need to place the resulting 3D plaster casts on a platform and cover with paint. It is important to let them dry thoroughly before and after applying a decorative coat of paint. You can apply paint in several layers, and also use contrasting shades. Any ideas - the possibilities for creativity are unlimited. How to color? It all depends on your wishes - choose golden or silver decor, antique or, on the contrary, fashionable and bright shades?
How to decorate a figurine? Add a little chic - rhinestones, beads, flowers or any other decorative elements.
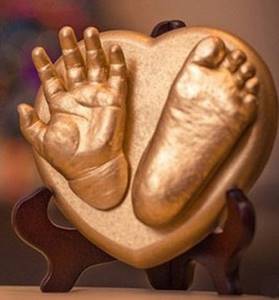
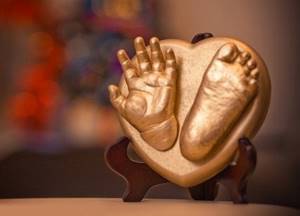
Heart shaped
Plaster prints or casts designed in the shape of a heart look very graceful. To add more chic to such souvenirs, you can use gold and silver dyes. And of course, don’t forget about a memorable signature with the name and age of the little child.
Sometimes it seems that children grow up too quickly, parents don’t have time to enjoy communication with their worries, and the awe they feel when looking at their children’s little hands and feet slips away. I really want to leave something in my unreliable memory so that it reminds me of the baby and demonstrates the miracle of the baby’s growth. Photographs and plaster casts of palms help partly.
Photo by Shutterstock
Making plaster casts is not difficult, the only problem is that babies are mobile, getting your palm to apply the right amount of force at the right moment and not bringing the baby to tears is really difficult. Little secrets come to the rescue.
Option one - economical
You will need: - soft plasticine, - oilcloth, - petroleum jelly, - plaster, - a glass of water.
Cover the table with oilcloth, otherwise you risk spending the rest of the day cleaning. From plasticine (take a couple of pieces at once), mold a cake at least 3 cm thick. It should be smooth and without holes. Apply a thick layer of Vaseline to one of the surfaces of the cake; you can even use Vaseline oil.
It is not at all necessary to use plaster; foot prints on plasticine look no less cute
In a bowl, dilute a bag of medical plaster (sold in pharmacies or by weight, or packaged in 150 grams), pour it into a glass and gradually pour in 200 ml of warm water. Stir constantly to avoid lumps. Cover the glass with a lid.
Now put the finished plasticine in the microwave for 10-15 seconds, so it will become very soft and pliable. Check whether the mass is too hot and whether the baby’s hands will be burned.
Let your baby “drown” his hand or foot in the mass of plasticine. This must be done quickly and clearly; the child must not have time to clench his fingers or twirl his palm in the warm mass. Feel free to take out the handle; the plasticine should not stick, because it has a layer of Vaseline on it. To be on the safe side, you can smear your baby’s hand with baby fat cream.
Pour the prepared plaster into the resulting cavity and leave the mold for 2–3 hours. Once the plaster has dried, you can remove the plasticine. Dry the plaster for another day, now you can file off the unevenness of the plaster using sandpaper. Cover the cast with paint; acrylic or meat paint work well. All that remains is to place it in a deep frame, even without glass.
Option two - home
Make salt dough impressions. Knead 2 cups of flour with 1.5 cups of warm water in a bowl, add 1 cup of fine salt. To make the dough soft and smooth, you can squeeze half a tube of baby cream into it.
Every mother, like a sorceress, strives to preserve her baby’s childhood moments. Tags from the maternity hospital, roots from baptism, strands of cut hair go into the piggy bank of the most precious things. An equally worthy example of the growth story of a little offspring are casts of arms and legs.
It will be especially interesting for your child to see tangible proof of his size in infancy. Many children's shops and stores offer ready-made safe mixtures for making an imprint, but a good alternative would be a cast of a child's hand and foot, created with your own hands.
Purpose
There are a great many composition options for family creativity, there are even options for those with hypersensitive skin. To select the material, you need to determine the purpose of the product. If casts of arms and legs, made with your own hands, will be hidden in a casket or box of memories, it is necessary to choose a lightweight material that would convey only the size of the limbs. In the case where the impression of the child’s limbs will be constantly visible, it must be formed from durable materials that can withstand both decoration and subsequent use in the form of a figurine or frame.
How to make footprints on salt dough
Preparing salt dough
Mix salt (1 cup), flour (1 cup) and water (1/2 cup)
. Mix everything well to form a homogeneous dough.
The child can also help in this process. He will really enjoy kneading the dough with his little fingers.
Cut out the heart
Roll out the dough with a rolling pin to form a plate approximately 1.5-2 cm thick
.
Cut out the heart
Place the heart on a baking sheet.
I also lined it with baking paper, but this made the bottom of the heart uneven. It would probably be better to just put it on a baking sheet without paper.
I would be glad to hear your comments on this matter if you repeat the idea.
Footprints
With bare children's feet we make an imprint on the heart.
Footprints
We got it right the first time. Although the child practically does not stand still, in those seconds that we need to leave an imprint, he stood still, enthusiastically watching the process.
Using a spoon, make an inscription on the heart.
Baking in the oven
Preheat the oven to 100 degrees
and place the baking tray with the imprint of the feet for baking
for 3 hours
.
Painting the footprint
After I took the print out of the oven, I let it cool for a while.
and then carefully separated the baking paper.
The original recipe says that you can paint the heart almost immediately, but I still had it for a couple of days
.
For painting I used acrylic paint
. It dries quickly.
Painting the footprint
First I painted one side, and at the end of the day I painted the other.
Painting the footprint
You can also involve your child in this process.
Even if it turns out less neatly, the main thing is the process. I haven't decided on this yet. We are now at an age when a child wants to do everything himself, he would not let me help, and at some point he himself could simply drop and break our print.
I am very pleased with the result.
Only now we need to find
a deep photo frame
to put our gift in.
I didn't make a hole for hanging on purpose.
The heart turned out to be not very light and could simply not withstand its weight, fall and break.
Please leave your review or comment. I'm very interested in your opinion!
Currently, many parents make casts of children's hands and feet with their own hands. Such a memorable print looks very cute and will allow you to remember the wonderful moments of early childhood for many years.
Manufacturing
In a tall and spacious bowl, you need to mix the dry part: finely grinding the salt ensures high-quality mixing of the particles with the flour. This will greatly simplify the whole process. Next, you need to add warm water in small doses to the mixture, the amount of liquid depends on the type of flour and its type, some use corn flour, which is quite hard and absorbs a lot of water. Note that the more evenly the dough is kneaded, the more manageable the base for the impression will be. When the mass becomes thick and viscous, it is completely ready for modeling.
Making casts of arms and legs with your own hands is quite simple. But things are worse with the process of their hardening. After the dough is rolled out to the required size (if the handle or leg is not cut out from a common piece, you should take care of the density of each edge in advance), you can apply the baby’s hands. You should apply pressure wisely: a uniform imprint will give the craft a well-groomed appearance, but digging in a certain place will spoil the overall picture.
A hand-made cast of children's hands and feet needs to be dried. A room with a constant temperature regime is suitable for this (a balcony is only suitable on hot summer days). You should not bake the base in the oven; the dough will rise and disrupt the relief of the print. After 2-3 days, the base is processed. The craft can be painted in a single color or given a creative form. Many modern families like the avant-garde and positive thinking. The cast can be painted in different warm colors, giving each finger its own shade. Some people imagine the base under the palm (feet) as a green lawn or a golden surface. After the paints have dried, the product can be safely varnished: a durable varnish for ceramics, which can be easily found in any construction department, would be ideal.
As a keepsake of infancy, we keep the baby's first things, a lock of his hair, rattles and other little things dear to the heart that are of great value to the mother. All these treasures are most likely put into a beautifully decorated box and replenished from time to time.
Babies grow very quickly, and parents so want to extend the time, at least for a moment, when the child is so cute, stupid and completely helpless. In order not to miss a moment that will not happen again, right now you can make a cast of the child’s hand and foot.
This can be done in various ways - using plasticine, plaster, building mixture, or a kit for children's casts, but the result will be equally good. After drying, the products are painted in various ways and used to decorate mantelpieces, walls, or simply stored in a box as a keepsake.
The only thing you should pay attention to is that products made from salt dough (if you have chosen this particular material for work) must be stored in a dry room, otherwise they may become deformed and lose their appearance, as they contain salt.
Before you start work and make a cast of a child’s hand and foot, you need to ensure that the model is in a good mood and prepare all the materials required for this:
- plastic mass for mold;
- the same for the cast itself;
- vegetable oil;
- paints (in a can of gouache or acrylic);
- frame;
- base or substrate for plastic mass.
How to make a cast of a child’s hand: master class
First of all, take a round lid, for example, from a jar with the mixture and carefully level the gypsum mass on it with a layer of about two centimeters.
Now we lubricate the baby’s palm with vegetable oil, and lightly pressing on the handle, press it into plaster or plasticine - into what you have chosen for work.
This is what the print should look like. It is best to make a clear impression when the baby is sleeping and does not resist. But if he is awake, then sometimes you have to do several takes before you get a normal print.
When the mold has dried well, you should grease it with vegetable oil using a brush, carefully working out all the bends. After this, we fill the resulting depressions with a freshly prepared mass of the same composition as the dried one, leveling it with our fingers.
Here is such a concave and convex figure. We carefully cut out the edges of the fingers and palms with a knife before the mass hardens, while smoothing the edges of the cut with wet fingers, and again let the new cast dry well.
After about 2-3 days you can start painting the product. Spray paints in silver and gold colors are very popular. This is how easy it is to make baby casts with your own hands, without using expensive materials.
What kind of design can be made for children's casts?
To give the plaster print a finished look, you will need to put in a little more effort and shape it properly. For example, it can be placed in a frame, which you can buy or make yourself.
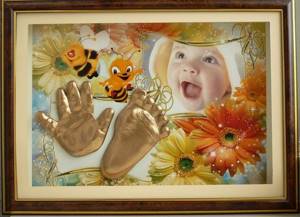
A bright picture with a cartoon theme or a photo of a newborn baby, into which the cast fits harmoniously, looks beautiful. A children's photo frame with a cast can not only become part of your box of memories, but also an excellent gift for grandparents who dote on their little grandson. You can also use it to decorate a wall in a child’s room, so that when you look at it you are surprised to discover that the child is growing literally by leaps and bounds.
|
|
|
|
|
|
Self-hardening plastic product
No less colorful is a cast of children's hands and feet, made with your own hands from self-hardening plastic. The material is more durable than dough or plaster, and can also be adjusted much easier than its predecessors. You can buy such material at any art store. The first step is to deal with the imprint of the limb: on the salt dough, you should carry out the procedure of squeezing out the handle and leave the base to dry. Carrying out an impression on the test will reduce the risk of allergies due to contact between the child’s small hand and the chemical composition of the plastic itself, which is undoubtedly a plus.
When the cast of the baby's hand and foot, made with your own hands, has dried, you can start processing it. The first step will be to coat the impression with vegetable oil - this will help the plastic not stick to the dough. You should not pour a glass of fat onto the cast; it is better to run a wide brush or a cotton pad soaked in the substance over it.
Homemade salt dough print
This type of printmaking is more labor-intensive, but the result will be more interesting.
For the test we need:
1 cup flour, 1 cup salt, 2 tbsp. sunflower oil and 0.5 - 1 tbsp. water. Knead the dough. Let it sit for half an hour, maybe in the refrigerator.
- Knead the dough, roll it into a ball, then roll it out with a rolling pin, about 1.5 - 2 cm thick;
- Take some foil, place a piece of dough on it and chill the dough in the refrigerator;
- Lubricate the baby’s hand (leg) with sunflower oil and press it into the dough;
- Don't forget to make a hole in the dough for the ribbon so that the finished “work of art” can be hung;
- If you are satisfied with the print, it should be left to dry for 2-3 weeks;
- After about a week, you can turn it over, carefully removing the foil;
- When the print is dry, paint it with acrylic paints.
Next stage
Next, you need to make impressions from plastic. To do this, a heavy piece of plastic that has already been worked out in your hands needs to be placed on top of the test base and carefully pressed through all the contours of the handle. The better the contact between the two layers, the more natural the craft will look. If the plastic is fresh or was stored strictly in a sealed bag, then working with the material is a pleasure. If there was access to air, you will have to work on it in advance. While the dough is drying, you need to knead the plastic in your hands every day so that it spreads a little.
The final stage
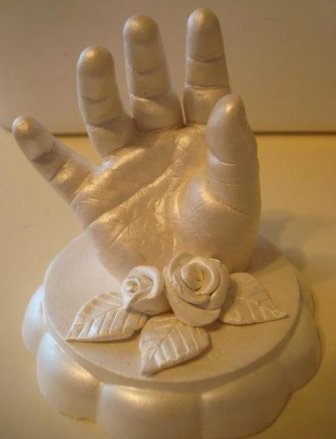
After treatment with oil, the plastic is easily removed from the dough. Next you need to trim off the excess. The finished handle (leg) must be supplemented with volume and allowed to dry. You can make a wreath with family palms. To do this, you should sculpt the parents’ palms and insert wire into the edges. This way the material will stick together well and dry. After drying the hand-made casts of arms and legs, you can plunge into decoration. After covering the stucco molding with acrylic paint of any color and varnish, move on to the wreath.
Material for flowers can be chosen in different textures. The brighter and more unusual the details, the richer the entire exposure will look. Having treated each petal with a light to fix its border, they should be fastened with a thread and a pebble in the form of a core. You can also make the leaves in the form of an autumn palette, then the wreath will turn out bright and cheerful. The palms themselves should be placed in the center, connected with wire to a circle of flowers. Afterwards, it is better to paint the wire in a suitable tone so that it is lost in the general array. You can safely hang such a craft in the center of a photo mosaic on the wall or by the fireplace.
Gypsum products
A more practical idea would be another option for creating a cast of a child’s hand or foot with your own hands. Gypsum is a fairly pliable material, but too heavy. Crafts made from it are not very practical; a separate place must be allocated for them.
The first impression should be made on the same salt dough, and plaster should be used in subsequent work. For a couple of prints, dilute 150 g of the dry mixture with a small amount of water. It is worth remembering that different manufacturers indicate the approximate amount on their packaging, since gypsum absorbs water differently over time. The finished mixture should have the thickness of homemade sour cream, so it will be easier to work with.
Decoration
The finished cast, if desired, can be beautifully decorated. It is better to choose gold, silver or snow-white paint. It all depends on the overall harmony of the panel or painting.
Time does not stand still, so it is important to remember every little thing about such an important thing as the childhood of your beloved baby. Many parents have a tradition of making hand or foot prints of their children. But all the old methods are already outdated: for them you had to prepare a solution yourself, which was not always successful, and the quality of such products left much to be desired. Over time, they began to crumble and burst.
Of course, there are special workshops that are ready to help you. Such services are very expensive and are only available in large cities.
But in the modern world everything is simpler. There is a wonderful alternative to all methods: now you can make impressions using a special children's kit without leaving home.
What is the kit?
The cast frame is the first set you can create together with your child, which allows you to preserve the memories of tiny hands and feet for a long time. The set consists of modeling paste, an original panel for pleasant wishes, satin and adhesive ribbons.
The set is for children, therefore it is presented in two versions with a unique design:
- for girls - in pink;
- for a boy - in blue.
It is important that the use of a special set is completely safe for health, since the composition does not contain harmful components for the skin. The set will be an unusual and stylish gift with which you will surprise people. Such things are still new and not everyone knows about them. Don't be afraid to make original surprises. For example, both for parents for the birth of a child, and for grandparents for the baby’s first little anniversary. This decoration for a children's room will be an excellent addition to the interior.
To make a cast frame, you do not need to have any experience, sculptor abilities, or attend special courses. It is enough to carefully read the instructions, which are indicated in detail on the set.
Mode of application
The modeling mass is completely ready for use; for convenience, you should knead it with your hands for 30 seconds and roll out a layer 2 cm thick. All that remains is to attach the baby’s tiny hand or foot. For a successful result, there is no need to rush, however, you should remember that the mass dries quickly enough in the air.
To create a hand cast, you need to do the following:
- Press your palm against the material to create a uniform outline. But not too much, remain calm and patient, even if the child is mischievous. Don’t be alarmed if you didn’t manage to make a pen cast the first time: you can knead the mass again and repeat the creative process.
- Next, you should leave the mass in the open air until it hardens completely (this will take no more than an hour); if desired, the resulting panel can be painted when everything is dry.
- After sculpting, you just need to wipe your hands with a damp cloth. The mass does not leave marks or unpleasant sensations on the skin, so there is no reason to worry about the baby’s health.
Making a cast of the leg will require a little more effort:
- This will require 2 people if the baby is still very small and cannot stand on his own. Ask to lift the child and carefully, holding his lower leg with your hand, lower him onto the modeling mixture.
- Make sure that the child does not move his leg. If necessary, adjust the contours with your fingers.
- Next, wipe the skin with a napkin and wait until the material dries completely. All that remains is to insert the cast of the leg into the frame from the kit.
Why is this necessary?
If you need access to a friend’s phone, then bypassing the biometric protection is not difficult: just take his/her hand in a dream and put it on the device. Problems arise if we have access to the phone, but the user is unavailable or constantly conscious. In such situations, you have to use the method of making fake fingerprints.
By the way, hackers have long been making artificial fingerprints to deceive biometric security. The first such systems appeared in the early nineties, and options for making artificial copies were immediately found. Tsutomu Matsumoto's 2002 guide is considered a classic.
The problem is that recently the quality of sensors has been increasing, so the requirements for the quality of prints are also increasing. But still, with enough diligence, anyone can make a print, even if not the first time.
How to successfully make a cast?
In order for the cast of an arm or leg to turn out the way you want the first time, you need to perform some steps:
- Take care of your baby's calm state and mood. Prepare a toy or an interesting cartoon to distract him if he doesn’t want to. But it happens that your fidget flatly refuses to participate in creativity. Just try to do it in a playful way or when he is sleeping. Castings of the whole family would also be a good idea.
- Make this a fun activity to make a tradition of making memory frames like these as your baby grows, such as during the first month of life and on the first birthday. Then, after a few years, the already grown-up baby will study them with interest. And you will be surprised how yesterday’s baby managed to grow.
The set includes a special panel for wishes. Ask close family and friends to leave some sweet wishes for the future. Over time, it will be a pleasure to re-read them when gathering with your family. The panel has special holes for ribbons, so it will not be difficult to hang it on the wall.
How to make a cast of a child's hand?
Time is fleeting, and you really want to leave memories of wonderful life moments. Of course, there are many ways to document a child’s growing up – photos, videos, drawings, stories, etc. But you can also monitor the child’s growth using a cast of a hand or foot. This cast will remain for many years and will perfectly decorate the interior of the apartment.
In children's stores you can find modeling kits, but their prices are quite high. Therefore, in order to save money, you can make baby casts with your own hands from available and inexpensive materials.
Salt dough cast
A very good and affordable material for modeling is salt dough. The ability to bake and knead dough is not necessary here. To prepare the impression you will need:
- 2 cups of flour;
- 1 glass of salt;
- ¾ glass of water.
Knead the dough and roll out the cake as thick as your finger. Let the baby place his hand or foot in the middle of the cake and press down somewhere in the middle. If the child is still very small, then help him and press down the arm or leg yourself. Bake the crust in a preheated oven for 1.5 - 2 hours.
Plaster cast
To do this, buy a package of gypsum at a hardware store, mix it with water, following the proportions indicated on the package. Place a small layer of plaster into a disposable plate. When the mixture dries a little, you can leave fingerprints. Place the plate in a cool, dry place and wait for it to harden.
Clay cast
A cast of a child's hand and foot can be made from clay, which is sold in children's stores. This is a special clay for creative crafts, it is softer than natural clay. Everything is very simple here - knead the clay, give it the desired shape, and make an impression of the foot or palm.
Making an impression using a ready-made set
If, nevertheless, you do not have time to tinker with the available materials, then go to the store and purchase a kit for children's casts. The instructions for this kit describe in detail how to make a cast of a child's hand. The materials provided in the sets are very bright and beautiful; accessories for decorating the product may also be included.
Making children's casts
In addition to making a cast, it also needs to be beautifully designed. There are many options here, the main thing is to turn on your imagination and give free rein to all your ideas. But there are several universal ways to decorate your crafts:
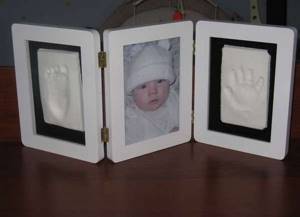
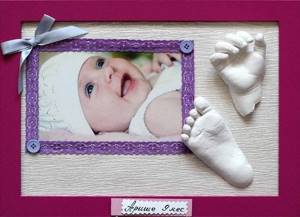
1. Children's photo frame with cast
.
Take out a photograph of the baby and the finished cast. Take any frame you like and cut out a piece of cardboard that will fit into it. Glue a photo and a cast onto cardboard and decorate them. You can hang a tag from the maternity hospital, your first pacifier, booties, etc. in a frame.
2. Pendant with cast.
When making a mold from the dough, use a drinking straw to make a hole while the dough is soft. Try not to make the hole too close to the edge, otherwise a piece may fall off. Give the dough an interesting shape (star, heart, oval, circle, square, etc.). If the cake is made with an uneven surface, then when it is baked and cooled, you can give the protrusions different images. To do this, take a regular marker and draw strawberries, cherries or various insects - bees, butterflies. It can be arranged according to what time of year the child was born. Hang the cast on a ribbon.
3. Figurine with a palm or foot
.
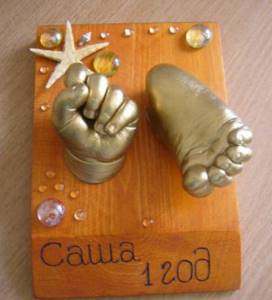
When making a cast, try to press it along the contour of dough, plaster or clay. Then you will get a real baby's hand or foot. Open it up with paint in a can of metallic or bronze color. Think of a base on which to place the print. The base can be a plastic cup. Cover it with paint of the same or a different color. Make an inscription on the “pedestal” with the date the cast was made. To do this, prepare a stencil with the required numbers. Place it on the cup and spray paint. It turns out to be a miniature figurine.