Halloween Makeup - Where to Start
First of all, you need to think through the entire image: from costume to makeup to behavior at the event. To do this, find out the theme of the party, it will help you determine your hero. Then look at ready-made costume and makeup options on the Internet. When choosing an image for yourself for Halloween, remember the main motto of the holiday - the scarier your appearance, the better!
- Regardless of the chosen pattern on the face, you will need to imitate blood. You can replace it with bright red lipstick, but it is much better to use raspberry syrup, red jelly or a liquid mixture of gelatin and dye.
- As for cosmetics, you will need shadows of different colors, the lightest shade of face powder, long-lasting mascara with mega volume, or false eyelashes.
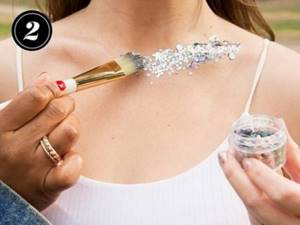
- For a romantic holiday look, purchase a jar of loose glitter to match your suit and makeup. Bright grains will add shine to your character and highlight your individuality.
- Since the makeup will be used on the entire face, as well as on some areas of the body, you will need a makeup base and an eyeshadow base. These funds will help preserve the drawing until the end of the holiday.
- Eyeliner can be used to highlight not only the eyes, but also to draw other makeup details, for example, freckles and smudges on the face. Therefore, purchase this product, but only in a bright shade.
- If you still don't have a set of makeup brushes and a makeup sponge, then Halloween is a good reason to buy them. To apply terrible makeup, they will be necessary to create the desired relief.
If you have not yet chosen your face makeup for Halloween, then take a closer look at the photo. Maybe from the examples given you will find your own option.
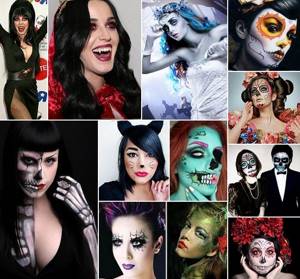
Beautiful ideas for girls
The Internet is replete with a variety of Halloween makeup types. And we share a whole bunch of them with you!
The most common images that girls try on are:
- nurse killer;
- witch;
- Catwoman;
- doll;
- vampire.
First, let's look at some easy makeup ideas that any beginner can handle:
- The image of a vampire does not require a particularly complex make-up; all you need to do is apply makeup on your eyes, lips and draw a trace of leaking blood near your lips. You can make it using regular food coloring mixed with chocolate paste or plain water. Your look will be perfectly complemented by red lenses and false fangs. Not a single Dracula can pass by such a beautiful vampire.
- The image of a catwoman is also quite simple; you can make it yourself without any problems. You will need standard classic makeup with long arrows, plus you can paint the tip and bottom of your nose black and add a mustache. Looks very beautiful and sexy.
- Turning into a doll is also not a big problem, just apply powder on your face that is about two shades lighter than your skin tone, and apply beautiful eye makeup with a magnifying effect. The lips should be given special attention; they need to be made wider and shorter in length. All this is done with a simple lipstick, lip pencil and foundation.

Now I bring to your attention more complex ideas on how to decorate your face for Halloween. Most often, to make such drawings on the face, people turn to professionals. If you are good at drawing, you can try to do it yourself.
Sugar skull. This art is very popular and looks very amazing.
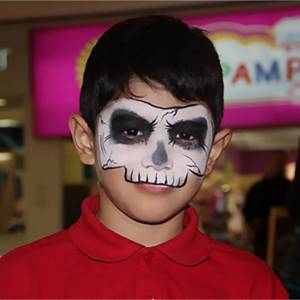
Half makeup. The skeleton is a Halloween classic.
Zombie.
Unbuttoned face. A zipper that is unbuttoned right in the middle of the face will make your costume one of the most unusual at the holiday.
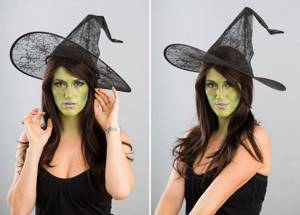
There will always be at least one female witch present at a Halloween party. These are the witches that will drive any sorcerer crazy. You can additionally decorate the image with special Halloween stickers in the form of stars, spiders, etc. In the photo we see that the painting affected not only the face, it smoothly turns into body painting.
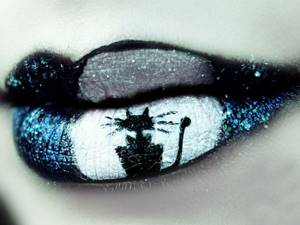
Separately, I would like to note the varieties of patterns on the lips. Today, professional makeup artists will fulfill your every whim and can repeat any idea picture downloaded from the Internet that you ask them to do. Here are some fun ideas for Halloween:
- Flying bats.
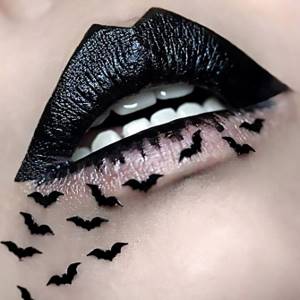
- Pumpkin.
- Spider.
- Black cat.
Halloween Makeup Tricks
When creating an image, it is important to take into account every little detail. You can make it easier to apply makeup and extend its durability with the help of small tricks.
- When wearing a lot of makeup, it is important to protect some sensitive areas of the face. Before applying paints with cosmetics, lubricate your eyebrows and hair roots with Vaseline or fatty cream. This procedure will protect them from staining and discoloration.
- For regular makeup you need to hide dark circles under your eyes, but for a holiday you need the opposite effect. To create dark circles under the eyes, first apply red eyeshadow along the lower lash line, then purple and black. After this, blend the cosmetics with a sponge.
- You can create the effect of chapped lips by mixing light lipstick with dark eye shadow. Apply the mixture to well-moisturized lips.
- Fake blood can also be made from a mixture of red lipstick, black liner and lip gloss. To create blood splatters on the face, use a loose powder brush. Apply the mixture, bring it to your face and use your hand to straighten the villi in the opposite direction.
- To complement your lost teeth look, use waterproof gel eyeliner. Wipe your teeth with an alcohol-based solution, then blot with a napkin and immediately paint them with black eyeliner. Let the makeup dry without covering your mouth.
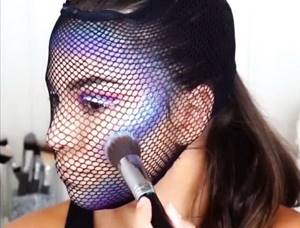
- To create a mermaid look, you need to apply a pattern of scales to your skin. This can be done quickly using nylon tights with a large mesh. Place them on your face and apply shadows on top.
- Lace can be used as a stencil for an interesting design. Also apply it to the skin and use liquid cosmetics on top.
- To make dry glitter last longer on your skin, apply a layer of Vaseline before using it. Then use a thick brush to draw the desired pattern.
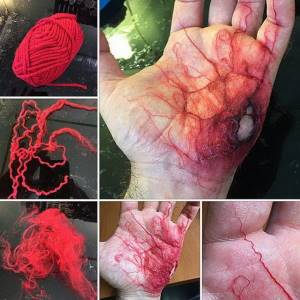
- To create a lacerated wound with an infection effect, purchase red yarn. Unravel the threads into thinner strips and fix them to the skin with PVA glue.
How to do easy makeup for Halloween
On the spookiest holiday, the face may not be so scary. After all, you don’t have to be a vampire, werewolf or ghost. You can choose any fairy-tale character for yourself, for example, the little mermaid, Batman or the scarecrow from the Emerald City.
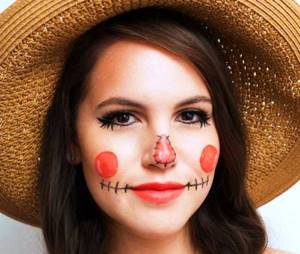
How to Draw a Scarecrow's Face for Halloween
- You won’t need any special skills or special makeup to paint your face for a party. First, prepare your face: apply foundation, foundation and powder the skin on top.
- Using bright lipstick or liquid red eye shadow, draw blush in the form of identical circles and a triangle with rounded corners. Paint your lips with the same color.
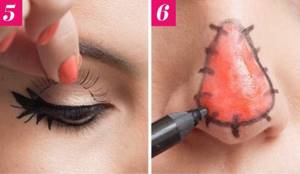
- On the upper eyelid, first apply brown eyeshadow, then create a white stripe near the lash line. Use liquid eyeliner to draw regular arrows. Then use the same product to create cracks in the form of strips with a pointed end.
- To give your eyes expressiveness, glue on artificial eyelashes. Use black eyeliner to outline the triangle on your nose. Draw seams on top of it. You will end up with a sort of sewn-on patch.
- Also draw a black stripe from the corner of your mouth to the middle of your cheek. Then draw lines on it. For a doll effect, create spots of glitter. Use the lightest pencil for this.
How to Paint Your Face Like a Comic Book Character for Halloween
Makeup in the form of comic book characters is becoming increasingly popular during Halloween. You can make such a drawing at home using regular facial cosmetics.
- Treat your facial skin in the usual way. Start your makeup with winged eyeliner. For this, you will need a black liquid liner or regular eyeliner. Apply mascara and line your eyebrows with a black pencil.
- Now you need to use dark cosmetics to create facial lines like a comic book hero. Using a black pencil, draw wide stripes on the cheekbones, along the chin and on top of the nose. Repeat all the lines shown in the photo. Using liquid eyeliner, draw a second line on the upper eyelid above the arrow and add 2 triangles under the lower eyelashes.
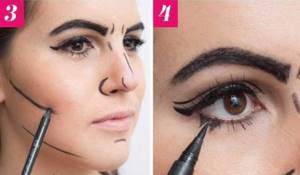
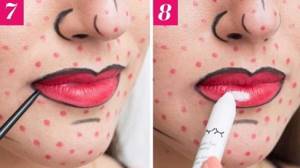
- Apply red dots all over your face using a cosmetic pencil. To make them the same size, cut off the tip of the core and simply apply the cosmetics to the skin. Paint your lips with the same color.
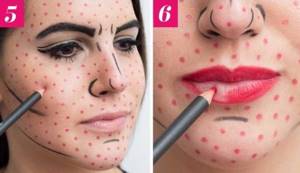
- Draw a black outline along the lip line. To add authenticity to the cartoon character, make traces of gloss on the lips with a white pencil.
How to Decorate a Room for Halloween
Pumpkins have already been mentioned above - these vegetables (or crafts in the form of these vegetables) must be included in Halloween decorations.
Here are some other Halloween ideas.
Witches and black cats
These are common themes for Halloween. The Christian Church portrayed witches as evil and ugly accomplices of evil spirits. Single women were often accused of witchcraft, many of whom had cats in their houses. Therefore, they were also considered devilish animals.
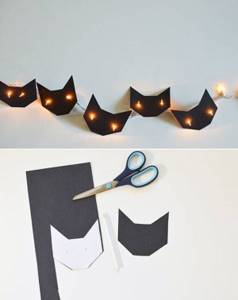
- Cut out lots of cat faces from black paper. Cut holes for eyes. Take an LED garland with small bulbs and hang the faces on it so that a bulb fits into each eye hole. You'll end up with a garland of cats with glowing eyes - these are truly mesmerizing DIY Halloween decorations.
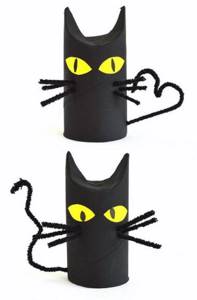
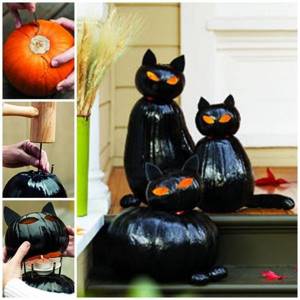
- Paint the pumpkin black using spray paint. From multi-colored paper, cut out and glue cat ears, eyes, nose and tail onto it. Make a mustache from chenille wire. This “cat” will look great among the jack-o’-lanterns. Using the same principle, you can make a witch's head or a bat from a small pumpkin.
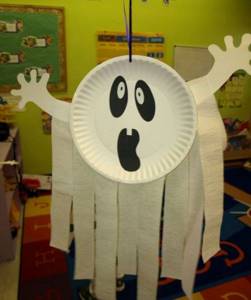
- Disposable paper plates are a wonderful material for children's DIY Halloween crafts. Paint a plate green, draw a face on it, and glue a black witch's hat on top. Hair can be made from multi-colored threads or thin strips of paper. In the same way, you can use plates to make pumpkins, cat faces, vampires, zombies and other evil spirits, which will perfectly decorate a child’s room for Halloween.
Bats and spiders
Bats and spiders were considered animals that accompanied ghosts and witches. According to legend, if a bat flies around a house three times, someone there will soon die. And if she flew into the house, it was believed that a ghost entered the house with her.
- Cut out lots of bat silhouettes in different sizes from black paper and decorate your walls with them. Kids can make bats from toilet paper rolls or kitchen napkins. To do this, you just need to paint them black, glue on wings made of black paper and draw faces.
- A funny web is made from... black garbage bags. To make this Halloween decoration, remember how you cut out paper snowflakes as a child. The principle is the same. Cut a large garbage bag so that it has a square shape, fold it into a triangle, then in half and in half again. Secure it in several places with tape so that the triangle does not fall apart, draw the lines of the future web with a light marker and cut it out with sharp scissors. Attach the web to the wall with tape and decorate with small spiders. Small webs can be cut out of plain paper.

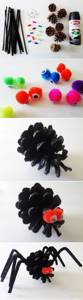
- Children can make funny spiders from cones or balls of thread and chenille wire.
Ghosts
What would Halloween be without guests from the other world?
- Make a concentrated starch solution. Cut two squares with a side of 30-40 cm from gauze. Prepare the base: inflate a balloon and place it on the jar. Now soak the squares in the solution, stack them on top of each other and carefully cover the balloon with them. When the gauze is completely dry, carefully burst and pull out the ball. The starched fabric began to look like a real ghost. Glue paper eyes and place it on a table or windowsill. You can make the ghosts smaller and hang them on strings from the chandelier.
- If there are no small children in the house, you can make a more frightening decoration. Print out an image resembling the reflection of a ghost and insert it into a frame under glass. Cover the frame and part of the glass with black or gray spray paint and hang the structure on the wall. It will seem to guests that a ghost is trying to break through the glass into your apartment.
- Kids can make a ghost garland. Help them cut out little ghosts from white paper. When your child draws a funny face for each one, string them on a cord and hang them on the wall.
Despite its dark roots, these days Halloween is a fun and noisy holiday. And DIY Halloween crafts will help make it even brighter and more exciting. We are sure that our ideas will also be useful to you if you are planning a Halloween-themed party, for example, a birthday. Finally, we offer some more Halloween paper templates.
Halloween Templates
Halloween Crafts
How to do sophisticated makeup for Halloween
For maximum authenticity of the chosen hero for the holiday, more complex makeup is needed. But you don’t have to turn to the services of professionals to apply it. You can do chilling makeup at home.
Female vampire makeup for Halloween
No scary party is complete without vampires. They are very popular, so if you choose the image of a bloodsucker, you definitely won’t go wrong.
- To complement the vampire's makeup, you will need special lenses, which can be purchased at optical stores. But before buying them, consult an ophthalmologist to determine the exact size of the accessory.
- Vampires have light skin, so you will need a powder that is 2 or 3 shades lighter than your usual makeup. It is best to use theatrical makeup. Apply it first to the nose area, then spread it across the cheeks to the temples. Pay special attention to the T-zone, as makeup will be more visible there.
- Use white eyeshadow with glitter on the upper eyelid and blend it, filling the space up to the eyebrow. Draw arrows with brown shadows and tint the lower eyelid.
- To make your eyes look tired, apply red shadows in the shape of wide arrows along the eyelid line. Highlight them with black makeup. Now paint your regular eyeliner with gel eyeliner.
- After eye makeup, apply several layers of mascara to your eyelashes to create volume. You can also use false eyelashes. Highlight the lower eyelid with a dark pencil. For eyebrows, also use dark-colored gels.
- Draw a line along the cheekbones with brown shadows. Bring your lips together into a tube and, using a wide brush, apply the product along a line from cheek to temple.
- The lips also need to be highlighted in a dark color. If you don't have such lipstick, then use black eyeliner. But apply it only along the outer contour of your lips, and fill in the inner area with red lipstick.
- You can complement the look with false teeth with large fangs and a dark cape.
Ghost Makeup for Women for Halloween
Another traditional Halloween character is the ghost. Face painting will take you no longer than it would for a vampire. For the costume, any white hoodie and wig with blonde hair will do, or wear a hood.
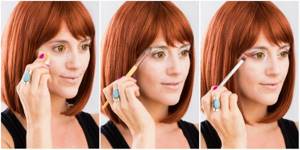
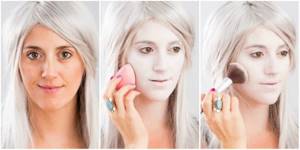
- Before applying makeup, apply moisturizer to your face as it dries out your skin. For Halloween, a white face can be enhanced with the lightest foundation or makeup. Using a sponge, distribute the product evenly over your entire face. To set it, gently brush over the skin with a powder brush.
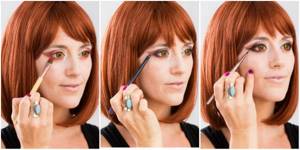
- Apply purple eyeshadow to the upper eyelid. Also highlight the lower eyelid with them. Apply a darker shade of makeup to the outer corner of your eye. To give an intimidating look, use brown eyeshadow with a red tint to draw dark circles under the eyes.
- Apply white mascara to your eyelashes or apply false eyelashes with silver fluff. Emphasize the cheekbone line with purple shadows. Use a wide brush to apply. Line your lips with a light purple pencil to slightly outline the relief.
- In addition to the ghost costume, do not forget to make frightening movements and pronounce phrases in a rough voice.
Witch makeup for Halloween
But still, one of the main characters for women on Halloween is the witch. Her makeup has several options, but most often she uses the image of the evil witch from The Wizard of Oz.
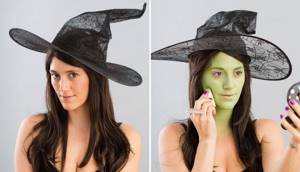
- Prepare your facial skin. Then apply green makeup. This time, use the product not only on your face, but also on your neck. Use a damp sponge.
- Use a dark green base to highlight your cheekbones and apply the product to your nose and chin. To fix the makeup, use loose powder of the desired shade.
- For eye makeup, use emerald-colored shadows. Apply this shade to the corners of the eyelids, and also tint the wings of the nose. Use a gray pencil or shadow to paint the line near the eyelashes. Give your eyes a sparkle with gold glitter.
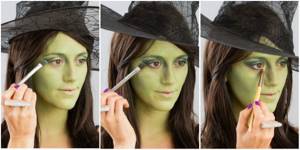
- Draw arrows with black eyeliner. Use false eyelashes to create volume for your eyes. Additionally, do not use mascara. Use a dark pencil to draw a line for your eyebrows.
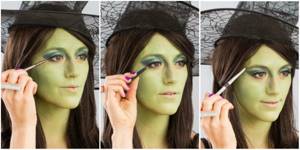
- Apply a spot of gold eyeliner to the inner corner of the eyelid. Highlight your cheekbones with dark green shades and apply highlighter above them.
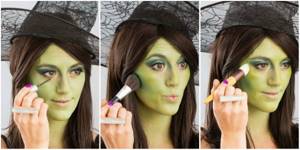
- Instead of lipstick, use a pencil in lavender shades and outline with purple.
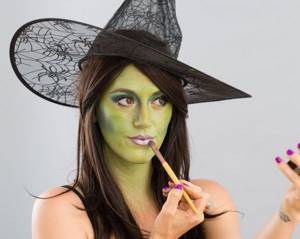
- For the witch character you will need a tall black hat and a wig with long dark hair.
How to Make Halloween Decorations for a Room
The colors mainly used for Halloween are black, orange and white. Black means night, orange because the symbol of the holiday is a pumpkin, white symbolizes fear and communication with ghosts and spirits.
Jack Lantern
Jack Lantern is a symbol and attribute of celebration, which is carved from a pumpkin. To do this, you need a medium-sized pumpkin, cut off the top and remove the core with seeds. Next, use a felt-tip pen and a stencil to draw a scary face on the side and cut it out with a knife. Place and light a candle in the finished pumpkin.
Small pumpkins will make candy bowls, and elongated pumpkins will make flower vases. Draw or stick drawings of spiders, skulls, and skeletons on the peel.
Candles
Candles are also an attribute of the holiday. They are based on ordinary glass jars, which can be painted, painted, or wrapped in paper or fabric.
Flowers
Dead and dry flowers in black, white or orange are suitable. For example, dry nettle or reed flowers. Ribbons and sparkles are also suitable for holiday decoration.
Leaves
Since Halloween runs from October 31 to November 1, and it's fall at this time, it's worth taking advantage of the yellowing leaves.
Mummies and ghosts
Such decorations can be easily made using white fabric, preferably transparent. Place balloons with a painted face under the fabric.
One idea is a do-it-yourself model of a mummy. If there are mock-ups, wrap them with gauze or a bandage, or fold clothes or fabric into a human shape and also wrap them with a bandage.
Posters
Paintings, posters and photos with classic Halloween characters, namely ghosts, witches and vampires, spiders, bats, can be hung on the walls. Place silhouettes of characters made of cardboard and black paper on the windows. Attach black spiders on cobwebs to the walls.
Wreaths
Wreaths are a type of Halloween decoration that can be hung on doors or other suitable places. Material for wreaths: hay, woolen threads, dry leaves, branches.
Finished decorations
If you don’t have time to make decorations for the holiday, you can buy them in a store or order them on the Internet, where there is currently a fairly large variety of attributes.
You can watch the hall decoration for Halloween in the video:
Templates
You can use stencils to make Halloween interior decorations.
These templates are used to paint walls and make stickers.
In order not to suffer while carving a pumpkin, there are special templates for this in the form of scary, evil and funny faces.
Decorating a room for Halloween is not at all difficult; you just need the right materials, imagination and a little time.
How to do scary makeup for Halloween
Many people like characters from the other world. You can draw a scary face at home. You can try on yourself the image with a pale face, a sewn mouth and bulging eyes.
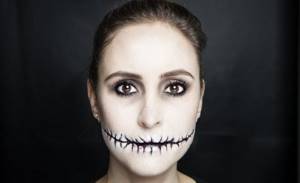
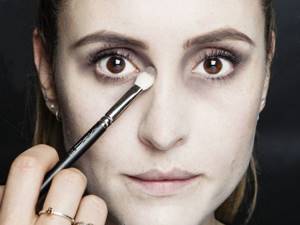
- Cleanse your skin and apply a moisturizer. Instead of foundation, use white powder. Blend it thoroughly all over your face.
- Use gray shadows to draw bruises under the eyes and on the upper eyelid. Use a fluffy brush to cover a larger area of skin with the cosmetic.
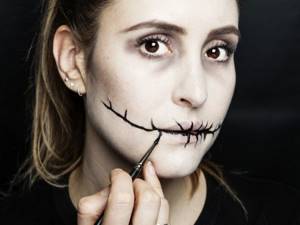
- Using a black liquid liner, draw a stitched mouth. First, place three dots on your cheek along the drawing line, then connect them.
- To simulate stitches, add vertical stripes to the line in a chaotic manner. As you get closer to your ears, reduce their length. Draw the seams on the lips in the same way.
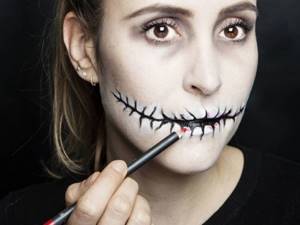
- To highlight the black seam, apply white makeup between the stitches. Blend the product with a soft brush.
- Using a red pencil to outline the lips, draw droplets of blood that seep through the scar on the skin.
- Apply a generous amount of black eyeliner to your eyes for maximum definition.
- During the party, try to talk less, don’t forget – your mouth is sewn shut!
How to Create Horrible Halloween Makeup with a Fake Wound
If you're going to the creepiest zombie character party ever, then you need to decorate your face with lacerations. To create such an image you will need more time than simple makeup with cosmetics.
- You will need to purchase additional liquid latex. Separately, soak the cotton pads in water. After a day, tear them into small pieces with your hands.
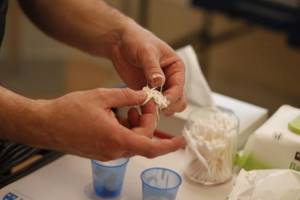
- Determine the size of the wound on your face and place small pieces of cotton around its perimeter. Additionally, create ragged pieces that will hang from the skin.
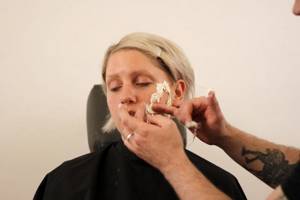
- Using a damp sponge, apply liquid latex over the entire wound and surrounding skin. Pay special attention to its middle.
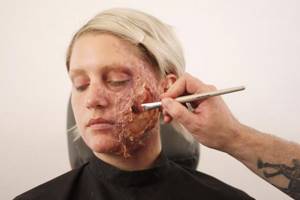
- Leave the mixture to dry a little, but not completely. While the latex is still wet, cut it down the center and fold the edges up. Do not touch the pieces that remain on the skin; they will give the wound the necessary structure.

- On a completely dry base, apply a foundation that matches your skin tone. First use a sponge for this, then paint over the missing areas with a brush.

- It is necessary to make the appearance of a bruise on the face. Use dark shadows to draw bruises near the eyes and mouth. Apply the lighter shade onto clean skin.
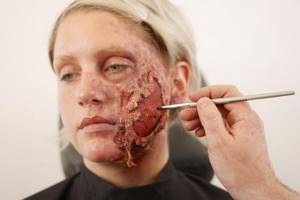
- Paint the center of the wound with bright red makeup or liquid shadows. Use a wide brush for this.
- Create depth around the edges of the wound that will highlight the torn pieces of meat and skin. Apply products with a dark red tint in such places. Or mix red and purple eyeshadow.
- Make your own blood using the methods described above. In this case, the mixture needs to be thicker and stickier so that it does not drip off the face. Apply the blood to the deepest parts of the wound.
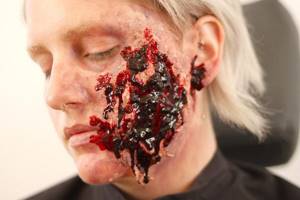
- To create light streaks, spray water onto the blood using a spray bottle. You will need very little liquid. Otherwise, all the makeup will run off.
Many more decoration ideas (photos):
When clicked, the pictures increase in size.
"Ideas for organizing a Halloween party"
You can make Halloween garlands with your own hands from colored paper, cardboard, or fabric. Cut out small identical pumpkins, figures of bats and black cats according to the templates and attach them to a long ribbon using tape or glue. You can make blanks for the garland in the form of orange flags with “scaring” inscriptions.
A handmade ghost garland looks especially impressive.
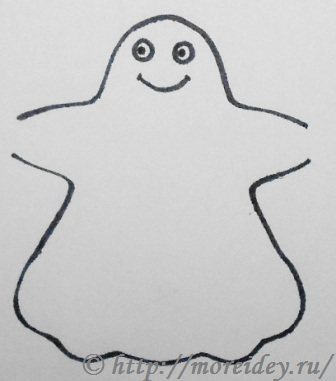
1. After folding a sheet of paper several times, draw a pattern of the image so that the ghosts' handles reach the edges.
2. Cut out the ghosts, following the line of pens along the edge of the paper. Unfold the paper accordion and draw eyes and mouths. Glue the individual parts of the garland. Happy Halloween!
GARLAND OF THEIR BATS
It was decided to use the materials that were lying around the house: black cardboard, wire... I think it turned out very nice.
You will need:
- cardboard;
- printer and pen;
- scissors;
- hole puncher;
- wire and wire cutters.
Step 1. Print out the mouse template and transfer the silhouette onto cardboard.
Step 2. Cut out enough pieces to make a garland. I needed 24 mice. The result was a garland in three rows. Punch holes at the tips of the wings. (This one took me about an hour. If you want to do it faster, involve the children).
Step 3. Make springs from the wire by wrapping it around a pen or pencil about seven times and then cutting it off. It will take about 8-10 inches of wire. Make as many springs as needed for the garland.
Step 4: Thread the spring through the holes. Connect the parts of the garland in this way. You can stretch the springs or compress them. Adjust the tension as you like.
Step 5: Once you've secured all the pieces together, hang the garland on the wall!
Note: if you don't have wire, connect the pieces with black satin ribbon, tying it in a bow.
GHOST GARLAND
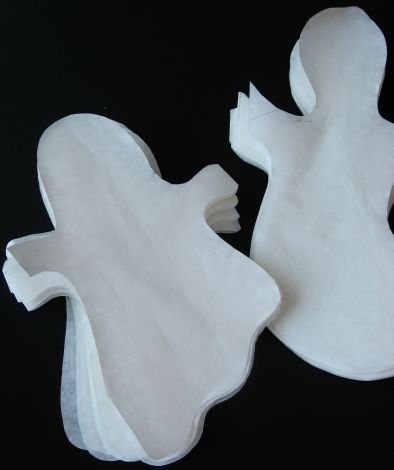
Fold the white napkin, already folded into four, in half. You can fold ordinary office paper like an accordion, but the ghost napkin turns out to be light, translucent - almost like real ones
Attach the ghost template to the folded napkin so that its sleeves extend slightly beyond the edge. Cut out. Unfold the napkin.
You should get 2 garlands of 4 ghosts each. Glue them into one. Draw faces for ghosts. Ours are good
A garland of such ghosts can be hung on a wall, you can decorate a postcard with them, and they also look good on a dark surface, for example, on a TV screen. We rarely watch ours, so they don’t bother us
To do this, attach a very small piece of tape to the sleeves of the two outermost ghosts. Then this garland is very easy to peel off and leaves no traces.
BAKING PAPER GARLAND
All you need is some baking paper of sufficient length.
Fold the paper like an accordion, draw a cast pattern on the topmost one and cut it out. Please note that the sides of the paper should not be cut, otherwise you will not end up with a garland, but many individual ghosts. You don't want this, do you?!
The child will really like to draw scary faces for ghosts)))
Here's a DIY Halloween decoration.
FIRELAND
WITH BULBS
Such a wonderful Halloween garland can be made in one evening. After all, you don’t need any clever materials, tools or special skills.
To make a Halloween themed garland, take:
- Christmas tree garland (preferably with red lights)
- decorative skeletons - a few pieces are enough if your garland is not too long
- thread for tying skeletons
- scraps, ribbons or scraps of black and red fabrics.
Skeletons can be replaced with other themed figures. A garland, for example, with witches, will look much more fun.
Manufacturing process:
Distribute the skeletons evenly across the garland and tie.
Tear the flaps into short ribbons and tie them to the garland, alternating them with each other, as shown in the photo.
That's it - the garland is almost ready! All that remains is to find a place for it, hang it up and plug it into the network.
What could be simpler and faster than a paper garland if you need to decorate for the holiday? Halloween is just around the corner, so today we will make a simple Halloween garland out of paper.
Garlands make the decoration truly festive. Their production does not require special preparation, and you can cut out blanks on long evenings right in front of the TV. Many identical elements create a harmonious decor, fill the space and make it truly festive.
Halloween garland - materials and tools
The beauty of this project is that it does not require any special materials. Everything is extremely simple and understandable even for an untrained handmaker.
- Black and orange paper
- Strong thread or rope
- Scissors
- Simple pencil
- Printer (if possible)
- Hot glue (if possible)
- Paper tape or masking tape.
Garland for Halloween - progress of work
Most of the time will be spent on tracing and cutting out the blanks for the Halloween garland from paper. Look at it as meditation in action. It is at such moments that the brain is distracted, thoughts calm down and...
1. First, print out or hand-draw templates for the Halloween garland. Templates can be downloaded.
2. Cut out the templates, trace them on colored paper with a simple pencil and cut out blanks for the garland. I added more triangular flags that fit nicely into the leftover orange paper.
3. Warm up the hot melt glue, cut the rope to the required length and glue the flags onto it.
4. Figures cut out according to templates can be glued to the rope using paper tape. This way it will be easy to tear them off to use again, and you won’t have to make holes in the blanks.
5. I collected several horizontal garlands and one vertical one.
If you need to really quickly prepare for the holiday, make a paper garland. You can involve your children, friends or loved ones in cutting out blanks and have a great time.
A garland of cute ghosts can be made for Halloween or a themed party. Little ghosts look very cute. And they're not scary at all.
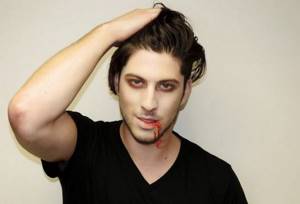
How to paint a man's face for Halloween
There are also plenty of male negative heroes, so you won’t have any problems choosing an outfit for the holiday. Men's makeup for Halloween can be done using theatrical makeup or black cosmetic pencil.
Male vampire image for Halloween
Vampires are especially popular not only with girls, but also with guys. Putting on the makeup of a blood-sucking demon will not be difficult, even for those men who do not understand cosmetics.
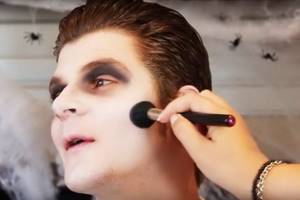
- First prepare your face. Apply the lightest shade of toner over it. This can be done using your fingers.

- Then the upper eyelid must be painted with black shadows. Do this randomly, as at the end you will need to blend the product and mix the shades.
- Apply brown eyeshadow to the skin under your eyes. Pay special attention to the area along the bruise line.
- To enhance the contours of your face, highlight your cheekbones with a gray eye shadow and use a large brush.
- Color the upper eyelid purple. Now use a soft brush to blend the makeup, mixing all the shades.
- The final stage is red lipstick and blood dripping from the lips. Instead of lipstick, you can use artificial blood or any scarlet syrup.
Zombie character for man for Halloween
For those who love films about the apocalypse, the image of a zombie is suitable. To create it, in addition to cosmetics, you will need napkins and a paper coffee filter.
- Soften the paper with water, tear it into pieces and glue it to the cheeks in an asymmetrical order. Unfold the filter and fix it on your face in the same way, but only covering one eye.
- When the paper is dry, apply foundation on it, and bloody smudges on top of it. Color the nose and second eye with black eyeliner or use makeup. This way you will visually have a black eye and the tip of your nose will disappear. Apply blood splatters to the free space between the laceration and the skin using a large bristled brush.
- Or just paint your face with white makeup and small wounds with blood.

Halloween Makeup Ideas for Men
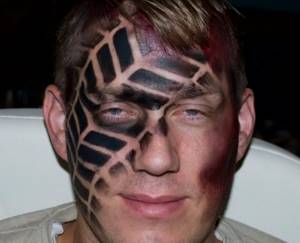
If you are completely unable to apply makeup, then simply draw the tire mark of a car wheel with black eyeliner. Find a rubber pattern on your computer, print it out and transfer the pattern to your skin. Just don’t forget to draw a bruise on the other side of the face.
Well, the simplest face design for Halloween can be blood dripping from the corner of the mouth. Using your finger, carefully apply the red jelly not only to your lips, but also to make streaks on your neck.
For the coolest party, it is best to use the services of professionals. They can create any terrible image for you.

Face paintings for children
Children are always not averse to having fun; they will undoubtedly be delighted if you offer them some kind of funny drawing on their face. By the way, it is not necessary to draw otherworldly creatures and scary faces; you can simply make a beautiful and cute makeup that will complement the image of the baby.
The child will definitely have a lot of impressions, and so that they remain not only in memory, but also on paper, you can arrange a thematic photo shoot.
It is most convenient to use face painting for coloring children.
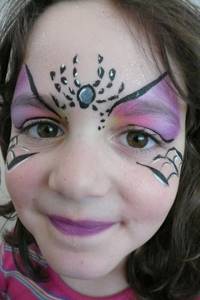
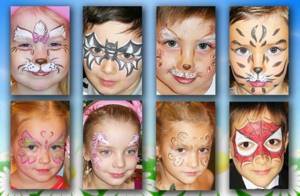
Ideas for girls
- Young witch. This option is the simplest and most common; you can easily repeat it at home yourself.
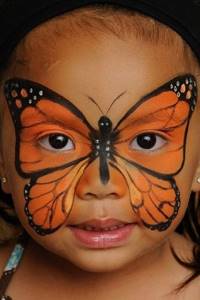
- Butterfly. This drawing is more complicated than the previous one, and if you are not confident in your artistic abilities, it is better to turn to a professional.
- Pumpkin. It looks very original and bright.
- Ladybug. A beautiful and at the same time unusual option.
- Hello Kitty. Any girl will be delighted with such face painting.
- Cute web. This look is perfect for girls who are going to a Halloween party.
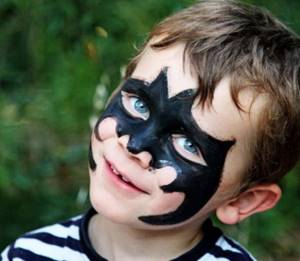
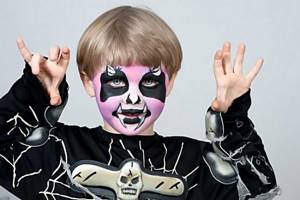
Ideas for boys
Boys often love images of various superheroes; if you don’t know how to draw, it doesn’t matter. You can print a stencil and draw a Batman mask or any other mask using it.
- Cobweb + spider. Beautiful and cute image. If you have a question about how to whiten your face, don’t worry, this can easily be done using gouache or special white makeup.
- Superhero mask. Your child will certainly be pleased with this drawing.
- Pirate. This negative character is perfect for a Halloween look.
- Vampire. This scary and at the same time cute themed makeup will perfectly complement your son’s costume on All Hallows’ Eve.
- Dog. You can dress up in absolutely any outfit for Halloween. If your child doesn’t want to go dressed as otherworldly creatures and super monsters, you can make this cute makeup for any animal.
- Scull. Over the past few years, makeup in the shape of a skull has become very popular not only among adults, but also among children. It looks very scary and brutal.
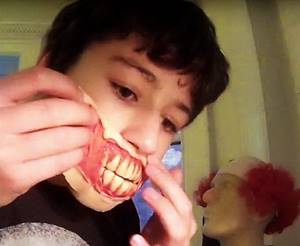
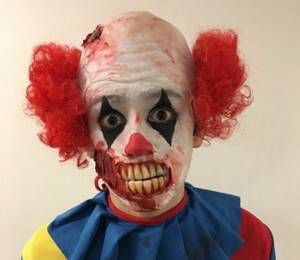
How to apply makeup for Halloween for a teenager
There are many examples of how to paint a face for adults. Teenagers can also choose such themes, but to stand out among your peers, use unusual Halloween makeup.
- Before applying professional cosmetics, the face must be well moisturized and then apply a nourishing cream. Teenage skin is very sensitive to cosmetics.
- You will need special silicone pads and makeup glue, which are sold in souvenir shops. First, install false teeth on your lips. They will give you the opportunity to talk freely during the party.
- Then glue the laceration onto the right cheek, press the silicone well and wait until the glue dries.
- Comb your hair back and put on a clown head with bright hair on top. To prevent the makeup from moving, fix it on the forehead with glue. Glue swollen cotton along the lines of contact between the silicone and the skin. Let the material dry.
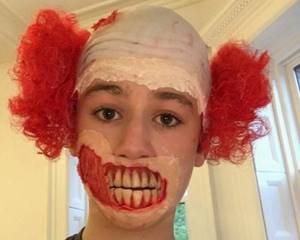
- Now you need to apply a thick layer of white makeup all over your face. A fluffy brush will help you blend the product thoroughly.
- Use a black pencil or liquid eyeliner to highlight the clown's eyes. First, mark the borders with dots, then connect them and fill the shape with color.
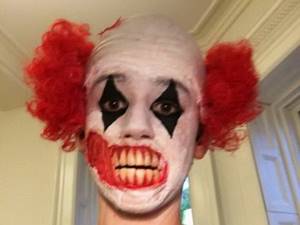
- Apply fake blood to lacerations and use red lipstick or liner to create bruises. Also, don't forget to paint the indentations on the wound with a darker shade to create the effect of torn skin.
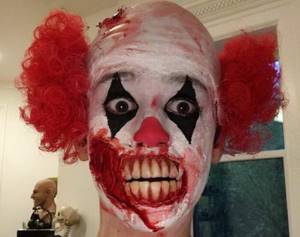
- All that remains to be done is to put on a clown costume and spill blood on it. Wide eyes can give your character a scary look. Don't forget about this when interacting with your peers at a party.
How to give your child makeup for Halloween
Children love the holiday no less than adults. They dress up with pleasure and rush to demand their sweets. On Halloween, babies' faces are more cute than scary. Therefore, children's makeup is very different from adult makeup.
Vampire child character for Halloween
- Vampire themes are loved by children, especially boys. Moms can do this makeup on their own. Whiten your face with makeup or light-colored powder. At the same time, fill in your eyebrows.
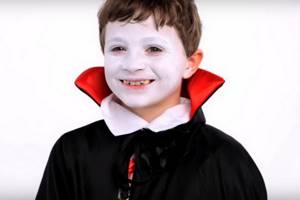
- Using a black pencil, draw eyebrows in the form of a corner.
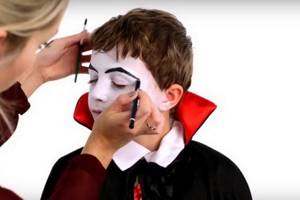
- Use a red liner to line your child's eyes along the lower lash line.
- Use red lipstick to paint your lips and two lines from them in the form of dripping drops of blood.
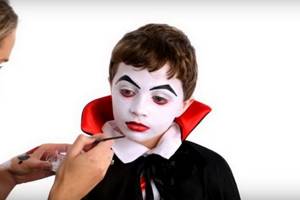
- Don't forget to add fangs and a cape with a high collar to the look.
Fun Halloween Makeup for Kids
Most often, face painting or face crayons are used to create the image of children. Such products are absolutely safe for children, as they are made from environmentally friendly materials and are hypoallergenic.
- The fairy is most often chosen as Halloween face makeup for girls. It is made in the form of a butterfly, the wings of which are drawn on the eye area. Use white makeup to apply the base for the wings around the eyes. Draw colorful spots on their sides, and put a few bright dots on the nose.
- Using a thin brush, outline the wings with black paint. Also draw the body of the butterfly on the nose. Line your lips with bright lipstick with glitter.
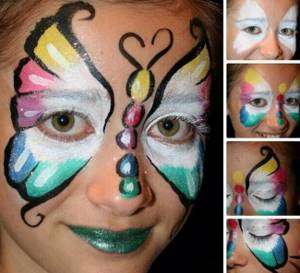
- If you find it difficult to draw a line on the butterfly's wings, then use simple drawings on the child's face. For example, it could be a delicate wreath of a forest fairy, a cheerful imp, Batman, a clown with a large lollipop or Spider-Man and even a rocket with a rainbow.
- For those parents who do not know how to do children's makeup, it is worth using the services of professionals.
As you can see, you can create any Halloween character yourself and at home. To do this, first decide on the image and start applying makeup on your face. Happy holiday!
To learn more about creating scary faces for Halloween, watch the video: