How to choose a heating mode
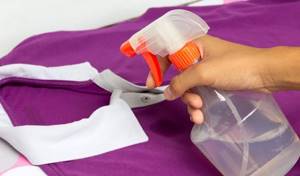
Before ironing, the shirt should be dried using a hanger. But you shouldn’t over-dry your clothes either. If you still get too dry, then use a spray bottle, slightly moistening the fabric just before you start ironing.
Before plugging in the iron and ironing, you should read the instructions for the device and select the correct heating mode. It depends on what material the shirt is made of. Look for this information on the tag. The temperature regime is usually indicated there as well.
Just look at the back of the garment. If there is no tag, then start with mode 2, gradually increasing the heating temperature if necessary.
When the iron begins to glide with difficulty, this indicates an excessively high temperature - you cannot iron like that.
To determine the required heating, it is better to start from the material. The temperature and mode are chosen as follows:
- For natural cotton the temperature is 150 degrees. At the same time, the strong steam mode is turned on, and you need to iron with some effort.
- The combination of cotton and linen is ironed at a temperature of 180 to 200 degrees and with high steam.
- Polyester with cotton cannot be heated above 110 degrees. The steam is small.
- If the shirt has a wrinkled or wrinkled effect, keep the temperature at 110 degrees and do not use steam.
- For viscose you need 120 degrees. You can use steam, but you should not wet the fabric.
- A shirt based on pure linen requires a high temperature - from 210 to 230 degrees. In this case, you will have to apply force by pressing your hand on the device.

If you have several ironing modes, but you cannot decipher them, look at the instructions. Usually it indicates what this or that mode means, and how hot the iron is at the 1, 2 or 3 mark.
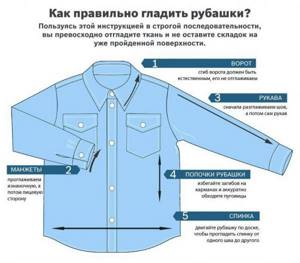
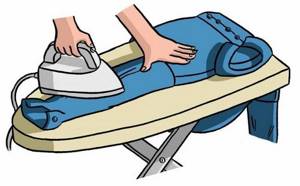
How to properly iron a men's shirt: operating procedure
Ironing is divided into several segments, within which the emphasis is placed on different components of the clothing.
Collar
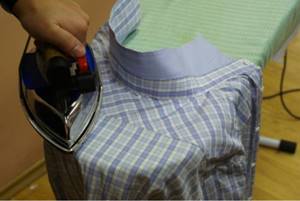
Let's start with how to properly iron a shirt collar. Here it is important to pull out the bone, if there is one under the collar, turn it inside out and run it with a hot device on the correct setting. Smoothing from the center, gradually move to the corners of the collar. Repeat the same steps on the front side. Pay special attention to the corners when ironing your shirt to avoid creating wrinkles in the fabric.
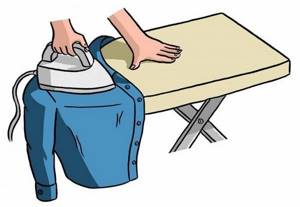
Sleeves and cuffs
Ironing cuffs and sleeves is the most difficult. Depending on the specific type of clothing and whether a jacket will be worn over it, sometimes it is necessary to make arrows or try to avoid their appearance.
Let's look at how to iron shirt sleeves without arrows, also touching the cuffs. The simplest thing is to use a special attachment designed specifically for ironing cuffs and sleeves. But you can do without it.
- Place the sleeves along the board, unbutton the cuff buttons.
- It is recommended to start ironing with the cuff, ironing it on both sides. If the cuff is double, first iron the unfolded one, like a regular one, and after folding, making sure that the loops match, it remains to iron along the fold.
- When ironing a men's long-sleeve shirt, you should try to get rid of creases. To do this, align the sleeve and place it on the edge of the board. Do not move the iron all the way to the fold line. Iron carefully in the desired mode.
- Next, the sleeve is turned over so that the fold line is in the center. Now go down the center of the sleeve. Similar manipulations are carried out with the second sleeve. Be careful not to iron the arrows and force yourself to do this procedure again.

Sometimes you need a shirt to have an arrow - this is often true for short-sleeved items. Simply lay the garment so that the arrow runs from the shoulder seam to the cuff. Please note that the arrows on the cuff should always be smoothed.
To save time and effort spent on ironing shirt sleeves, you can use a simple method. To do this, take an ordinary rolling pin or bottle, wrap it in a terry towel, and get something like a roller. Insert it into the sleeve and iron it from all sides.
Shoulders
To smooth the shoulders, use the narrow part of the board - put the shirt on it. The product is placed on the edge of the ironing surface in such a way as to first iron the left and then the right shoulder, or vice versa.
Make the most of the iron's nose to reach those tricky areas and get rid of all the creases. Having smoothed one shoulder, start working on the next one.
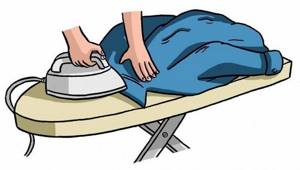
Front and back
It is important to be able to iron the front and back of a shirt correctly:
- It's better to start with the part where the buttons are sewn on. Place the shirt on the board, trying to cover most of the front of the garment.
- Carefully go over the area near the collar so that there are no wrinkles there, since even under the tie it will be visible.
- Iron around the buttons, but do not apply the iron to them as the plastic melts easily under high heat. Or simply turn the shirt inside out before ironing.
- Now drag the garment so that the back of the item is on the board. Depending on the board, you can usually fit between half and 2/3 of your clothes on the work surface.
- When ironing, focus on the area near the collar.
- Having finished with the back, start again at the front, but this time from the side where there are no buttons. Take a good look at the chest pocket area, if there is one. Don't forget about the space around the collar.
Since the main part of the shirt is ironed at this stage, and the procedure is carried out quickly, problems with the front and back usually do not arise. The main thing here is not to forget about the small areas around the collar and pocket. It’s even better to iron all the buttons on your shirt to avoid damaging them.
Quality checking
There is nothing particularly difficult about ironing a shirt yourself. Make sure there are no folds, follow the sequence and don’t forget about choosing a mode.

Once you've completed the job, check to see if there are any poorly ironed areas or areas that you may have overlooked. If everything is fine, hang the clothes on the hanger.
If you notice any shortcomings, use the iron while it has not yet cooled down, eliminating the shortcomings.
Without knowing exactly what material the shirt is made of, it is better to use a low temperature, increasing it if necessary. This will require more time to iron the clothes, but will not burn them.
What you definitely shouldn’t do is iron dirty shirts that haven’t been washed. Smoothing out stains will make it much more difficult to remove them in the future. Some iron stains last forever.
Ironing steps
You should not overdry the product, as this significantly complicates the task of bringing it to a perfectly smooth state.
- See in what mode this product is allowed to be ironed. If the label on the product is lost, it is better to start with the minimum temperature mode and increase it gradually. If the garment has a piece of fabric to patch, try the ironing process on it.
- Sprinkle the dry shirt with water and iron it in the “steam” mode.
- Start ironing the collar first, laying it on the surface of the board with the wrong side up, then turn it over and do the same on the front side.
- Unbutton your sleeves. Along with the ironing board there is usually a device for ironing sleeves. If you don’t have one, you can roll up a towel and stick it in your sleeve. If the sleeve does not hold onto the roller too well, take a thicker towel and roll up a new roller. Iron the cuffs first, then the rest. Pay special attention to the seams. If you need to place an arrow on a sleeve, lay it out on a board and run the iron from side to side 3-4 times. The arrow should not double.
- On the narrowed part of the ironing board, lay out the shoulder and armhole seams and iron them thoroughly. Do the same with the other shoulder.
- Now lay out the shelf with buttons on the board. Use the angle of the iron to iron the spaces between the buttons especially carefully, being careful not to touch them. After ironing one shelf, move it on the board so that the side seam is in the middle. It is also carefully ironed. The same steps are repeated with the second shelf.
- All that remains is to iron the back of the shirt, and this is the easiest step. Especially if there is no fold in the middle.
- Now hang the shirt on a hanger, buttoning the top button to prevent creases from appearing. Cool the item before putting it on, otherwise it will quickly wrinkle.
Ironing shirts with other equipment
There is a lot of controversy regarding what is the best way to iron shirts and what equipment to use for this. Fans of the classical approach do not perceive anything other than the iron. But there are alternative solutions that are not inferior to an iron, and sometimes allow you to iron men’s shirts even better, faster and with better quality:
- steam generators;
- steamers;
- steam mannequins.
Steam generator
If you already know how to properly iron your shirt using a regular iron, working with a steam generator will not cause you any difficulties.
This is practically the same iron, only with increased power and a constant supply of hot steam. Compared to a regular iron, the steam jet is much more powerful, which makes ironing clothes made from different materials faster and easier.
Steam generators do not apply to all shirts, but only to those that can be ironed using steam.
Steamer
The essence of the device is to supply hot steam in a dense stream. A steamer is not an analogue of an iron and cannot completely replace it in everyday life.
How to iron a shirt if you don't have an iron
It happens that you don’t have any utensils at hand, but your shirt is wrinkled and needs to be ironed. To get out of this situation with dignity, you can use several methods:
- If the shirt is slightly wrinkled, wet your hand with water and run it over the item. You need to make sudden movements, moving from top to bottom. Then shake off the clothes and leave to dry. Make sure your hands and the water you use are clean. The method is suitable for linen shirts.
- For synthetic products, chiffon or silk, there is a different method. You need to take a hanger, hang your shirt on it in the bathroom, turn on a hot shower, but do not let the water get on your clothes. Close the doors and leave the shirt in the steam environment. Steam will help get rid of bruises.
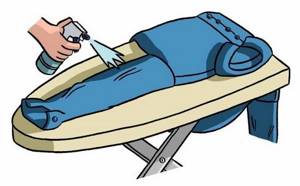
- Using a spray bottle, slightly moisten the fabric and put it on yourself. This is a good option for ironing clothes that are smoothed out due to tension.
- If the shirt is made from natural materials and not synthetics, there is another way. You need to mix water, vinegar and any fabric softener. The proportions are equal. The resulting liquid is poured into a spray bottle and applied to a wrinkled shirt. All wrinkles are smoothed out quite quickly, and the conditioner hides the smell of vinegar. But it still wouldn’t hurt to ventilate.
When going on a business trip or vacation, when you still need a shirt, it’s a good idea to grab an iron. Good hotels can iron your clothes themselves for a nominal fee.
Tips and life hacks for the perfect shirt look
Knowing how to properly iron a shirt's sleeves, back, front and collar will help you maintain a perfect and well-groomed appearance. When starting to iron a white, black or colored shirt, you should listen to a few additional tips:
- If this is a men's shirt, then it is customary to iron it from the front side, without turning it inside out.
- But if the shirt is dark, it is better to turn it inside out so as not to leave iron marks.
- Some shirts stubbornly refuse to be ironed. Even strong steam won't help here. It would be more correct to moisten the product and use strong pressure to iron difficult areas.
- If fabrics are difficult to iron, you can use the moisturizing method by mixing water with conditioner.
- It is better to iron prints and embroideries on shirts from the reverse side. A regular sheet of paper should be placed under the drawings themselves, otherwise it may be imprinted on the board.
- To make ironing easier, use a hanger for drying, and start ironing while the shirt is still slightly damp. It is not recommended to forcefully wring or dry shirts using a washing machine.
- After finishing ironing, be sure to remove the clothes from the board, hang them on hangers and let them cool completely. Otherwise, the shirt will remain wrinkled.
Mastering the process of ironing a shirt is not that difficult if you approach the task correctly.

There are hardly many people for whom ironing shirts is their favorite pastime. Meanwhile, this familiar and necessary piece of clothing can tell a lot about its owner, because one is greeted by his clothes. A person in a wrinkled or clumsily ironed shirt, especially with long sleeves, often causes mistrust and, as a specialist, carelessness in clothing is involuntarily associated with carelessness in work. To prevent this from happening, it’s a good idea to learn how to stroke them quickly and correctly.
Ironing the front and back of the shirt
The shelves begin to be ironed from the yoke with buttons. The nose of the iron is wound between them. It is more convenient to iron the shelves from top to bottom. Be sure to iron under the shirt collar. Smooth out the yoke with eyelets well, because it will be visible.
The backrest begins to be ironed from above from the side seam and moves downwards. It is worth paying attention to the seam connecting the back to the yoke.

Correctly iron men's shirts from the front side | Front
Shirt sleeves
Each housewife has her own opinion on how to iron shirt sleeves. Many people start the process with them, but in the end they are upset, because the sleeves have already become wrinkled. Remember: ironing ends with sleeves!
The sleeves are ironed from the front. It is best to iron a long sleeve shirt on a special small board. To avoid creases in the fabric, the bottom seam needs to be stretched well. When ironing a sleeve, do not go to its edge; there should be no arrows on the shirt. After the front part of the sleeve, move on to the back.
How to iron a shirt without arrows? There is one trick: when ironing the sleeve, hang its middle from the board and do not bring the iron to it. Once you have ironed both sides of the sleeve in this manner, turn the middle over and iron it.
Where to begin
So, before you is a pile of shirts that need to be given an impeccable look.
- Before you start ironing, they, of course, need to be washed. Never iron worn shirts, even if they have only been worn once and seem clean. Unnoticeable dirt and stains after ironing will be tightly welded to the fabric and will be difficult to get rid of.
- When washing, use the “easy ironing” function, this will simplify your task.
- Do not dry things completely; slightly damp fabric is easier to iron.
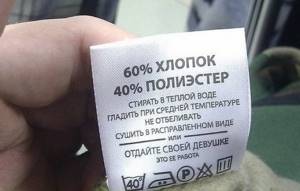
- Study the product label to determine the fabric composition. As a rule, it also contains recommendations for care; this will help set the correct temperature on the iron.
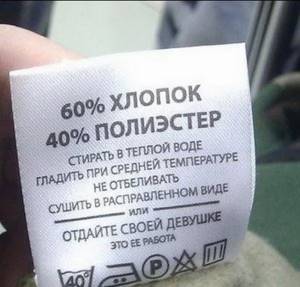
The label on the shirt will tell you about the composition of the fabric and help you decide on the ironing mode
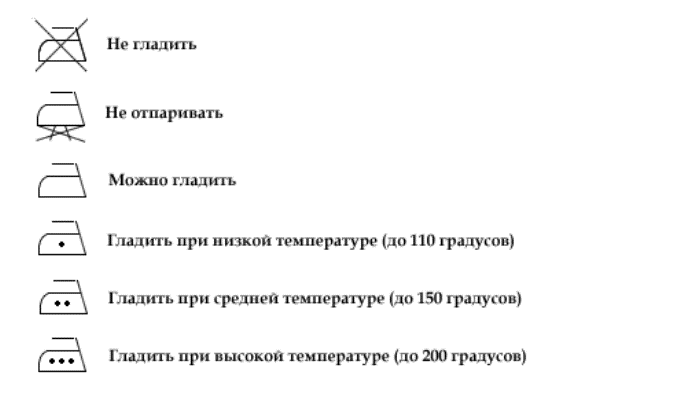
Iron heating modes
Modern irons are equipped with a temperature regulator. The ironing modes on them are indicated by dots; on some, the type of fabric is additionally indicated.
- one point corresponds to temperatures up to 110 0 C;
- two points - up to 150 0 C;
- three points - up to 200 0 C.
Table of ironing modes for different types of fabrics
| Textile | Temperature (0C) | Steam | Iron pressure | Peculiarities |
| Cotton | 140—170 | wet | strong | needs to be moisturized |
| Cotton with polyester | 110 | a small amount of | ordinary | iron like polyester, cotton |
| Silk | 60—80 | do not use | ordinary | iron with a dry iron through a damp cloth (not gauze), do not dampen |
| Chiffon | 60—80 | No | lung | through a damp cloth, do not use a spray bottle - stains may remain |
| Polyester | 60—80 | No | lung | low ironing temperature, the fiber melts |
| Viscose | 120 | A little | ordinary | do not dampen to avoid stains, iron slightly damp on the inside or through the fabric |
| Crinkled cotton | 110 | No | ordinary | depends on the composition of the fabric |
| Wool | 110—120 | steaming | lung | through a damp cotton cloth, steam embossed items |
| Linen | 180—200 | a lot of | strong | iron inside out, use a spray bottle |
| Cotton with linen | 180 | a lot of | strong | like cotton, linen |
| Knitwear | minimal or medium, depending on fiber composition | ferry in vertical position | light, do not press | in the direction of the loops from the wrong side |
If the label is missing and you do not know the composition of the fabric, set the minimum temperature, gradually increasing it until the fabric begins to smooth out. Add gradually. As soon as you feel that the iron is sliding worse, lower the temperature and let the device cool.
Prepare everything you need for ironing.
What you will need
- iron;
- ironing board or table covered with thick cloth;
- attachment for ironing sleeves;
- spray;
- Some products will require mesh or fabric.
Necessary accessories for successful ironing - gallery
Preparing a shirt for ironing
- If the shirt is dry, spray it with water from a spray bottle and put it in a bag for 20 minutes, or wrap it in a damp towel.
- In men's shirts, the ends of the collar are often reinforced with plastic clips located in small pockets. Take them out if you haven't done so before washing.
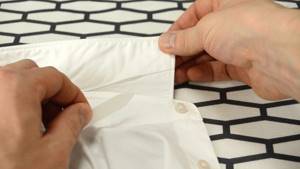
Remove collar fasteners before ironing
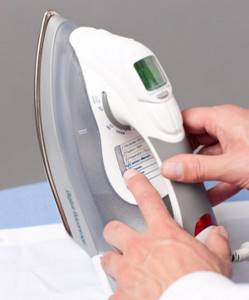
Set the temperature according to the fabric type
Having prepared everything you need, start ironing.
Proper ironing of different types of long and short sleeve shirts
The most difficult thing, perhaps, is to iron men's shirts. Having learned this wisdom, dealing with other shirts will not be difficult.
Men's shirts
There are different opinions about the ironing order. The general rule is to iron small and double parts first.
Professionals advise starting with the collar.
Iron small and double pieces first, starting with the collar
Stage 1 - Collar
- Place the collar on the ironing surface, wrong side up. Iron lightly, moving from the corners to the center - this will help avoid creases on one side. Carefully work the fabric around the button on the stand and the eyelet.
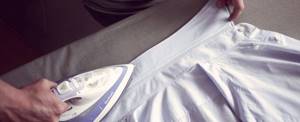
Iron the back side of the collar first, then the front side
Once you've finished with the collar, move on to the sleeves.
Stage 2 - Sleeves
When ironing sleeves, also start with double parts - cuffs.
- Place the cuffs wrong side up and iron from the corners to the center. Unlike the front side, the back side is not reinforced with an additional layer of fabric, so it wrinkles slightly. To avoid folds from excess fabric, it should be ironed towards the center.
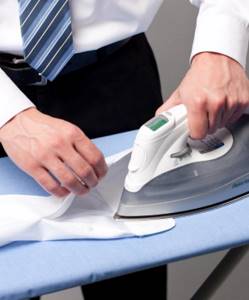
Start ironing cuffs from the inside out
At what temperature should you iron short-sleeve shirts without creases?
A few more recommendations on how to properly iron short-sleeved shirts without creases.
At what temperature ironing is performed is determined by the material of the product:
- If the fabric includes polyester or is made entirely of polyester, minimal iron heat is used. The same applies to viscose.
- The cotton shirt is ironed in medium mode using steaming.
- Linen fabric is ironed using the maximum degree of heat; steaming and significant pressing force of the iron are required.
- a silk shirt to the iron; just hang it evenly. If you do iron, use minimal heat.
Important ! To avoid the appearance of arrows, it is necessary to carefully straighten the fabric, avoiding folds under the iron. For some materials, it is very difficult to eliminate the arrow that has arisen.
Useful video
Share this post
- Related Posts
- Who was the first Russian Tsar in Rus'?
- How to get rid of black mold on bathroom walls?
- How to wash a down jacket in an automatic washing machine?
- How to make your own universal dishwashing detergent, its health safety and affordability
- How to clean arctic fox fur at home?
- How to easily remove old wallpaper from walls: liquid, non-woven, vinyl, washable and others?
How to iron shirts
Ten years ago this question did not arise - there was no alternative to the iron. Now there are household appliances that cope with ironing no worse than an iron, and sometimes better.
Ironing equipment
- iron;
- steam generator;
- steamer;
- ironing robot-steam dummy.
The most important part of the iron is the sole. The quality, material and coating of the sole determine how easily it will glide over the fabric. This means how high quality the ironing result will be.

The better the sole of the iron glides, the better the ironing.
Modern irons are equipped with a thermostat, which allows you to iron things at the optimal temperature, a steam function and a sprinkler.
Steam generator
This is still the same iron, only more powerful than usual and equipped with a constant steam function. The steam jet power of this device is much higher than a conventional iron, due to which it easily smoothes any fabric.
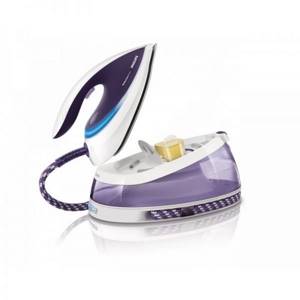
The steam jet power of a steam generator is much higher than that of an iron
If the use of steam is acceptable for fabric, then this device is a godsend for the housewife.
Important! The steam generator produces only dry steam.
Steamer
This is a device for smoothing fabrics with a stream of hot steam. A steamer is not an iron and does not completely replace it. They are good for refreshing things, smoothing out wrinkles after storage, and getting rid of the smell of tobacco.
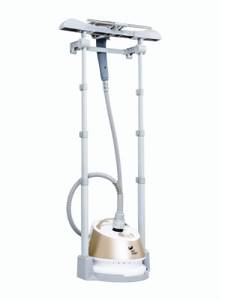
The steamer can be used to iron items in a vertical position, hanging them on hangers
The advantages of a steamer include the ability to iron things in a vertical position.
Steam manken
It is an inflatable mannequin for drying and ironing men's shirts and jackets. The thing is convenient, but the price is high, and it’s difficult to buy. Therefore, it is mentioned here for the overall picture.

The ironing robot-steamman will dry and iron any shirt without any problems.
It happens that the device breaks down, the power suddenly goes out, or you are far from the benefits of civilization, but you need to maintain your reputation.
How to iron a shirt without an iron
There are some tricks you can use to make your shirt look presentable.
Method 1
Small wrinkles can be removed by wetting your hands with water and running them over the fabric. Do this with a sharp movement from top to bottom. After this, shake the product vigorously and let it dry. It is important to keep your hands and water clean, otherwise marks will remain.
This method works well on linen products.
Method 2
Hang shirts made of silk, chiffon, synthetic fibers on hangers in the bathroom and turn on the hot water, directing the stream from bottom to top. Be careful not to splash onto the fabric.
After some time, the wrinkles will smooth out under the influence of steam.
Method 3
Moisten the shirt with a spray bottle and... put it on yourself. Under the influence of tension and your heat, the fabric will smooth out.
Method 4
Prepare a mixture of water, vinegar and fabric softener, taken in equal proportions. Pour the liquid into a spray bottle and spray the crumpled product - the wrinkles will smooth out.
This method is suitable even for white things; the composition will not leave stains. It won't work for synthetics.
How to iron fabric without an iron - video
Some useful tips and nuances for proper ironing
- Men's shirts are always ironed on the front side.
- Dark shirts should be ironed from the inside out so that there are no marks left on the front from the iron.
- It happens that despite all efforts, the shirt cannot be ironed. Steam will not help in this case; the fabric must be moistened and ironed with strong iron pressure. The heavier the iron, the better the result.
- In cases where the fabric is difficult to smooth, moisturizing with water with the addition of conditioner or spray starch will help.
- If the shirt has darts, iron them from the wrong side first. Vertical darts are smoothed towards each other.
- Embroidery or print on a shirt or T-shirt is ironed from the inside out. Place a sheet of paper under the design to prevent it from imprinting on the ironing board.
- To make shirts easier to iron, dry them on hangers and iron them slightly damp. Do not wring shirts or dry them in a machine.
- Store knitted shirts rolled up to prevent wrinkles.
- Do not leave ironed shirts on the table or ironing board as they may become wrinkled. Hang on a hanger and let cool, then place in your wardrobe.
Master class with comments on ironing a men's shirt - video
There is no limit to perfection, but we must strive for it. Having mastered the art of properly ironing shirts, you will be one step closer to the ideal. And, perhaps, you will fall in love with this difficult, but so necessary work.
How to iron a shirt correctly: general tricks
- Fabrics that are too damp and hot crease most easily, so try ironing in a well-ventilated area with plenty of fresh air. Allow each ironed part to cool and only after it has cooled down, continue further.
- Heat the iron to the required temperature, focusing on the type of fabric, in order to correctly select the desired ironing mode. Check the symbols on the inside label or study the label if the shirt is brand new.
- It is better not to fold the ironed item, but to immediately hang it by the hanger, fastening only the top button. The same goes if the shirt has buttons or hooks.
- If you are not sure about the quality of the fabric, then it is better to start ironing at a low temperature and moderate humidity.
- Never touch the buttons, even if you iron from the wrong side: go around them from the side and insert the nose of the iron between them so as to smooth only the fabric itself.
- It is not recommended to iron dirty shirts: the stains can become firmly embedded and will not disappear even after washing. In addition, the smell of stale fabric will only intensify as the temperature rises.
- To clean your iron from dirt caused by mineral deposits in tap water, use vinegar. Water at room temperature and the bite are mixed in a 1:1 ratio, pour the finished solution into the reservoir of the iron, with the sole down so that the liquid does not leak out. Allow excess steam to escape until the solution has completely evaporated. If necessary, repeat the procedure several times.
- Use specially purified water when ironing: a home filter or bottled water will do an excellent job with the steaming process.
Preparing for proper ironing
The fabric should be slightly damp: do not overdry the shirt after washing or spray it moderately with water at room temperature from a spray bottle. This method is suitable for cotton and linen shirts, but it is best to iron a silk shirt dry and on the wrong side, placing a thin layer of chintz or cambric. Products with embroidery, beads and other convex details are also ironed from the inside out. By the way, gauze or waffle towels can leave unwanted marks and unevenness on the fabric. For artificial silk, water is generally contraindicated during the ironing process, because stains may remain on it. It is best to choose a special gentle mode for ironing silk, having first cleared the material of hair and lint. Always pay attention to the soleplate of the iron: there should be no dark deposits on it, which can damage clothing upon contact. Any material can and should be steamed; for this it is wiser to use distilled water, which will definitely not leave streaks.
How to choose a board for ironing a shirt
It’s very simple: the harder the surface on which you iron, the more noticeable the subsequent effect. But do not press the item to the edges of the board, as this will wrinkle the shirt even more and creases will become visible.
How to brush your teeth correctly: the secrets of a beautiful smile
Specifics of ironing shirts made from different fabrics
Before you begin the ironing process, you need to carefully study the label. Each type of fabric has its own temperature regime, which allows you to get rid of wrinkles without harming the material. You can see them in the following table.
Table - Ironing modes for shirts made from different types of fabrics
| Shirt material | Ironing temperature, °C | Additional recommendations |
| 100% cotton | 140-170 | — Wet steam; - strong pressure; - hydration |
| Crinkled cotton | 110 | — Without steam; - do not moisturize |
| Cotton with linen | 180-200 | — Regular steam; - strong pressure; - through a wet gauze cloth |
| Cotton with synthetics | 110 | — Weak steam |
| Linen | 180-200 | — Jet steaming; - strong pressure; - intense hydration |
| Silk | 70 | — Without steam; - do not moisturize |
| Chiffon | 60-80 | — Without steam; - light pressure; - do not moisturize, otherwise stains will appear |
| Polyester | 60-80 | — Weak steam; - light pressure so as not to melt the fibers |
| Viscose | 120 | — Weak steam; - from the inside out or through gauze |
| Woolen | 110-120 | — Strong steam; - light pressure; - through damp gauze |
| Knitted | 60-80 | — Steaming; — weak pressure; - from the inside out |
How to iron a long-sleeved shirt: instructions
Ironing a man's shirt is not as easy as it seems. Ironed in one place, the item begins to wrinkle in another. And the end result turns out to be far from ideal. If you want to bring something that has been lying in a closet or suitcase for a long time back to life, or want to iron a new shirt, step-by-step instructions will help you cope with the task.
Collar
- How to iron a shirt collar correctly? Place it with the wrong side facing you and iron it towards the edges.
- Turn the item over and iron the collar again, but from the edges to the center.
- Turn the collar inside out again, fold it back and press it, leaving a distance of 5 mm from the stand.
Sleeves
- The cuffs need to be ironed on both sides. Work towards the center to avoid creases.
- Place the sleeve seam side up. Iron well, being careful to avoid creases along the edges.
- Grab the collar with one hand and the cuff with the other. Turn the sleeve on its side. Iron again without creasing the edges.
- Fasten the buttons and iron the area where the straps join together well.
- How to iron a short sleeve shirt? It needs to be put on a narrow edge and ironed on all sides.
Yoke and shoulders
- Place the product on the narrow side of the board and straighten it out.
- Iron the shoulders and yoke well. The sole of the iron should be moved parallel to the collar.
- Carefully iron the armholes, as well as the junction of the collar with the fabric.
Back and shelves
- To iron shirt fronts, place the item so that the shoulder rests on the narrow side of the board.
- Iron the side with the buttons sewn on first. Using the tip of the iron, go over the space between them.
- Starting from the seam near the collar, gradually move the iron down.
- Move the item so that the side seam is on top. Iron it well.
- Continue moving the shirt in the same direction until the back is completely ironed.
- Lastly, the shelf with the loops is processed.
How to iron a shirt correctly: step-by-step instructions with photos
Want to know how to properly iron a shirt? We will tell you about this intricate process from scratch, so that the issue of ironing a shirt does not seem like something scary and voluminous.
- The first rule of ironing clothes is to read the label. It indicates at what temperature the product can be ironed (and whether it can be ironed at all), because some shirts made of synthetic fiber cannot be ironed at all (we’ll tell you what to do with them a little later).
Giving a shirt to a girl is the easiest way for many people to iron a shirt.
- The second rule of ironing a shirt is not to overdry the product until it becomes dry. When ironing shirts, place them slightly damp. If it’s already too dry, hang it on a hanger and spray it lightly with a spray bottle and let it hang for 10 minutes and only after that you can start ironing.
- The next step is to turn the shirt inside out. This is a mandatory rule for those who want to wear a shirt for a long time and not have iron marks on it.
- Select the temperature setting on the iron as indicated on the label. Please note that you may have several shirts and each will have a different temperature rating. You must select by degrees (indicated on the iron or in the instructions for it, as well as in brackets on the label under the iron icon itself).
- Inexperienced people often make the following mistake: the label indicates two points, they select the second setting on the iron and begin ironing. In this case, the probability that the temperature conditions will coincide in this case is 50/50. But are you willing to take the risk, especially if the shirt is expensive?
- If the shirt is not new and there is no tag, set the iron to the minimum setting and iron a small area from the bottom (which is tucked into the trousers); if it does not iron, increase the temperature by one setting. But if you feel that the iron is not sliding well, this means that the fabric is melting and you need to lower the temperature. After reducing the temperature, wait 1-2 minutes and only then continue ironing.
- Steam is an indispensable tool for ironing a shirt. Set the function on the iron, and if there is none, spray a little water on the shirt and iron it. When the iron comes into contact with water, the same steam is formed.
In hardware stores you often come across small ironing boards, which many mistakenly mistake for a tourist version of a full-fledged board. Everything is a little more complicated - this is a special device for ironing small parts and shirt sleeves in particular. Buy such an assistant, and you will understand how much it facilitates the process.
Now let’s move on to the actual action, how to properly iron a shirt:
- Turning the shirt inside out, pull out the sleeves and straighten the cuffs;
Damp shirt - quick ironing!
- First of all, iron the shirt cuffs;
- We move on to ironing the sleeves. Fold the sleeve so that the seam lies closer to you and smooth it with your hand in the direction opposite to the seam; when you smooth it out with your hand, you can iron it. This way, you will iron both sides at the same time without creating unnecessary folds or unevenness;
Iron the sleeves first
- Now let's move on to the outer side of the sleeve, which many leave with a fold; it doesn't look very nice. Therefore, we recommend ironing the sleeve, leaving 1 cm on the outside, after which you need to slightly move the top layer of fabric towards you so that the part that is not quite ironed is on top, and go over it again. If there is a stand for ironing sleeves, just iron on one side, scroll and iron on the other;

Carefully iron the areas near the buttons
- The next part is the front half of the shirt where the buttons are located. Iron carefully around each button and only then iron the main part. If you place the shirt on the edge of the board (it usually tapers), it will be easy to iron the area near the shoulder and sleeve. Otherwise, you can use the above-mentioned stand;
The edge of the ironing board is the ideal place to iron the top area of a shirt.
- Iron the other half of the shirt where the loops are. This half is ironed without problems;
- Turn the shirt over and place it so that the collar hangs slightly over the edge of the board and the sleeves and front off the sides of the board. Now iron the back, pull it in one direction, iron it in the other direction. 30 seconds and the back is ironed;
All you have to do is iron the collar and the shirt is ready!
- All that remains is to iron the collar. We iron it from the wrong side so that the iron marks are not visible, then we fold the collar along the fold, apply a thin fabric (to avoid the same iron marks) and smooth the corner between the stand and the turn-down part of the shirt.
In conclusion, it is worth adding how to store ironed shirts. Each shirt is hung on a separate hanger and fastened with all buttons. Hanging it in the closet, straightening it among things. This way you can iron shirts for the whole working week!
Ironing without iron: 4 ways
What to do if the electricity suddenly goes out and you need to iron your office suit? How can you look neat at work if your shirt is constantly wrinkled? After all, how do you put your clothes in order in a train car and get off the platform in perfect condition? There are four proven ways to iron a shirt without an iron at home and in “extreme” situations.
With wet hands
- Lay the product on the table so that all folds are visible.
- Wet your hands and move them across the fabric with a sharp movement, as if shaking it off.
- Shake vigorously.
- Hang on hangers and let dry. If you are in a hurry, you can dry the wet areas with a hairdryer.
Steam bath
- Hang the hanger with the item in the bathroom.
- Open the hot water.
- Close the bathroom door to allow the steam to smooth the item. This will take about 20 minutes.
On myself
- Spray the shirt completely or locally using a spray bottle.
- Put it on and dry it on yourself.
- Under the influence of body heat, the moisture will dry quickly enough and the fabric will take the desired shape.
Leveling solution
- Pour equal amounts of water, table vinegar and laundry softener into a spray bottle.
- Shake the bottle well and spray the liquid over the crumpled item.
- It is better to dry outdoors.
How to iron a shirt: men's and women's at home without an iron?
Ironing shirts without an iron at home is quite possible and does not require special training. To do this, the main thing is not to wrinkle the products when washing.
There is no need to perform a spin cycle and select a mode so that the automatic machine washes at low speeds. After washing, hang the wet shirt on hangers so that it stretches evenly.
Another simple way is to dry the product by putting it on yourself . To do this, put on the moistened product, carefully smoothing the sleeves.
It will take about half an hour to dry completely. This way the material will be completely smoothed out.
It is allowed to use hot water to steam fabric. You need to hang the product in the bathroom using hangers.
The hot water is turned on, the stream is directed upward towards the wall . After five minutes, the shirt is put on the body. After 15 minutes she is ready to go.
These methods are, of course, simpler, but the wrinkled surface still remains. Methods that require the use of an iron produce better ironing results.
New technologies, or Iron - yesterday
Not so long ago, irons that produced steam and sprayed water seemed like a miracle of technology. Today, such a device will not surprise anyone. In addition, ironing a shirt that is difficult to iron is not so easy with a regular iron. New achievements of technological progress are coming to the aid of housewives. Take a closer look at the next three.
- Steam generator. Both in form and in essence the device is quite close to an iron. The main difference is that it continuously delivers a powerful stream of dry steam. The steam generator smooths out even heavily wrinkled items.
- Steamer. The action is based on an intense stream of hot steam, which removes wrinkles, makes the item look fresher, disinfects and removes odors from the fabric. The main advantage is that you can iron clothes in a vertical position, without an ironing board. But a steamer cannot be considered a complete alternative to an iron, because in the instructions for use you can find restrictions on types of fabric.
- Steam manken. An inflatable mannequin shaped like a human torso. It quickly dries and smooths shirts, jackets, and sweaters. The device is intended for professional use and therefore cannot be found in the public domain.