The gel polish in the lamp does not dry when using counterfeit/low-quality materials, lighting equipment with low power or faulty elements, or when the lamp is heavily soiled. Professionals recommend first of all paying attention to the quality of gel polishes, especially since there is a list of materials that most often add difficulty to drying in a lamp - Noname, Lianail, Bluesky and others.
Any problems with poor drying of gel polish in a lamp can be solved: change the manufacturer of the materials, provide them with the correct storage conditions, use only powerful lamps, and so on.
Lamp dirty
Clean instruments are not only the calling card of the master and ensuring sterile conditions. A dirty lamp may cause the polymerization effect to weaken.
Therefore, it is necessary to wipe the lamp daily with the following liquids:
- Liquid for removing the sticky layer with medium dirt;
- Liquid for removing gel polish in case of increased contamination.
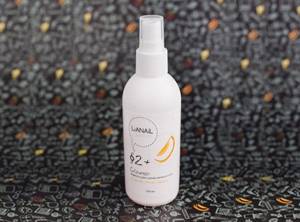
Liquid for removing sticky layer
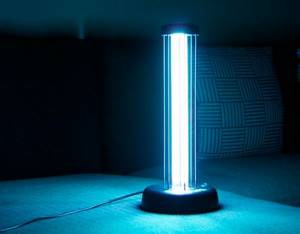
Quartz lamp, what is it
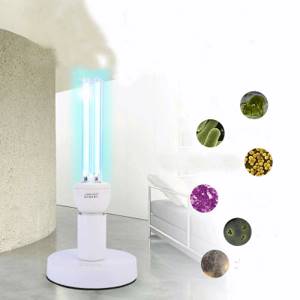
The quartz lamp was created to destroy pathogenic bacteria indoors. It looks like a flask with quartz coating, in the middle of which there is mercury and an inert gas. During operation, the lamp emits ultraviolet light, which disinfects the air in the room. Moderate ultraviolet exposure is also beneficial for human health.
Benefits of a quartz lamp in the home:
- The main feature of the lamp is its bactericidal properties. The ultraviolet light emitted by a quartz lamp is capable of destroying pathogenic viruses and bacteria.
- It is recommended to use a quartz lamp to prevent colds. If there is a sick person in the house, it is recommended to use a lamp to disinfect the air in all rooms. This will reduce the risk of infection in healthy people.
- Chronic bronchitis, sinusitis or runny nose are also indications for using a quartz lamp at home.
- Experts say that ultraviolet light can treat ear diseases, such as otitis media.
- Skin diseases such as eczema, acne, psoriasis are effectively treated with a quartz lamp.
- For stomatitis or toothache, it is also recommended to use ultraviolet light.
- A quartz lamp allows you to accelerate the synthesis of vitamin D, which is responsible for the absorption of phosphorus and calcium from food. This is a good prevention of musculoskeletal diseases. Quartzing is especially useful when there are small children in the house. This will prevent the development of rickets.
- A quartz lamp will be useful in a house where pets live.
So, it is recommended to have a quartz lamp in every home to be healthy and beautiful.
The lamp is not suitable for gel polish type
Most often, the type of drying lamp is indicated by a special marking on the varnish jar (UV for ultraviolet, LED for LED lamp). The latest generation of gel coatings produces varnishes that can polymerize in both types of lamps.
If the method of polymerization of the varnish is not indicated, then when purchasing a product you should ask the seller about this.
Important! In LED lamps, LEDs do not burn out and do not lose their power, therefore, if the selected coating does not require the use of a UV lamp, it is better to give preference to an LED lamp.
Advantages and disadvantages of using a tanning lamp at home
Tanning lamps at home make it possible to get a beautiful skin tone year-round, not to depend on the opening hours of beauty salons and not to pay quite impressive sums for each visit to the solarium. But the use of such equipment must be in strict accordance with the instructions and only after medical examinations - the procedure has both advantages and distinct disadvantages.
| Benefits of using tanning lamps at home | Flaws |
| Can be used year-round, maintaining a bronze skin tone in all seasons | Frequent exposure to ultraviolet rays can cause age spots to appear. |
| The tan appears quickly, the procedure takes just a few minutes | Staying under a lamp for a long time (and we're not talking about hours!) can cause burns |
| At the same time, the immune system is strengthened and overall well-being improves | There are categorical contraindications for certain diseases |
Despite the fact that both sunlight and artificial rays from a lamp lead to tanning, they have different effects on the skin and the human body as a whole.
| Sun rays | Artificial ultraviolet |
| Given to a person absolutely free | Get a tan without leaving home |
| The tan is more uniform because it is acquired while moving. | You can get the desired skin tone much faster - literally in 2-3 procedures |
| Low Power UV Power | The dose of ultraviolet radiation is very high |
| You can get them only “by the grace of nature” and in clearly designated seasons | It is possible to control the radiation intensity |
| There is no way to control the intensity of the impact | Makes it difficult to get a completely even tan |
| To get a beautiful tan, you need to spend a lot of time sunbathing. | The operation of the lamp does not depend on weather conditions and seasons |
Principle of operation
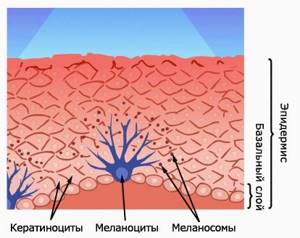
Lamps for tanning at home emit two types of ultraviolet rays - medium wave (B) and long wave (A). They freely penetrate into the shallow layers of the dermis and affect melanocyte cells - they produce melanin, which is the coloring pigment for the skin. Under direct ultraviolet rays, the activity of melanocyte functionality increases significantly, and the epidermis acquires a bronze or dark color.
The rays of lamps intended for tanning are as gentle as possible, and if you follow the instructions for using the equipment, there is no risk of getting burns.
Home lamp designs
A home lamp that emits ultraviolet rays is a sealed flask containing an inert gas. It definitely contains mercury impurities. As soon as the lamp is connected to the electrical network, a discharge is formed - it heats the inert gas and mercury. The latter just has the ability to emit ultraviolet rays.
If the lamps are industrially produced, then the presence of mercury in the flasks does not have a harmful effect on human health. The only clarification: such safety is confirmed only in the case of competent, strictly according to the instructions, use of tanning equipment at home.

The varnish has expired
Do not neglect the expiration date indicated at the bottom of the bottle or on the label. As a rule, the shelf life of varnish is from 1 to 3 years from the moment the bottle is opened.
Important! Often the varnish can simply stagnate or become thick if it is not used for a long time, which also makes it take a long time to dry. In this case, you should first check whether its expiration date has expired, and then “reanimate” it by rolling it in your palms. It is not recommended to shake this varnish.
All gel polishes have a limited shelf life
What kind of tanning lamp can be used at home?
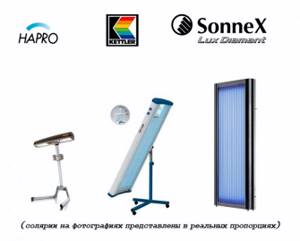
A tanning lamp at home can be small or large in size, consist of one or more bulbs, and be table-top or floor-standing.
| Type of tanning lamp at home | What is | Brief characteristics, price | Photo |
| Tabletop or hanging | They are a frame-type housing measuring 40-80 cm with built-in lamps that emit ultraviolet rays. Depending on the specific model, the number of lamps can vary from 1 to 6 pieces | They are used to tan the face, neck and décolleté; they are rarely used to “irradiate” the hands. They are characterized by high power. Examples of such lamps: · PHILIPS HB 179/01 - about 2000 rubles; · "Sun OUFK-03" - within 4000-4300 rubles; · Summer Glow HB175 - 15-18 thousand rubles. | |
| Tripod-mounted, floor-mounted | 2-7 lamps emitting ultraviolet rays can be installed in the frame of the housing. The tripod is usually foldable, which allows you to adjust the height of the rays | They allow you to “cover” your entire body with a tan; a person can carry out the procedure while lying down or standing. Examples of such lamps: · Hapro Mobile Sun HP 8540 – about 100-110 thousand rubles; · Innergize 8550 – 90-127 thousand rubles, depending on the configuration. |
UV lamp
The designs of ultraviolet lamps are the same, but the contents of the sealed bulbs may be different, so not everyone is approved for use for tanning at home.
For such targeted/targeted use, erythema lamps are optimally suited - in the flask, a mixture of inert gas and mercury is enriched with specific elements that only transmit long-wave ultraviolet rays “outside” - they are safe for the human body.
An ultraviolet lamp, in addition to a beautiful tan, has a positive effect on the entire body as a whole:
- strengthens/increases immunity;
- stimulates vitamin D synthesis;
- helps get rid of acne, seborrhea, psoriasis (at least the severity of symptoms becomes much less);
- accelerates recovery from tuberculosis if drug therapy is carried out in parallel;
- promotes rapid recovery after fractures.

Is it possible to sunbathe under quartz?
Sunbathing under a quartz lamp is strictly prohibited; when such equipment is operating, all people must leave the room. And such precautions are associated with the formation of ozone, a powerful oxidizing agent that has a bactericidal effect.
It appears in the air due to the addition of the quartz element to a flask with an inert gas and mercury. Ozone is very harmful to the skin and can provoke the rapid development of cancer.
Quartz is capable of transmitting ultraviolet C rays, which are simply absent in other tanning lamps, in solariums and in sunlight - in the latter case, our planet is protected from them by the ozone layer.
Quartz lamp has a bactericidal effect
"Sun"
The “Sun” ultraviolet lamp is considered a mini-solarium and is used not only to obtain a beautiful tan. The initial purpose of this equipment is to provide therapy for diseases of the dermis, bone tissue, and chronic pathologies of the respiratory system. They are installed not only in beauty salons, but also in clinical hospitals.
The “Sun” lamp is a small design that allows you to irradiate individual parts of the body and the face, neck, and décolleté area. It must be used according to the instructions, because even a slight excess of a single “dosage” can lead to burns and the development of benign and malignant formations on the skin.
For tanning your face
For facial tanning, designs with one lamp, tabletop and low power are used. Of course, you can move such lamps and expose your limbs, torso, décolleté, and buttocks for tanning. But the problem is that you won’t be able to get an even tan using this method, even if the time and frequency of the procedure are strictly observed.
There are lamps for tanning the face, consisting of 4 bulbs and a slightly convex shape. They are more convenient to use because the skin is exposed to “volumetric” ultraviolet rays.

Mini solarium VES SL 10
The VES SL 10 model remains a popular model of mini-solariums for home use. It has the following quality characteristics:
- 4 flasks in frame;
- equipped with a timer – maximum 30 minutes;
- has certification;
- power – 80 W;
- emits UVA rays - the softest known ultraviolet rays.
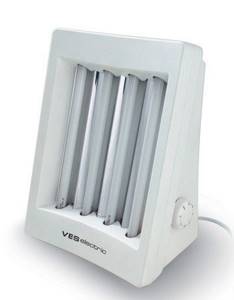
Mini-solarium VES SL 10
The mini-solarium is very easy to use, just spend 5 minutes a day with it and the result will be a beautiful bronze tan. And the specified time is not the initial time!
Optimal choice
To make the best choice according to the desires/needs of a particular person, you need to consider the following characteristics of tanning lamps at home:
- Purpose of the equipment. It must be stated that the lamp can be used for cosmetic purposes when the main purpose is to obtain a tan. Quartz lamps are not suitable for this use.
- Impact area. For home use, it is better to use mini-solariums, when you can sunbathe in parts - face/neck/décolleté, arms and chest, legs and buttocks, and so on. For floor lamps consisting of several powerful bulbs, you will need a separate room; in most cases, this is impossible to organize in a standard apartment.
- Radiation power. The higher this parameter, the faster the skin acquires the desired shade of tan. But this same indicator also affects the cost of equipment - the higher, the more expensive.
- Presence of a timer included. It is not available in every model, although it is this additional element that allows you to clearly control the irradiation time.
- Manufacturer. You need to purchase mini-solariums only from well-known companies that guarantee the safe operation of such equipment.
Improper storage of varnish
This product is especially sensitive to light, so for proper storage of gel polish you must follow the following rules:
- Always close the bottle of varnish to avoid the harmful effects of both UV lamps and sunlight. Exposure to light may cause changes in the structure of the product. This is why most manufacturers produce varnishes in dark bottles;
- Do a manicure in artificial light to protect the polish from the harmful effects of daylight;
- Store varnishes in dark places;
- Avoid temperature changes. Store the varnish in a place that guarantees a constant temperature of 26 degrees. If the temperature regime is violated, the life of the varnish is significantly reduced.
In addition, gel polish does not like shaking. When shaken, air bubbles form in the bottle, which cause poor surface quality.
Why does gel polish chip off at the ends?
Quite often, customers complain about chipping of the coating in the end zone. It looks sloppy and the manicure has to be redone from scratch. There may be several reasons. The main one is the individual characteristics of the plate. The material does not adhere well to soft and flexible nails - ideally, it will take a maximum of two weeks until it starts to chip. In this case, the best option is acrylic or gel extensions. Cracks can also form due to improper treatment of the nail plate at the stage of hygienic manicure. The master must remove all irregularities with a file and apply the base to the buffed surface. When applying the coating, be sure to seal the ends, and only then place your nails in the lamp.
Incorrect nail treatment
Often masters violate the procedure for preparing the nail plate for manicure, which leads to the fact that the gel polish does not dry in the lamp.
The procedure for treating the nail is as follows:
- Treat your nails with a buff, which will create a rough surface for applying polish. Treating a nail with a polisher is a big mistake, since a too smooth surface of the nail plate prevents the uniform application of the varnish and, therefore, makes it difficult to polymerize;
- Apply cuticle oil after applying nail polish. Gel polish requires a dry and slightly rough surface. Cuticle oil makes the nail greasy, which creates an extra layer between the polish and the nail.
Why gel polish does not dry in a lamp: errors in technology
Most often, gel polish does not dry in the lamp due to improper manicure performance (improper positioning of the hand in the lamp, a thick layer of coating, residual stickiness, etc.), problems arise among newcomers to the nail industry, because the masters are well aware of the possible provoking factors.
The hand is positioned incorrectly in the lamp

If the gel polish does not dry completely in the lamp, then you should pay attention to the position of your hand - the best option would be to dry each nail separately, but this takes too much time. Professionals carry out the drying stage of each layer taking into account the following points:
- Dry only the thumb separately;
- It’s better to place everything else in a lamp in groups of 2;
- Nails are placed to dry in the center of the light fixture;
- All fingers (except the thumbs) can be placed simultaneously in the lamp to “dry”.
And you need to make sure that your fingers are positioned inside the lamp, tightly adhering to the hard surface - even a slight misalignment can cause the gel polish to slip and not dry enough.
Too thick layer of gel polish
Each layer of coating should be thin, and novice artists try to hide imperfections in the treatment of the nail plate with a thicker layer. If there is too much gel polish on the nail, even the most powerful lamp will not be able to dry such a layer. Professionals recommend not to rush, but to apply 3-4 layers and dry each thoroughly.
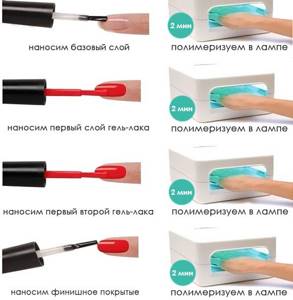
An example of correct application of gel polish
Residual sticky layer
Often, beginning craftsmen complain that the top layer of gel polish, even after prolonged drying in a lamp, remains soft and pliable, although the overall polymerization of the decorative coating has taken place. This is how residual stickiness manifests itself - this phenomenon occurs often, and is corrected with a special liquid. But professionals warn that you need to use a cleaner for this manipulation, and not replace it with medical alcohol, acetone or nail polish remover.
If the general technology for performing a manicure with gel polish has been fully followed, but the top layer remains soft after drying, then you just need to moisten a cotton pad in a cleanser and wipe each nail plate - the coating will be perfect.
In addition to the reasons listed, you need to pay attention to the choice of gel polishes - there is an anti-rating for those that are difficult to dry in a lamp, even with the correct application of layers and ideal preliminary preparation of the nail plate.
Examples of bad varnishes
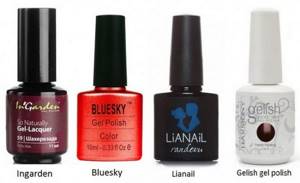
The most problematic gel polishes with regard to drying include:
- Noname made in China. Their popularity is due to their low cost, and even many buyers receive positive reviews about the quality of such products. But you need to understand that China produces counterfeits of well-known manufacturers and is unlikely to comply with technological processes during the manufacture of products. The result can be completely unpredictable; often the gel polish spreads, practically does not polymerize, and becomes covered with cracks.
- Gelish gel polish is a decorative coating from an American brand. In general, this material is famous for its high quality characteristics, but it also has disadvantages. For example, sometimes there are complaints from professionals that the first layer of this gel polish “curls” a little when drying, even if a branded base coat was previously applied.
And one more nuance regarding this brand of gel polish - the white color of the coating polymerizes very poorly, so you have to significantly increase the drying time in the lamp. It’s interesting that other shades of gel polishes “behave” absolutely adequately.
- Lianail is a well-known brand, its popularity at one time was simply incredible, because the quality-to-price ratio of gel polishes was simply ideal. Over time, complaints began to be received that when applying the next layer, the brush began to get dirty with the previous one, and the last one “stretched” behind the lint.
Even experienced craftsmen reported this, but a priori they could not disrupt the technology of drying gel polish in a lamp. Afterwards, professionals adapted to solve this problem by increasing the drying time of each decorative layer in the lamp.
- Ingarden - the range of gel polishes from this manufacturer is simply huge; the line always includes the most popular shades. But users often complain that when removing a sticky layer and applying a subsequent one, the previous one may shift. The solution to the problem is simple - you need to increase the drying time for each layer of decorative coating to 2 minutes. This, of course, prolongs the time of manicure, but it turns out to be of very high quality.
- Bluesky is a well-known brand, but with one caveat: light shades take much longer to dry than dark ones. In general, it is believed that the materials from this manufacturer will be easiest to use for professionals who can properly dry gel polish in a lamp with ultraviolet light.
Wrong varnish
Today, the Internet is replete with offers from various brands of gel polishes in different price categories. In this variety, it is easy to make a mistake and buy a poor quality gel polish base that does not dry even if all the rules are strictly followed. Therefore, before choosing gel polish, you should carefully study customer reviews of the product, as well as the reputation of the manufacturer itself.
You should also not skimp on materials and tools for manicure. When choosing them, it is best to rely on the quality of the product. Good quality materials make the master’s work easier, and compliance with the above conditions not only improves polymerization, but also guarantees a longer manicure.
Rules for using the lamp
New generation devices have a simple interface and are as easy as possible to use. Some models are equipped with a digital display that displays a timer, as well as motion sensors. All UV lamps are subject to basic rules for handling electrical equipment. They should not be dropped, impacted, damaged or touched with wet hands. The inside of the lamp must be cleaned with a solvent - solid drops of gel polish can interfere with the normal operation of the device. With careful use, it will serve you for several years without breakdowns or repairs. Follow a number of simple recommendations.
- Please read the instructions first. It may differ from one manufacturer to another. Often it is written in a foreign language, and masters ignore it. It’s better to play it safe and translate it using an online translator or look for the Russian version on online shopping sites. This way you can avoid the most common usage mistakes. Before each use, cover the lamp with a clean cloth.
- Polymerization in modern devices takes from 30 to 60 seconds. If the client keeps his hands in the lamp for more than this time, it is advisable to moisturize them with a special cream with UV protection. This way you will 100% protect your delicate and sensitive skin from large doses of ultraviolet radiation.
- Do not exceed the recommended duration of the procedure. You can find out about its completion using a timer - if not a built-in one, then use your own. For example, before each drying, set the required number of seconds on your smartphone.
- Nothing lasts forever in the world of electrical equipment - especially when it comes to light bulbs in a UV device. With daily use, they need to be changed approximately every six months. If you are not a manicurist and use the lamp once every few weeks, the bulbs will last much longer - about two years.
- Not only the lamp, but also the rest of the equipment should be professional. Cleanliness in the workplace plays an important role - one of the most common causes of gel polish peeling is dust getting under the coating. You can get rid of tiny nail particles using a manicure vacuum cleaner. It will also provide comfort during the procedure and protect your lungs. To make your manicure durable and beautiful, you need to use high-quality tools at all stages - from cleaning to applying the product. Hardware manicure devices will help you clean the plate from cuticles and dry skin, as well as remove the old coating without harm. Choose your supplies carefully. Pay special attention to cosmetics - bases, bonders, primers, gel polishes and top coats.
Rich shade of varnish
If you encounter a problem where the gel polish becomes soft after drying, read the instructions for the device. The existing power may not be suitable for drying polygel or gel material.
Pay attention to the drying time of the product; it is better to increase the reduced time until complete polymerization.
Long manicure procedure
Caring for your hands takes time. It’s very disappointing when it goes to waste just because the manicure needs to be started all over again, because the nails look untidy, bubbles have appeared on them, the design is blurred, and the decorative coating is uneven.
All this can happen if the technology for carrying out the procedure is broken, or if it was completed in a hurry. How long does it take for nail polish to dry and is it possible to speed up the process, for which - for some reason - you always lack patience?
Content:
Why does regular varnish take a long time to dry?
- The composition contains less fixative than required, that is, the quality is not very high;
- The technology for painting the nails was violated - they were not degreased first;
- The varnish layer is very thick;
- The cosmetic product has expired or was stored incorrectly.
What can I do to speed up the drying process?
Before applying the coating, just wash your hands with soap and dry, the varnish will dry faster.
It is better to apply the varnish with a thick brush with short bristles, in several thin layers. After applying each one, you need to wait for it to harden.
A few minutes after applying the coating and setting the last layer, apply a layer of any vegetable oil to the nails or dip your fingertips in a container of cold water. You can also hold your fingers under running cold water, but the pressure may smear the coating.
Can regular varnish dry in a UV lamp?
Yes, if its design is equipped with a fan. You can even do without ultraviolet radiation if you have a fan - cooling with a flow of cool air will help the coating harden faster.
Just don’t flap your hands like wings or direct a stream of warm air from a hairdryer onto your nails. This causes the varnish to flow, soften, and bubbles appear on it.
What else can you do if the varnish does not dry? Buy a special product that speeds up the drying of the varnish. This could be a special varnish or spray, some kind of fixative.
A responsible approach to choosing varnish is required: do not buy cheap products and discard tubes in which the coloring composition begins to thicken.
Gel polish is now often used to cover nails. Typically, such a coating is dried using a special lamp. But it also happens that you have purchased a lamp, but your nails remain sticky, and it is almost impossible to achieve an even manicure.
Why doesn't gel polish dry in a lamp?
There are different types of coatings of this type. The lamp is needed only for photosensitive species. But some types of gels will dry only when it is applied to a special dispersed layer.
If this layer is not applied, you can keep your fingertips in the lamp for a long time, but the gel will remain sticky. It is polarized from the inside, and the top layer of varnish will not stop sticking. In this case, you need to purchase a special liquid to remove the sticky layer and remove it. A hard nail will remain.
As you can see, it is impossible to do without visiting a cosmetics store. What you will have to purchase: a dispersed layer that ensures reliable drying from the inside, or a catalyst coating. The catalyst is sold packaged in tubes or as a spray. Its main component is cyanoacrylate.
In some cases, the coating has smudged because the lamp is not powerful enough. For example, in a 9 W UV lamp, you need to hold your fingertips for at least 2 minutes, and in a 36 W lamp - only 30 seconds.
There are also gel polishes that dry without a lamp.
These, as already mentioned, are products that require a catalyst to harden, and the newest gels - for them it is enough to use cold water as a fixative.
How long does it take for gel polish to dry in cold water, without a lamp?
If it is applied correctly - that is, by degreasing the nails and using a thin layer - then a maximum of 7 minutes. Do not dry the coating under a running stream. You need to pour water into a container, throw in a few ice cubes, and carefully dip your fingertips into the liquid.
Acrylic varnish is considered one of the most harmless decorative coatings.
It protects the nail plates from adverse external influences, they stop breaking and flake less. This effect of acrylic can be verified in practice. But!!!
Despite the fact that this product does not contain toluene and formaldehyde, the protection is only mechanical and is carried out due to the properties of the synthetic coating - acrylic does not have any healing effects.
Your nails will look healthy, but they will not become healthier. When the decorative coating has to be removed, they will return to their previous state and even their quality may deteriorate - the varnish tightly covers the nail plate, blocking air access.
How long does acrylic varnish take to dry? Quite fast if used correctly.
Nails should be degreased by washing your hands with soap or wiping with a special substance before manicure.
The acrylic mass is applied to the nails as follows:
- first, the brush is dipped in a special liquid called liquid and squeezed out thoroughly;
- then a ball of acrylic powder is applied to the end of the brush;
- when it is soaked, the mixture is applied to the nails in a thin layer;
- wait until the layer hardens;
- all irregularities are sanded with a special file, over the frozen layer;
- apply the 2nd thin layer in the same way - and that’s enough.
You can apply decorative varnish to acrylic - just then dry it naturally, or paint with it.
The only inconvenience of a manicure with acrylic is that the coating requires adjustment as the nail plate grows.
A special fixative will help speed up the drying of any varnish - it is also called top varnish. This final layer is applied after finishing the manicure in 2-3 minutes; it fixes the top layer and allows the bottom layer to set well. In some cases, it has an adverse effect on the main decorative coating: the color quickly fades, the surface cracks.
A manicure will last a long time if done correctly: choose only high-quality varnishes, and purchase the necessary fixatives of the same brand along with the varnishes.
mjusli.ru