Among the trendy shades of manicure, the leading positions are still occupied by expressive and rich tones. Such colors are clearly visible on nails, focus attention on the hands, and allow you to create dozens of interesting nail art with sparkles, stucco, rhinestones, glitter and other decor.
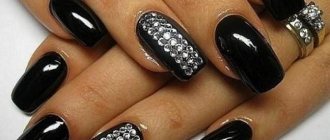
Black manicure has always aroused interest among girls. The deep and rich color gives its owner mysterious and exciting notes, allowing her to stand out among pastel nail art. When it comes to combining black with shiny decor, there are a huge number of options. We invite you to take a closer look at the current ideas for black manicure with sparkles and other iridescent decor.
Matt lacquer
You can turn an ordinary glossy varnish into a matte varnish. Using cornstarch you can easily do this. Thus, the matte varnish you receive will become several tones lighter.
To achieve this effect, mix a few drops of varnish with starch. About a teaspoon is enough for the last component. Apply the mixture to the nail area. It should be noted that after complete drying you will get a pleasant shade of matte texture.
You can achieve the same shade using ordinary powder. You can also use matte texture shadows.
You need to change the varnish yourself. Simply add some loose powder to the area of the bottle. Rolling the paper using the funnel method will prevent the powder from spilling past the bottle area.
You can add a few balls to the bottle. This way you mix the bottle much better. A matte effect is obtained by combining light, loose powder with colorless varnish.
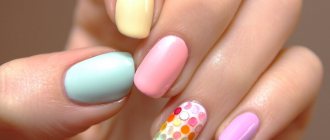
#6 Manicure ideas for short nails in minimalist style 2020
Minimalism design is a favorite of 2020. Girls are already bored with complex nail art with an unimaginable amount of rhinestones and broths. The trend is nail art with abstract patterns: portraits, inscriptions, haze, etc. When implementing a minimalist design, a stamping kit will come in handy. It will help you quickly make a print and fill it with different shades of gel polish or glitter.
The minimalist style is dominated by muted tones such as light brown, gray, translucent black or white. Matte textures with glossy decor or glitter look great.
Nacre
To make glitter polish, add glitter to the bottle. Apply this mixture to your nails. Often, in order to make your manicure more beautiful and original, you should sprinkle the tips of your nails with glitter. Finally, coat the surface with clear varnish to strengthen it and further preserve its attractive appearance.
To add pearl to your nails, use the master class on how to make a manicure at home. To do this, you can simply add eye shadow.
To do this, you need to grind the shadows. To do this, you can crush them in a bowl with any hard object. After such manipulations, they should turn into a fine powder. This way the varnish coating will be uniform. The powder should be added directly to the varnish.
You can also make the polish the same color as the eyeshadow you are using. To do this you need to take a transparent varnish. To complement the look, you can get a manicure that matches your makeup color.
Using the applicator, crush the shadow and apply it to wet nails. Then blow off the excess and use clear varnish to secure the base.
Current manicure colors for short nails in 2020
When you visit a manicurist, your eyes widen at the variety of shades and tones. It’s unlikely that you’ll be able to try all the shades on your nails, there are so many of them, so we’ll highlight a few favorites that deserve your attention.
Trending new products for 2020 include:
- light colors - white, milky, dusty pink, blue, turquoise, gray, etc.
- dark shades - indigo, rich black, burgundy with sparkles, cinnamon and others
- chameleon polishes
- cat eye polishes
As for short nails, you need to choose shades for them with caution. Despite the versatility of most gel polish tones, many of them can ruin the design of short nails. These shades include neon tones, too light, barely noticeable shades, and translucent textures.
Making a new varnish
Follow the instructions on how to make nail polish at home. It’s worth starting by choosing two varnishes that match each other. Then you should pour them into one jar.
Many people use one secret on how to make varnish thinner or thicker. You can also put one polish on top of another. While you go about your business, the varnish will mix naturally. After completing the procedure, mix and shake the bottle vigorously. With simple steps you will prepare a completely new varnish.
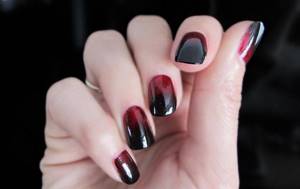
By gradually darkening you will get an attractive ombre effect. This effect is quite popular today. The positive thing is that such a varnish can be made independently.
Glowing polish
To achieve this effect, you should combine an acrylic helmet and varnish. Thus, fluorescent acrylic paint can be purchased at a regular office supply store. For these purposes, also use a helium pen.
To get the best shine, use a clear base coat. It is often applied to the top of colored varnish. Also, the fluorescent substance goes well with any color. It is best to use white. To achieve this effect, you can use a light-emitting stick. One stick is quite enough for these purposes. The main thing is to use one important condition - a combination of both colors.
To make such a varnish, you should stretch the stick well over its entire surface. This applies in particular if it is made in the form of a necklace or a special bracelet. To do this, cut off one end with scissors. Next, you should cut off the tip of the stick into the area of the bottle. Gradually squeeze the contents from the stick into the inside of the bottle. Then you need to apply nail polish.
It is worth remembering that when making varnish in this way, such an effect will only last for several hours. To prolong the desired effect, coat the varnish with a transparent base.
To prepare the varnish, you should start preparing the materials necessary for this. You need a water-based clear coat. Use the polish you already have. It is best to use a bottle purchased at a pharmacy.
Also for the process you will need a brush and eye shadow. You should use food coloring of the color that you like best.
Also prepare henna and white clay. The main advantage of making your own varnish is that all the ingredients are natural, readily available, and have a low cost. You can also add olive oil to all of the above ingredients. The use of such varnish can be considered a healing procedure for nails.
Photo of DIY nail polish
We've collected 30 tricks and tips for girls who love to take care of their nails on their own. How to dry your manicure quickly? How to make varnish? How to carefully draw a French jacket? About this and more - in our article.
We erase the varnish carefully
To prevent the skin around your nails from looking like you killed someone or were poking around somewhere after removing red or other bright polish, apply a rich cream to your hands before the procedure.
Removing polish residue from leather
If you did not use the previous advice and the skin around your nails is stained, tape will help remove stains. Adhesive tape is great for collecting polish residue, especially silver.
We erase the varnish quickly
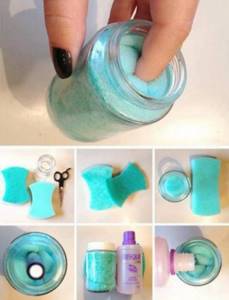
In the manicure departments of cosmetic stores they sell various products for quickly removing nail polish. They are bubbles with a sponge soaked in cleaning liquids. You don't need to run the cotton wool over your nails: just dip your nail into the bottle and wait a little.
You can make this product yourself. Take a small glass jar, place a sponge cut to size in it and soak it in nail polish remover. The principle of operation is the same.
Removing glitter polish
Soak cotton pads in nail polish remover, apply them to your nails, and wrap each finger in foil. After 10 minutes, the polish will come off easily, despite the glitter.
Whiten nails
Sometimes colored polish is absorbed into the nail plate, leaving behind an unsightly yellow discoloration. You can get rid of it with whitening toothpaste. Take an old brush and brush your nails with it.
But to prevent such incidents from happening at all, do not forget to use a base coat before applying the main varnish.
Saving a broken nail
You will need a tea bag and clear nail polish. Apply the latter to the damaged nail, and then place a patch cut from a tea bag over the crack. Re-coat the nail with clear polish.
We store varnishes conveniently
If you store your polishes in an opaque box, label the caps with the appropriate shades. This way you don't have to take out all the vials to find what you need.
We make varnishes ourselves
If you have few varnishes or cannot find the desired shade in the store, you can make what you want yourself. You will need clear varnish and mineral shadows. They dissolve perfectly in varnish, and you can adjust the color saturation.
You can also add various glitters to your homemade varnish.
Opening a bottle of nail polish is easy
If the varnish cap is glossy, tightly screwed and does not give way, rubber bands will help to cope with the problem. By wrapping them around the lid, you will get the desired grip and easily open the varnish.
Extending the life of manicure
If you want the varnish to last longer, before applying it and applying the base, the nail plate must be thoroughly degreased. To do this, wipe your nails with a cotton swab dipped in white wine vinegar.
Painting your nails correctly
Creating an even coating
One thick layer will never lie as smoothly and neatly as several thin layers. Just be patient: let each layer dry.
Making a matte finish
Matte varnishes have been very popular lately. But if you don't have one, then just mix light loose powder with a clear polish. In this case, you should mix as shown in tip No. 8.
Making the varnish brighter
Many girls know that if you apply shadows to the base, they go on more evenly and the color turns out more saturated. It's the same with varnishes.
If your colored nail polish looks faded, use a white matte polish as a base. You will get a bright manicure and will be able to avoid multi-layer application.
Apply glitter correctly
This video shows how to apply polish with large glitter so that it adheres well to the nail and does not bulge.
Protecting your skin
Applying stamping or gradient to your nails can seriously stain the skin around you. We have already written that in this case, a special latex varnish will save you. But if you don’t have one, use PVA glue: it also forms an easily removable film.
Eliminate manicure defects
Painting your nails without staining the skin around them, especially on your right hand, is quite difficult. But it doesn't matter if this happened.
Take a thin brush, soak it in nail polish remover and erase the blemishes. Unlike a cotton swab, the brush does not cling to the polish and does not leave lint.
Drawing patterns on nails
If your eyeliner has dried out or simply doesn't suit you, don't rush to throw it away. Her excellent elastic brush - as a rule, this is exactly what is there - can be used in nail design to draw fine lines.
Some girls even use ordinary stationery markers for nail art.
Create an animal print on your nails
If you cut the eraser on a pencil like this, you get a homemade stamp: dip it in black polish and make leopard print designs on your nails.
Making blanks for nail art
Apply silver polish to the clear backing and let it dry. From the resulting film you can cut blanks for nail design.
Making sliders for design
The principle is the same as in the previous case. Only here you need to make a film of transparent varnish and apply drawings on it. For example, using dots.
Replacing dots
A dot is a stick with a metal ball at the end. With it you can create various designs on your nails.
If you don't have a dots, use available tools. For example, safety pins, toothpicks, empty ballpoint pens, and so on.
Doing a French manicure
French manicure looks feminine and suits almost any occasion and outfit. But not everyone can draw a smile line for a French jacket. The video shows several ways to do this carefully.
In addition, you can highlight the tips of your nails using a regular rubber band.
Just pull it around your finger and apply white polish. This is a budget alternative to special vinyl stencils.
Masking the unevenness of the jacket
If, despite all the tricks, you cannot get even stripes, you can use a trick. Draw a line under the white part with glitter varnish. Glitter will hide flaws, and you will get an original design.
Making stencils from electrical tape
This irreplaceable item in the household can also be used in nail art. For example, for the same drawing of a French jacket.
Insulating tape also makes excellent stencils, which, unlike adhesive tape, do not stick tightly and do not peel off dried varnish.
Dry your nails quickly
If you don't have a special drying product and you're in a hurry, soak your fingers in cold water for a few minutes. This way the varnish will set much faster.
Protecting dry varnish
To protect freshly painted nails from small lint and dust, add a drop of cuticle oil on top.
Saving manicure
If you have smeared the manicure you just did, do not rush to wash everything off. Just wet your finger with water and gently rub the damaged area. The varnish has not yet hardened and will easily return to the desired position.
Shake the varnish correctly
What do you do before opening a bottle of nail polish? Do you shake it well to make it less stringy? Great! Just do it right: place the bottle between your palms and roll it around.
If you shake and turn the varnish over, it may bubble up when applied.
Saving thickened varnish
Has your favorite polish started to thicken and doesn’t fit well on your nails? Place it in the refrigerator for 10-15 minutes and then shake well.
If you are tired of your old nail polish, or just want something new and unusual, then try making an original cosmetic product at home.
How to determine if a black manicure is for you?
Black color is a classic. It is ideal in clothes, but when it comes to nails, such coloring requires special attention and adherence to certain rules.
Firstly, the optimal shape for a manicure is short square nails, since it looks vulgar on long rounded or pointed nails and it is impossible to achieve the desired effect. If your nails are square-shaped and have not grown long enough, consider yourself lucky. You can give yourself such a manicure without any doubt.
Secondly, if you have beautiful night-colored hair, then willy-nilly you will have to give up using dark hairspray, giving preference to another color, for example, scarlet or burgundy. Because a black one will look vulgar and overly gothic. Black nail polish is best suited for girls with brown hair, red hair, light brown hair and blondes.
Thirdly, if you have a short haircut, but you are not trying to give the impression of a rock girl or give your image too much insolence, then the option of black hairspray is out of the question.
How can you make nail polish at home?
How to make homemade nail polish? The most interesting methods are described below.
Production of colored varnishes
If you like bright colors and you have a clear, white or discreet pale varnish, then add some color to it. The first method is the most common ink. You can purchase them at the stationery department or use a ballpoint or gel pen you have at home. But add this dye carefully so as not to “overdo it” and stain everything around.
The second way to add color to your varnish is to use food coloring. With their help you can get almost any color: red, purple, blue, crimson, green or another. Change the intensity of the shade by increasing or decreasing the amount of dye.
Try making one polish from several old ones by mixing them. You can combine the products in a separate container, or you can use “original” bottles. Such experiments will allow you to obtain unusual tones.
Fashionable matte varnishes
You can easily turn an ordinary glossy varnish into a trendy matte one. There are several options:
- Starch. This product will give a matte finish if a small amount is mixed with varnish. But it is advisable to prepare a little product for one-time use, since if starch is added to the bottle, the varnish may thicken and lose its properties. And remember that the matte effect becomes noticeable after the coating has completely dried.
- Loose powder. Pour a small amount into the bottle, stir the mixture with a toothpick, and then vigorously shake the bottle for a couple of minutes so that the ingredients are fully combined.
- If you have matte eyeshadow, use it instead of powder. The method of application is exactly the same.
Pearlescent and shiny
If you think that regular nail polish lacks shine, then add it yourself! And you can do this in several ways:
- Use cosmetic mica. This is mica, supplemented with mineral pigments and has a beautiful pearlescent luster, reminiscent of the radiance of pearls. You can purchase it either in specialized cosmetic departments or in online stores. Miki is typically sold as eyeshadow-like powders and can be added to a variety of cosmetics, including nail polishes.
- Dry glitter is suitable, which can be purchased in stores and departments of cosmetics or accessories for nail service and manicure. Pour the required amount into the bottle and shake vigorously to evenly distribute the shiny decorative elements.
- Shiny eye shadow will add a beautiful shine. But before adding them, they need to be thoroughly crushed, for example, crushed with a spoon. Then carefully pour the powder into the bottle of varnish and stir by vigorous shaking.
Unusual glowing varnish
Do you want to attract attention at a party and surprise everyone with glow-in-the-dark nails? Then make a bright varnish and... All you need for this is fluorescent acrylic paints, which are added to the varnish and give not only a new tone, but also a glow in the dark. And if you have a fancy neon gel pen, just use that ink.
There is another way. You've probably seen glow sticks and bracelets, and if you have such an accessory, cut off one of its ends with scissors and squeeze the contents into a bottle of nail polish. But the effect will not last long, so it is best to do a manicure immediately before the upcoming event.
- The most convenient way to add bulk components to the varnish is using a small funnel made of paper.
- Introduce supplements gradually to monitor changes and find the desired effect.
- If you are not sure that the result will impress you, then prepare a small amount of polish and test it on your nails. If the effect is not impressive, continue experimenting.
- It is best to use a high-quality and not very thick varnish as a base, otherwise you will not be able to fully stir the mass and achieve the desired uniform consistency.
- You can transform not only transparent varnish, which is an excellent base for bright experiments, but also white or any color. And as a result of experiments and trials, you can get an absolutely incredible shade.
- Try combining several shades. Moreover, if you don’t mix them, you can get unusual and stunning effects, with interesting transitions and abstract patterns.
- Use several methods at the same time. So, having given the varnish an interesting shade with the help of a dye, you can add shine to it by adding glitter to the mixture. Also try using starch after dyeing for a vibrant matte finish.
Using the methods described, you can conduct experiments at home and get an unusual and exclusive nail polish that you will not find in the store.
They say men always remain children. It’s hard to say whether this is true or not, but it’s easier to believe that there is a little girl inside every woman. Just like in childhood, we love to dress up, in times of trouble we always rush to our mother and are never averse to creating something useful for our beauty with our own hands. If in childhood these were experiments with creating perfume from some fragrant plant, then in adulthood the field for imagination is much greater. What if you conjured up the creation of... say, nail polish. For the sake of economy, curiosity, the desire to decorate your nails with a unique color - it doesn’t matter...
- Transparent varnish (water-based). Can be bought at a pharmacy
- Brush
- Any eye shadow
- Food coloring of desired color
- White clay
- Olive oil
As you can see, almost all the ingredients are natural and this is already an important advantage of homemade nail polish. However, you can also use olive oil, white clay or henna here. This nail polish at home will also be therapeutic.
We conjure a “potion” - we make a healing varnish
What do you need:
olive oil and any of the natural dyes.
How we do it:
- Mix the dye (henna or, say, clay) until the consistency of a smooth dough.
- Apply this mixture to pre-treated and degreased nails with acetone.
- Leave for twenty minutes, allowing to dry.
- Wipe your nails with a wet cotton pad.
To ensure long-lasting nail polish at home, repeat this coloring procedure two to three times a week. This way your nails will acquire not only a healthy color, but also the same shine. And in general, health, because olive oil perfectly nourishes both the cuticle and the nail itself, and henna or, say, white clay smoothes it out.
Option 2, colored varnish with dye
What do you need:
food coloring of the desired color, clear water-based varnish, metal ball.
How to make nail polish:
- Grind food coloring in a container
- Add ground food coloring to a colorless varnish (necessarily water-based).
- Place a small metal ball in the container. It is needed to thoroughly beat the contents.
- Stir the resulting mixture and use as directed.
Option 3, Colored nail polish with eye shadow
What you need: To make nail polish at home, use a good eye shadow.
How to do it: repeat all the steps with food coloring. The option with shadows is advantageous in that the latter have a richer palette of colors, which will allow you to create nail polish with an absolutely unique shade. And not just one, but a whole collection.
Option 4, Make varnish with alkane root
What you need: half a teaspoon of alkana root (a plant with medicinal properties, actively used in cosmetology, for the production of soaps, lotions and creams), three tablespoons of olive oil, a quarter of a teaspoon of beeswax and a couple of drops of vitamin E oil.
How to do:
- Heat the olive oil and alkana root in a double boiler.
- Remove from heat and leave for five to seven minutes.
- Strain the mixture through a fine sieve and return to the steam bath.
- Add beeswax to it.
- When the wax melts, add vitamin E oil and mix everything thoroughly.
- Remove the mixture from the heat.
- When it cools down, you can apply it to your nails.
The nail polish created in this way at home is applied with a brush or drawing so that it does not get on the skin of the hands.
Alcona, like blue and white clay, as well as oil with vitamin E, can be bought at the pharmacy.
How to make gel nail polish shiny or glowing
Those who like shiny or glowing marigolds will find glow-in-the-dark sticks or the same resin powder useful (the latter is preferable, but will cost more). For shine, dry sparkles are used, which are simply added to a home-made or purchased varnish.
To make your polish glow, add six caps of glowing resin (resin jar caps) to it. Resins are sold in different colors, so there will be plenty to choose from to suit your taste. Don't forget also.
Today it is easy to buy ready-made medicated nail polishes: with calcium, various oils and protein complexes. But no matter what useful additives the purchased varnish is endowed with, it is still a chemical product, i.e. synthetic origin, because in addition to them, it usually contains toluene, formaldehyde, aspartame... And it has long been proven that these substances can cause serious harm not only to nails, but also to health in general, if purchased varnishes are used frequently. This is exactly what most working women do - beautiful nails are the “final touch to the perfect look.” Now imagine that you also often paint your nails with healthy homemade varnishes made from natural ingredients. Agree, this is a good reason to work some magic on your own masterpiece J).
Matte nail polish has been breaking all popularity records lately! Technologists love it because with a matte finish you can implement very interesting design solutions. And we love matte nails because such a manicure perfectly hides all scratches and roughness.
First way
The most convenient way to make nail polish matte is to treat your nails with steam from boiling water. If you try, you can get a matte effect comparable to a professional manicure with matte nails. The main thing about this method is that you don’t need any additional costs, and it’s easy to make gel polish matte even at home.
To create a matte manicure, you don't have to buy matte nail polish. Take your favorite glossy nail polish of the desired shade, fill a pan with water, prepare a nail file, cotton pads and nail polish remover.
- First, remove any remaining polish from the surface of your nails and clean your nails completely.
- You will need to use a nail file to give it a nice shape and remove the cuticle.
- Using glossy nail polish, carefully paint the nails to your liking on one hand.
- Turn on the stove and heat a pan of water.
- While the varnish is still wet, place your hand over the bowl, palm up, and hold it over the steam for about two minutes.
You need to hold your hand over the pan very carefully! Otherwise, you may get burned from the hot steam. Manicure - matte nails will be obtained if you move your fingers over the steam so that it completely envelops each nail, and the matte coating appears on each nail.
Repeat the procedure with the other hand. This way you will quickly and easily get a manicure with matte nails and can enjoy it without going to a beauty salon. As you can see, making matte varnish at home is quite simple and convenient.
Manicure gel polish with glitter and rhinestones
Glitter and rhinestones have long been an integral part of nail design, and summer gel polish manicure is no exception. Summer ideas 2020 include the use of shiny details in a variety of variations. You can highlight an accent nail with a pattern of rhinestones or a composition of sparkles, boldly different from the rest of the fingers with a contrasting background, or complement any design with shiny touches and several stones. Modern shiny decorative details amaze with their abundance of colors and shapes, so every fashionista can easily select additions to suit her taste.
Second way
Another way to make gel polish matte at home without harming your nails is to purchase a special fixing agent for manicure. It is the matte finish coat that will give a velvety feel to matte nails in a manicure, consolidate the result and help the nail polish to adhere well. With the help of a matte finish, you can make a matte shade of varnish from absolutely any manufacturer. But keep in mind that a matte manicure, although it hides all scratches, perfectly emphasizes the slightest irregularities and defects of the nail plate. That is why you will first have to thoroughly polish your nails, and only then apply glossy and matte coatings.
Why gel polish after all?
Long gone is the trend of painting your nails only for holidays or special occasions. A beautiful and neat manicure, well-groomed hands are indicators of your well-groomed appearance. But you want to look well-groomed every day, right, dear ladies?
Gel polish will help make the coating more durable and comfortable to wear. It is confidently ahead of all fashion trends in nail art and remains the best option for covering the nails of every fashionista. Thanks to a wide color palette, in 2019 he creates many variations of everyday manicure.
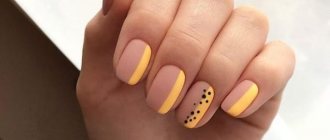
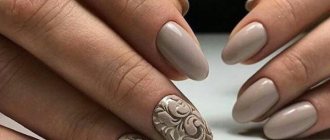
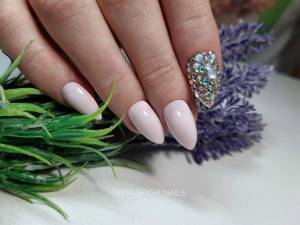
Fashionable manicure in a nude palette
Advantages of gel polish:
- practicality and durability - manicure will retain its attractiveness in everyday hustle and bustle and everyday affairs;
- long-term wear - on average 2-4 weeks;
- perfectly smooth coating;
- protection of the nail plate from mechanical damage and harmful environmental influences, and nails grow faster;
- variety of textures - gloss, matte, cat's eye, metallic, various rubbings and more;
- absence of a pungent and repulsive odor;
- acceptable price.
All that remains is to choose a company with good reviews or an experienced nail specialist. And, of course, a fashionable design for your nails!
Interesting : Manicure with acrylic powder
How to make a lunar manicure and matte polish at home?
- Paint your nails with regular glossy polish and wait until it dries completely.
- Seal the tips of your nails with special strips to create a French manicure. If you don’t have such strips for a lunar manicure, you can use tape.
- Paint over the exposed part of the nail with a matte finish and wait until it dries completely.
- Remove the stripes to create a French manicure and you will get a manicure with matte nails with glossy tips.
Nail industry professionals advise choosing dark shades of nail polish for a lunar manicure, as they look most impressive in a velvety finish, when the task is to make the polish matte at home.
Advice:
Matte nail polish and its matte finish last longer on the nails than glossy ones, but they eat into the nail plate more. If you don’t want your natural nails to be painted with a dark varnish pigment instead of a natural shade, then be sure to apply matte nails before your manicure - a base coat for the varnish.
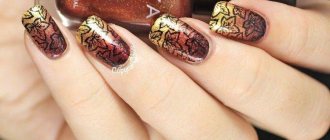
#7 Black manicure with gold glitter
The combination of black and gold looks expensive and noble. This manicure is not for everyday wear; most often it is used in formal occasions. Nail design must be in harmony with the rest of your look and accessories.
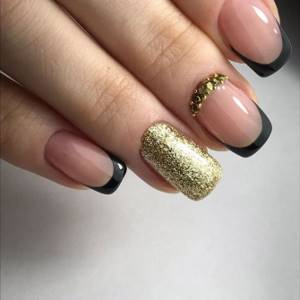
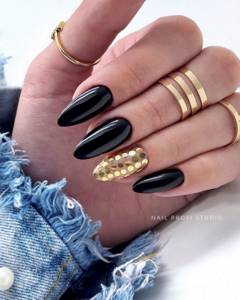
The most popular manicure option is a single-color design with 1-2 nails highlighted with solid gold gel polish. This design looks discreet and relaxed, and will fit into the look for a party or corporate event. Gradient designs with gold sparkles, moon manicures with triangular holes, and cat-eye manicures are also popular.
It is important not to overdo it with gold decor, otherwise the manicure will look pretentious and too noticeable. The main decoration of nails is black, and gold decor only slightly complements it.
Black gel polish is still collecting dust on the shelves of many nail artists. Girls prefer light and delicate shades, which are versatile and harmoniously combined with any decor. However, black manicure still finds its loyal fans and gives them stunning nail art in rich and deep color.
Expert opinion
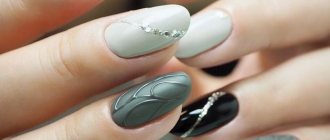
Matte nail polish goes very well with gloss. You can alternate glossy and matte topcoats on different nails or combine both on one nail. In order to achieve a matte manicure, you need to use a special matte top coat. Many people want to make the varnish matte at home by adding regular starch, flour or baby powder to it. But it is not recommended to do this, because... You might just ruin your nail polish. “Homemade” components were not initially provided by the manufacturer to make the varnish matte. Most often this leads to thickening of the top coat. But even if this does not happen, then when applied to the nails, the color of the varnish will change and not for the better.
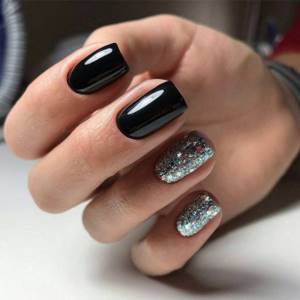
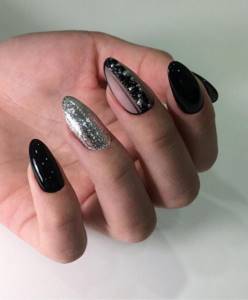
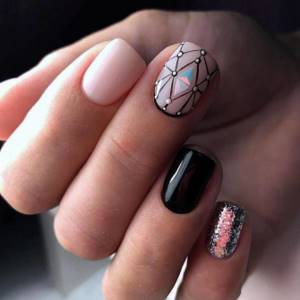
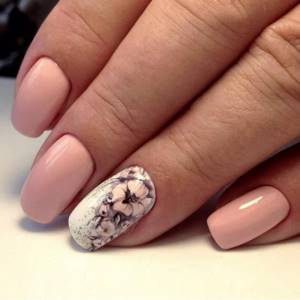
#2 Black manicure with glitter for short nails
On short nails you can do the same decor as on long nails. It is important to adhere to the minimalist style and not to clutter your nails with voluminous decor. The simplest and most visually light design is the use of gel polishes containing glitter, shimmer, and shiny granules.
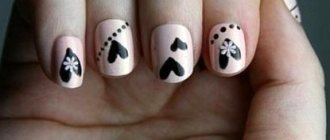
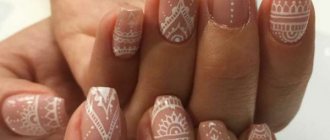
Combine black with cream, beige, milky and other neutral tones. On a light background you can place patterns in black, for example, lace, hearts, stripes. A combination of black and pink looks great on short nails. This tandem allows you to create a light everyday design with a solid color finish and glitter accents.