Female beauty is based on the correct combination of many details. Timely and regular care of skin, nails, hair, as well as the selection of the right clothes, makeup and hairstyle play almost a decisive role in a woman’s life when it comes to a well-groomed, beautiful appearance. That is why wise representatives of the fair half never take this lightly. And that is why they carefully ensure that everything is appropriate and appropriate.
They can style even an ordinary braid in such a way that it is suitable for a walk, for work, or suitable for an evening promenade. Particularly successful are compositions made from strands of long hair woven together. Weaving beautiful braids seems overwhelming to many girls, but in fact, modeling them is not that difficult. The main thing is to maintain the correct technique and have the appropriate skill. Then braiding long hair will become not a puzzle, but a fun activity.
Advantages
You may be interested in: Light brown hair color: palette, review of the best dyes, application, durability, photos
Before considering the most common techniques for braiding long hair with photos of beautiful successful works that clearly demonstrate the features of each technique, it is worth identifying the strengths and weaknesses of this type of hairstyle. In fact, weaving has many advantages, namely:
- there are a huge variety of them - for each specific event you can choose a successful appropriate composition of weaving;
- with correct styling and proper presentation, braids always look noble, aesthetically attractive and instantly endearing, creating a vivid impression of the girl’s integrity and modest disposition;
- most types of braids allow their owner to calmly go about her business during the day, without being distracted by regular adjustments to her hairstyle, because the braids are distinguished by their durability and composure;
- This style suits different girls with different hair types, so it is considered universal, because there are a huge number of types of weaving and choosing the right option for each is quite possible.
Basic rules of weaving
Children's hair, unlike adults, is considered more fragile and thin; its hair follicle is not yet strong enough. Therefore, when weaving, it is important to take into account certain features of children's hairstyles.
Rules for weaving beautiful braids for girls:
For easy combing of curls, you can use a special spray.- Do not pinch the weave too much. It is necessary to alternately loosen and clamp the strand.
- Make the weave tight, but not tight on the head. During the day, children are very active and mobile. Therefore, the hairstyle must be stable so that the strands do not unravel.
- The hairstyle should be appropriate for the child's age. Adult weaving options are more complex and tight. Simple ones are more suitable for young girls.
- For daily wear, you should not choose complex designs. Their weaving is more labor-intensive and takes longer. This can ruin the child's mood in the morning. It is better to prefer simple options.
- You can use elastic bands, hairpins, bows or ribbons as decorations. But you need to observe moderation and not use them in large quantities. For children, choose accessories made of plastic rather than metal.
Advice! Avoid using adult products to style children's hair. Braids will be easier to braid if your hair is slightly damp.
Flaws
You may be interested in: Light brown beige hair color: photo, choice of dye
But against the background of all these advantages, hairstyles with braids for long hair have their drawbacks, in some cases quite significant. What can be included here?
- Duration of modeling complex wicker compositions. Since not all hairstyles with braids on long hair are the same, many of the festive and formal models are created using complex techniques, which, accordingly, require much more time than creating a simple traditional braid. Therefore, the preparation of such installation should be carefully thought out in terms of the time allocated for this and the labor intensity of the process.
- Harmful to weakened strands and split ends. Hair that is naturally thin and weak due to improper care should not be regularly braided. This can affect their fragility, and also lead to even greater split ends due to constant exposure to an unnatural position - the state of bent strands pulled into a braid.
- The appearance of headaches. Any bride or prom attendee who has had the pleasure of wearing a chic braided hairstyle will confirm that leaving hair in this state for a long time provokes headaches and even in some cases itching. Excessively tightly tied strands put tension on the root zone, and, accordingly, create a kind of discomfort for the scalp. Therefore, trichologists strongly do not recommend using this method of modeling styling too often.
Weaving rules
You may be interested in:Dyeing your hair white: dyeing technique, tips, photos and reviews
And yet, despite some nuances, most representatives of the fair half find various braids on long hair very feminine, aesthetically attractive, comfortable and versatile in purpose. Therefore, many of them continue to experiment with individual varieties every day.
An experienced braid lover knows that creating perfect braids on long, medium and short hair requires special preparation. The stages of creating the perfect hairstyle are successful if you follow some rules:
- Hair preparation. Before modeling beautiful braids on long hair, you need to wash your hair - only clean hair will look well-groomed and neat as a result.
- Light humidity. For perfect styling, it is better not to dry your hair 100%, but to leave it slightly under-dried. Residual moisture will give the master (or a girl modeling her own braids) convenience and ease in further work with them.
- Pre-fixation. Before starting the braiding process, you need to treat your hair with styling foam or mousse. It is worth paying attention to the fact that the gel is not a suitable product specifically in this case.
- Final fixation. At the end of the process of weaving hair into braids, they also need to be fixed so that they remain in their original shape for as long as possible. Hairspray with both strong and medium hold is perfect for this.
- Auxiliary tools. Creating braids on long hair requires the presence of hairpins, bobby pins, and bobby pins, since the process in some cases is particularly labor-intensive. It can be caused by dividing the strands into sections (hairpins are definitely needed here) or maintaining the braids in a zigzag position, for example (which, of course, is only possible with the help of additional fasteners in the form of bobby pins or hairpins).
- The right comb. Most braids require a strand of hair to be unraveled at the end to give the braid a voluminous look. Of course, similar manipulations can be carried out using your fingers. But it is much more convenient and practical to use a comb with a sharp tip on a handle - it very easily picks up the desired sections of hair and pulls individual strands into the desired position above the level of the head.
Russian weaving
Traditionally, the Russian braid is one of the simplest and most commonly used versions of hair braiding. A hairstyle with a long braid has been the standard of Slavic femininity and beauty since ancient times. It is considered the primary source of all other models in the extensive classification of braids that currently exists in the world of the hairdressing industry. Therefore, it is traditional Russian braiding that opens the list of possible varieties of beautiful braids on long hair.
You may be interested in:Long bob: description with photo, haircut diagram, variety of hairstyle options and styling features
The essence of this work is extremely simple, because the weaving technique can be mastered even by elementary school children. The entire head of hair is divided into three equal strands: braiding begins by throwing the right strand into the intermediate space between the middle and left ones, after which the left strand is similarly brought inward between the middle and right strands. The result is a cute and cute elastic stitch of hair that can be left as is or twisted into a snail, for example. By dividing the hair into two, three or more sections, in the same way you can weave two, three, four or more braids in the traditional Russian style.
And yet, the simplicity of classic weaving is more suitable for little ones to attend kindergarten or school. But such braids will look much more mature, harmonious and feminine in the version with French braiding.
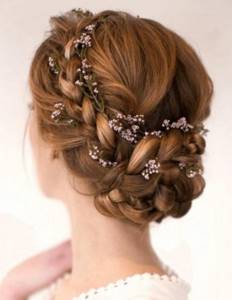
Festive braids
Among festive hairstyles, braids also occupy a place of honor; they hold their shape well and retain a magnificent appearance until the very end of the celebration. Even a simple fishtail or simple braid can become the basis of a formal look if you decorate it with ribbons, a bow or a hairpin, twist it into an elegant bun, or make it part of a more complex hairstyle.
Openwork braid
Such braids on long hair look simply amazing; braiding them does not take much time, but requires special styling products, such as mousse for volume and hold. To get a neat hairstyle, it is better to resort to outside help.
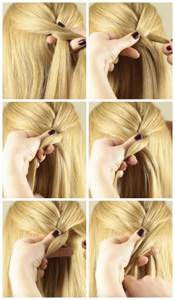
One of the options for an openwork braid is “Waterfall”:
- Separate a strand of hair near the temple, dividing it into three parts.
- In an arc from the temple to the opposite part of the head, begin to weave a French braid, adding strands from the top.
- Release the added strand from the braid from the opposite side, leaving its end hanging freely.
- Braid the entire head in this way, slightly lowering the angle of the braid, and secure the end with a beautiful hairpin or bobby pin.
You can braid several braids at once, going around your head.
Unusual voluminous braid
Based on a simple braid, you can create an elegant and spectacular evening hairstyle:
- Divide the entire volume of hair into three parts, where the main one will be in the center, and two thin ones will be on the sides.
- Weave a reverse French braid from the central part.
- Strongly pull the strands out of it, creating volume. Secure the end of the braid by bending it to the base.
- Twist the left temporal strand into a bundle, fluff it slightly and throw it over the braid. Use a bobby pin to secure its tip at the right temple.
- Twist the right temporal part into a bundle, throw it over the braid and tuck it behind the left one. Bring the tip out and secure it with a bobby pin under the braid.
Romantic bun of two braids
This hairstyle can be done every day, but if you decorate it with a hairpin or ribbons, then it’s also suitable for a holiday:
- Throw your hair back, comb it lightly and spray with hairspray.
- Make two low ponytails out of them, securing each with a thin elastic band.
- Braid both ponytails into regular braids until the very end and secure with elastic bands. Lightly pull out the strands for volume.
- Twist one braid clockwise to form a bun. Secure it with pins.
- Twist the second braid around the first bun counterclockwise and secure it with hairpins.
Hairstyle made of plaits
A hairstyle made from simple braids - plaits - looks very unusual on long hair. It is suitable for a special occasion, and for an office where they are demanding about their appearance:
- Collect part of the hair near the forehead, temples, connect them at the back of the head, twisting them into a plait, moving it slightly to the right, secure with a bobby pin.
- Take a piece of hair behind the right ear so that it overlaps the tip of the previous strand, twist it, and secure it to the left with a bobby pin.
- Repeat the action on all loose hair, wrapping the last strand around the ponytail at the base of the neck.
- Divide the tail into two parts, twisting them together into a thick rope.
- Pin the end or make a low bun out of it.
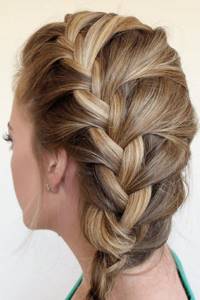
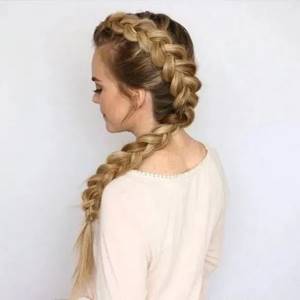
French weave
The essence of braiding and the difference between a French braid and a traditional Russian one is that the main part and tail of such a braid are not isolated from the head, but fit tightly to it due to strand fixation to the head during braiding. And if the classic braid originates in a suspended state, when the hair falls freely on the neck and shoulders, then the French braid often begins to be woven from the top of the head, smoothly moving across the entire back of the head to the neck area and continuing there, below, with free braiding.
The technique itself is carried out according to an already familiar scheme: three strands are taken from the frontal zone and begin to intertwine like a Russian braid. But the fundamental difference is that in French weaving, each subsequent twist around the central strand is carried out with additional strands being picked up from the right and left from the temporal and then, along the weaving, from the occipital zone. It is this stranded hold that implies the further adhesion of the braid to the head, that is, it is with these additional strands that the braid is fixed in a specific place, passing along the center of the circumference of the head all the way to the neck and continuing there in free fall. The meaning of this technique is easier to perceive by looking at it clearly with an example (see photo below).
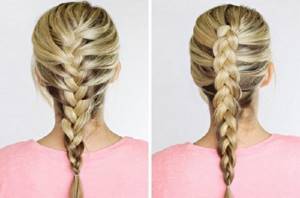
Purl weaving
An even more original weaving option is purl weaving. In terms of technique and visuals, it is similar to the standard French version, but, being its variety, it seems to be going the other way around, in the opposite direction. If in the case of the previous braiding model the braid fit tightly to the head due to the strand grip of the accompanying curls inside the braid, then in the case of reverse braiding the strands are grabbed from underneath. That’s why the braiding received the name purl - here the braid turns outward, as it were, due to which, by the way, it becomes more voluminous. The visual difference can be understood and seen by looking at the photo below. In the first case (on the left), the girl used standard French weaving, and in the second (on the right) - purl. Both options look well-groomed, neat and girlish.
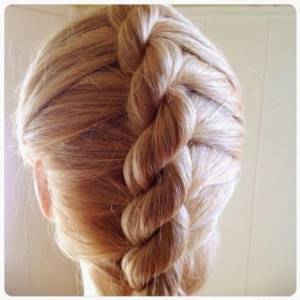
Wire weaving
For those who value simplicity and fast speed in weaving, a braid made from strands is ideal. In fact, there is nothing simpler than collecting the entire head of hair in a ponytail on the top of the head, dividing it into two equally stranded sections and, twisting each of them around its axis, intertwining it with each other along the entire length, from the base of the ponytail to its tip. Moreover, rope weaving can be done both in the classic Russian style (with a tail), and in the French style, adjacent to the head and originating from the crown area. The aesthetics of the second can be appreciated by looking at the photo below. With such a braid, it is quite possible for a child to go to kindergarten or school, or for an adult girl to go for a walk or to a business meeting, because the styling is universal.
Long hair braids
How to braid a child's hair and style a hairstyle with braids on long hair has a number of advantages. The length of the hair allows you to braid a variety of braids and combine them.
Basket
Braiding around the circumference of the head. A practical and comfortable hairstyle that stays neat for a long time.
Description of weaving:
- Select a strand in the center of the head, dividing it into 3 parts.
- Weave a regular braid in a circular design, smoothly wrapping the work.
- Make a parting around the circumference, 1st tier of hair and the 2nd.
- As you work, weave loose strands in a circle.
- Fasten the braided braid and carefully hide it.
The basket should be in tiers. For density, it is recommended to make the weaving quite tight.
Another method:
- Along the circumference of the head, part the hair in a circle shape and make a tail on the top of the head.
- The elastic band must be covered with a strand of hair.
- Select a small strand from the tail and a strand from the main body of hair closer to the ear.
- Using the regular braiding method, do the braiding from start to finish around the circumference. Distribute the strands evenly.
- Braid the remaining length of hair with a regular braid or as desired.
- Hide and secure the tip.
In this case, the basket will be made from 1 braid in a circle on the top of the head.
Harnesses
Strands of hair twisted along the entire length and transformed into plaits are easy to do and look interesting.
Step by step diagram:
- Gather the entire mass of hair into a ponytail and tie at the crown.
- Divide the tail into 2 parts of equal thickness.
- Start twisting the strands simultaneously in different directions. Left - to the left, right - to the right.
- Cross and twist the strands twisted by 5 cm so that they remain in opposite hands.
- Continue twisting the strands for the remaining length.
- Twist the strands again and secure the end with an elastic band.
There are a lot of designs for weaving plaits on a child’s head: there can be 2 or more of them, located along sections of the head or along one line.
Headband
Simple and sophisticated hairstyle.
Weaving pattern:
- Select a strand at the temple and divide it into 3 parts.
- Weave the braid using the French braiding technique, weaving strands from the side of the face, starting from the temple and along the forehead to the opposite temple.
- You will get a kind of “rim” of hair.
- The finished “rim” should be secured or pinned.
The hair does not get into the eyes and is loose at the back.
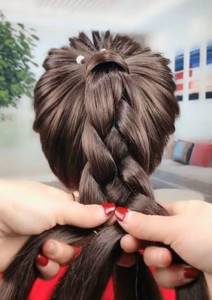
Braid on a donut
Looks good on any hair, making it even more voluminous.
Execution diagram step by step:
- Tie your hair into a ponytail on the top of your head.
- You can divide the tail into 2 parts and braid from 1 part.
- Pass the free part of the hair through the “donut” and hide it under this hair, securing the strands with bobby pins.
- Fix the braided braid at the base of the donut.
- You can make a braid from the entire tail and wrap it around the donut, securing it at the base.
Quite a simple, comfortable and practical hairstyle.
Fish tail
A trendy braid at any time and for any event.
Classic weaving pattern:
- Tie the ponytail at the top of your head with an inconspicuous elastic band.
- Divide the hair into 2 parts of equal thickness.
- A small strand is separated from the left side, passed under the tail and placed on the right side of the strand, while the left hand should grab it.
- Next, a strand is taken from the right side of the hair and placed on the left side of the strand, grasping it with the right hand. The strand should go under the tail.
- Continue braiding this way until the end of the braid and secure it with a hair accessory.
The braid can be made without additional fixing elastic bands.
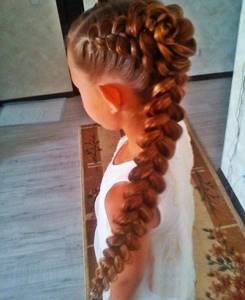
Volumetric weaving
Volumetric weaving is more complex and labor-intensive in terms of the preparatory process. In fact, the very creation of a braid, purely technically, differs little from purl French weaving. But specifically visually, in the end, this hairstyle is completely different from the standard tight braid. And if tight, strict weaving is applicable in almost any setting, then voluminous weaving is considered more elegant, more romantic, and more solemn. Girls create this hairstyle before a certain event, an important event, an occasion for which they need to look their best.
Volumetric weaving can be accompanied by the insertion of live or artificial decorative branches, as well as all kinds of ribbons and combs. And here, when modeling a hairstyle, a more strict step-by-step process is already observed:
- Creation of root volume. Not a single correctly designed volumetric weave can be created without preparing the hair for this type of composition on the hair. After all, weaving is called volumetric because it performs the function of improvised density, splendor, and airiness. Root volume is achieved through light backcombing in the fastest styling possible or using corrugated curling irons in a more favorable environment for creating the perfect hairstyle. In both the first and second cases, you will definitely need a fixing agent such as hair styling powder. It is able to hold them in the originally laid position for as long as possible.
- Direct weaving. It is practically no different from the purl French - the technique of pulling the curls together and gripping left and right remains virtually unchanged. Unless you need to be more careful with the already prepared root volume: the hair should lie evenly on all sides. Therefore, you need to ensure that the level of lift from the roots is the same everywhere, both at the temples and in the frontal area. All these precautions are necessary to ensure that the hairstyle looks harmonious and elegant, and not eccentric or careless.
- Creating volume in weaving. The braid itself also becomes larger and thicker visually. This effect is achieved by pulling out strands from the links of the braid - this is perhaps the main and main distinguishing feature of the technique of weaving a volumetric braid from the technique of a pulled purl one. In this case, it is not an elastic, tight stitch that is woven, but, on the contrary, a relaxed and maximally loose stitch. And here that same comb with a sharp end on the handle will come in handy - it’s easiest for them to pry up the links of a braided braid and carefully pull them out to imitate thick, large strands. It is important to remember that this should be done not at the end, when the entire braid has already been woven, but immediately after each entanglement - then the residual bundle of strands will allow you to extract the widest possible sections of curls from the already woven part, which ultimately give such a stunning effect.
Multi-strand weaving
You may be interested in: Age-related haircuts for women over 50
Multi-strand weaving is considered one of the complex but incredibly beautiful weavings. The technique of creating a four-strand braid, for example, is quite simple - you just need experience and a certain dexterity. You can create such a braid as part of a French braid, or you can use the ponytail gathered at the top of the head as a starting point for creating a multi-strand stitch.
The principle of multi-strand weaving is as follows:
- all hair, collected in a ponytail or in a free position, is divided into four identical sections;
- for convenience, all sections in the mind are numbered in order, from left to right: so, the left strand becomes the first, the next one is the second, the penultimate one is the third, the one on the far right is the fourth;
- the first strand is wound under the second, threaded from the bottom up over the third and again wound down under the fourth, thus becoming the farthest one on the right;
- now, on the other side, an additional strand is taken from the temple (if it is a French weave) and woven together with the outermost strand on the right under the second one down, wraps around the third strand from above and is wound again under the bottom of the fourth - now this is again the first strand on the left.
And the rest of the hair is braided in the same way. As you weave, the strands need to be leveled and adjusted so that they appear as uniform as possible. If you follow the braiding technique correctly, the result will be excellent - you will get a truly large and bright braid of long hair.
On hair of the appropriate length, using a similar method, you can create wide stitches of five or more strands. The longer the strands, the more spectacular the result will be.
Greek weaving
A distinctive feature of Greek braids is that they are often gathered around the head like a headband. The Greek braiding itself differs little from the French classic, but the position of the braid on the head changes: it originates in the temple area, passes along the circumference of the head through the back of the head and visually smoothly descends in the area of the other temple. Most often, this styling scheme involves weaving long hair into two braids, which start from two opposite sides and seem to merge together at the back of the head. This “meeting” of two braids is ultimately shaped into a neat snail or a beautiful rosette of hair. This hairstyle looks incredibly romantic, feminine, very gentle and even chaste. That is why it is often used as a wedding hairstyle by many bridesmaids, as well as by the brides themselves.
Who is it suitable for?
Two braids, correctly selected for a girl’s face type, can look more advantageous than many complex hairstyles. Depending on the type of weaving, they are suitable for ladies of any age and character: both schoolgirls and their mothers, both business women and charming young ladies. This hairstyle is appropriate in any situation, from meeting with friends to a wedding or business meeting. Two braids look great on any hair: red, light brown, light and dark, although in the case of highlighted strands they take on a truly special and unique look.

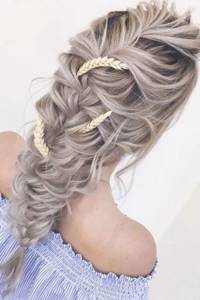
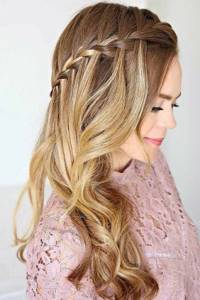
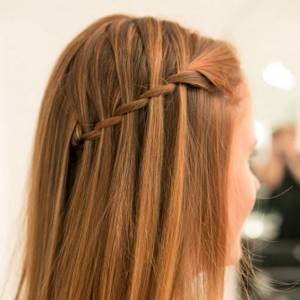
Waterfall
A very delicate and incredibly beautiful weave is a braid with loose strands. Among today's fashionistas, this hairstyle is called “waterfall.” A very neat, elegant and sophisticated hairstyle is suitable for both a romantic date and an evening event (of course, in the case when the image is chosen to be delicate). Visually, the waterfall resembles half Greek hairstyle, half Malvina. As in the Greek hairstyle, the braid here plays the role of a headband. And just as in the case of malvina, part of the hair remains gathered, and part falls on the shoulders in a free position.
The technique of weaving a braid in the waterfall style is not so complicated as it is painstaking. The French technique taken as a basis is complicated by the fact that the grabbed strands from the inside are threaded through the middle strand and released from the braid link in free fall from the outside. In standard French braiding, it is customary to twist alternately the right and left strands around the middle one. In contrast, a waterfall involves alternately weaving some strands from the upper zone and releasing others from below. For a clearer understanding of what this looks like as a result, you can look at the visual example in the photo below.
Spit-waterfall
Don't know how to braid your own hair on a date? This braid is one of the most romantic options and is perfect. You will feel confident and will blow him away.
How to braid a braid?
- Comb your hair and make a side parting from one side of your head to the other, as you prefer.
- Separate the outermost side strand and divide it into three parts, just like for a regular French braid.
- Take a side strand, place it between the central and another side strand and lower it down, creating a “flow”.
- Take a new strand to replace the one you dropped and repeat the step.
- Secure the braid.
To create a more sensual look, you can slightly curl the remaining strands at the bottom.
Diagonal weave
Young girls, who are alien to classical stiffness and severity that is inappropriate for their age, prefer original ornate solutions with non-standard braids on their heads. One of these is diagonal. Often, the braiding technique used is the French purl: this method is used to ultimately achieve the effect of a voluminous large braid. Therefore, there are no particularly significant distinctive features in this method of creating a hairstyle. The main feature here is only the selection of the starting point and the trajectory of its movement. Many people prefer to start in the upper left temporal area and finish the braid closer to the right shoulder. And vice versa.
During the weaving process, you can also change the direction of the stitch. Weaving can be carried out from the right temporal zone through the crown to the left, and then through the back of the head diagonally back to the right shoulder. There may be several options; everyone here chooses a version at their own discretion and relies only on their own preferences.
Braiding technology for girls with ribbon (video tutorials)
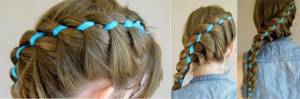
Weaving a variety of ribbons is an easy way to update your braid. Although this method has been known for a long time, its popularity has not subsided to this day. There are many options for using ribbons in hairstyles, but the most important thing is to choose the right accessory. The ribbon should be in harmony with the overall image, and also be of high quality. In the presented options for braiding four and five strands, you can use an accessory of any color and width. For a festive occasion, you can replace the ribbon with a thread with stringed beads and seed beads.
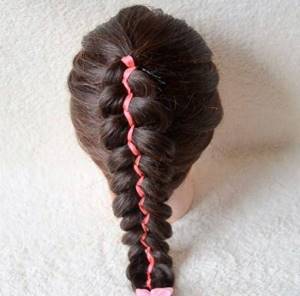
From 4 strands
To create such beauty, use a satin or lace ribbon. A four-strand braid creates a sweet, innocent look. This hairstyle will surprise everyone around you with its originality and unusual technique. Using tape will only enhance the effect and add additional zest. A girl’s hair can also be braided in honor of a holiday, for example, a matinee in kindergarten or a ball at school. To skillfully perform a hairstyle, preliminary training will be required. The video below clearly demonstrates the process of creating a hairstyle from A to Z.

4-strand braid (3+1 ribbon).
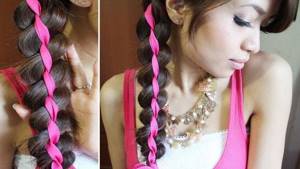
From 5 strands
The next hairstyle we'll teach you is a five-strand braid with a woven ribbon. The styling looks very interesting and impressive. The braid itself comes out wide, which is very fashionable now. Be sure to add to your piggy bank the skills of weaving such a bright, unusual braid. After all, this is a ready-made option for a holiday or other special occasion. It can also be braided on one side, or two braids can be made on the sides. The video below is a tutorial on how to create this fun, beautiful hairstyle with a ribbon. Carefully follow the movements of your fingers, and you can easily repeat the weaving yourself.
- Vapor tube for newborns: how to use, video
- Burpee - what kind of exercise is it? Techniques for weight loss and Burpees method for beginners
- How to make hair thicker and thicker at the hairdresser and at home
5 strand braid with ribbons. We braid hair. 5 strand braid with ribbon