Gel paint has long established itself as a material that a manicurist cannot do without. A professional's magic wand, with which you can realize a wide variety of nail design ideas - it needs no introduction. However, no matter how popular the paint is, newcomers to the world of nail design, as well as nail salon clients, still have questions: how to use it, for what purpose, is there an alternative? In this article we will try to look at gel paint from all sides.
Advantages of acrylic paints
There are many reasons why acrylic nail paints are so popular in nail art. Main advantages:
- Convenient to use, can be diluted with water.
- It dries quickly, making it easy to create multi-layered designs.
- Color fastness to ultraviolet.
- Huge selection of color palettes. By mixing different tones you can create any desired shade.
- The pattern is durable and does not crack, maintaining its appearance for up to 1.5 months.
- Acrylic is flexible, so there are several painting technologies. The product is used not only by professional nail artists, but also by those who like to experiment with manicure at home.
- Using acrylic, 3D and 4D drawings are created.
- It is easy to wash off and adjust the pattern until you get the perfect result.
- Non-toxic composition, practically odorless.
- Easily removed without the use of solvent.
- Does not damage the nail plate.
- Used on natural and extended nails.
- Economically used. If used twice a week, a pack of tubes of primary colors will last for a year.
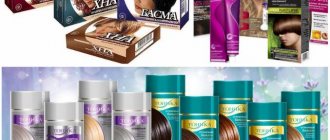
The price for these products is low, especially if you buy the product individually. For example, the cost of a black tube from the Irisk brand, with a volume of 12 ml, is about 60 rubles. But, it is more profitable and expedient to buy a set. The table shows several popular manufacturers, indicating the average prices for a set of 12 tubes:
| Name |
| ruNail, Meskalito |
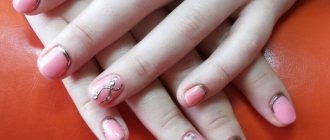
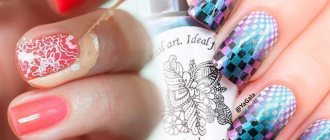
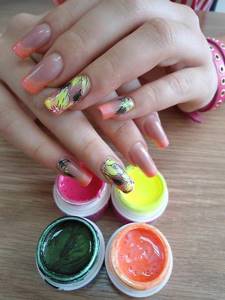
Beautiful nails: design with acrylic paints on gel polish
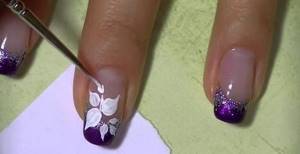
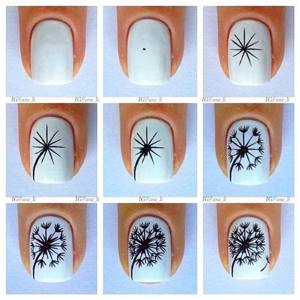
We approach the question of what to draw without limiting ourselves in anything. By changing the intensity of the paint, you can paint anything - from rectilinear geometry to watercolor blur. See examples of work and acrylic designs on nails step by step in our photo gallery.
Simple designs with acrylic paints on nails
- these are, of course, flowers. A dot in the middle and petals in a circle - that’s a flower. Vegetation of the “pro” level – Chinese painting, Zhostovo, Gzhel, naturalistics. You can train your hand on tips, training cards or cardboard.
In addition to flora, do not forget about fauna. Animal color and animal print are stubbornly in trend. Zebra, tiger, python or ladybug - choose according to temperament.
Nails can be made “cultural” by depicting ornaments, traditional patterns, national motifs and drawings in the style of cave paintings on them. Here are still lifes, landscapes, portraits.
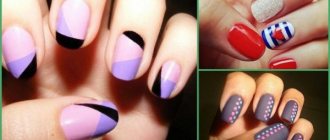
Pay attention to abstraction and geometry. The design does not require artistic skills, is in demand, fashionable and goes with everything - both with club dresses and office trousers. Well, in general, you can paint anything on your nails if your hands grow from the right place and the paints are good.
Good paints: review of sets with acrylic paints
All acrylic paints differ from each other, essentially, only in consistency. That is, you can paint on your nails with Gamma acrylic paints purchased at a stationery store.
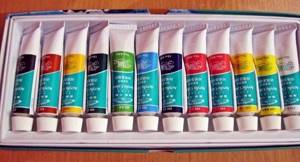
But it is believed that paints for nail art have the correct thickness, high pigmentation and, most importantly, do not contain fat. We will discuss them using the example of four sets for nail design, each of which consists of 12 tubes of 12 ml of acrylic paint.
- RuNail, Set of acrylic paints “Meskalito”
Classic professional set for nail design with gold and silver paint. The paints are quick-drying, well pigmented, optimally thick, in natural shades.
Apply without lumps, do not flow or roll down. All paints can be bought individually, which is very convenient when, for example, you have run out of black and don’t want to take risks by mixing brands.
A caveat: the tubes are made of metal, which means they can break.
Approximate cost 530 rub.
- TNL, Set of acrylic paints
The South Korean brand, whose gel polishes are often compared to American shellacs, has again pleased us by releasing a wonderful set for painting with acrylics. All paints have a deep, rich color. Among the exclusive shades, it is worth highlighting carrot and turquoise.
A number of popular paints - black, white, silver and gold - can be purchased separately. Mixes well with water and with each other. They are easy to use when painting and, as is common among “decent” acrylic paints, they dry quickly.
Approximate cost 595 rub.
- IRISK, Set of acrylic paints “Acrilic Nail Art Paint”
The Russian company IRISK has several sets with acrylic paints in its assortment. In addition to the basic “Acrilic Nail Art Paint”, it is worth noting an elegant box with acrylic paints for 3D effects and Chinese painting with tubes of increased capacity (20 ml).
As for Acrilic Nail Art, the paints are of moderate thickness, well pigmented, expressive. Despite the Chinese production, the quality is stable. Quantities can be upgraded - base colors are sold separately.
Approximate cost 560 rub.
- OUMAXI, Set of acrylic paints
Acrylic paints OUMAXI - China, which is unstable in quality. Density, washability, drying and even the color of the paints in the set are not constant values. If unpredictability doesn't scare you, take it.
There is a high probability that you will find a magnificent lavender shade in the set and the rest will delight you - consistently bright and saturated. If it’s blue, it’s deep; if it’s orange, it’s juicy carrots.
Suitable for training and good mood. You can buy it at a joint venture 2-3 times cheaper.
Approximate cost 540 rubles.
And get inspiration from galleries, museums and exhibitions, memorizing plots, manners and details. And then any paint will be applied thoughtfully, and the drawing will have meaning.
Every girl wants her hands to look well-groomed and beautiful, and her nails to stand out with a spectacular manicure. Different nail designs allow you to emphasize your style, express your mood and simply make your nails original. This is why many girls choose beautiful nail designs and painting when creating a manicure. The use of acrylic paints helps to bring many ideas into reality; on your nails you can depict various patterns, floral motifs, abstract figures and quite realistic drawings of landscapes, any figures and many other ideas.
will show you
how to paint on nails with acrylic paints
, what designs can be made and how to correctly use such paints in nail design. Acrylic paints are very popular; they are used by manicurists in their complex works, as well as by girls who make their own designs at home. Acrylic paints are safe and odorless, making them very easy to work with. It is absolutely not necessary to buy special acrylic paints for painting nails; you can purchase the desired colors of paints at an art store. These paints are no different from each other and allow you to save significantly. But not all paints are of good quality; too cheap ones will not allow you to create beautiful designs on your nails; they may crack or lie unevenly. According to reviews, Polycolor acrylic paints are suitable for painting on nails.
Drawings on nails can be done using various materials: varnish, gel, shellac, gel paint and, of course, acrylic paints.
What are the advantages and features of acrylic paints?
- A very wide color palette; besides, the paints mix well with each other and allow you to get an unlimited number of new shades.;
- Acrylic is a very flexible and easy-to-apply material;
- You can make drawings both on natural nails and extensions, on gel polish;
- Acrylic paints are diluted with plain water;
- They do not require special products to remove nail designs. It is easy to remove with regular nail polish remover (ZHDL);
- The drawing applied with acrylic paints dries quickly in air;
- Acrylic paints are used very economically, especially for nails. Therefore, the purchased paint tubes will serve you for a long time.
How to paint on nails with acrylic paints
Manicure with acrylic paints takes place in several stages. Prepare the nail plate so that the pattern is easy to apply and adheres firmly:
- Do a standard manicure: buff your nails, shape them and trim the cuticles.
- Degrease your nails with a special product or alcohol.
- Apply a base so that the design sticks to it and does not get absorbed into the nail plate.
- When the base is dry, remove the sticky layer.
- Treat the nail with a buff to create a matte finish, wipe again with the product to remove “sawdust” and begin applying the design.
Follow certain rules to use the set economically. Remember three important points:
- the product dries quickly, so squeeze it out in small portions;
- do not leave the tube open;
- always check the expiration date before purchasing;
- store the kit under the conditions specified by the manufacturer.
What to breed
There are two types of paints: thick and liquid. Thick acrylic is diluted with ordinary clean water. Liquid – comes in tubes and is immediately ready for use. But, after a while, even acrylic in tubes can become thicker, so it is also diluted. Nail art specialists dilute acrylic paints for painting on nails to create a pattern using a specific technique:
- Watercolor. Acrylic is diluted with water to make the final design transparent or translucent. Forming a tinted aqueous composition, the background, small details, outline and stains between shades are drawn. French, together with this technique, turns out to be very delicate and beautiful; lilies, peonies, roses and other flowers are painted on the nails in discreet colors.
- Pastose. Acrylic is diluted if necessary. In this technique, it is important that the strokes maintain their shape, texture and size. You can collect 2-3 shades on a brush for painting, which should practically not touch each other.
- Oily. Acrylic does not dilute. This is the most popular technique in which the result resembles oil strokes on canvas. To do this, use a thin small brush, with which you can stretch several colors over the nail plate.
How to dry
Acrylic-based paints do not require drying in an ultraviolet lamp. The composition dries on the nails very quickly, within a few seconds. It remains moist on the brush for several minutes due to quantity and moisture. Do not forget to thoroughly wash your painting tools, otherwise once they dry they will become unsuitable for further use.
Tools
Before you start painting, make sure that in addition to the acrylic set, you have all the necessary tools on the table. To work you will need several things:
- brushes – kolinsky or elastic nylon from 00 to 2;
- gel polishes – base, base color and finish;
- lint-free cloth - for cleaning the brush from excess moisture;
- a container of water - to rinse and wet the brushes;
- palette - to dilute and mix shades. Even a piece of plastic will work as a palette.
If you are a beginner, get some tips, cardboard, or practice cards to get some practice. Using these items, you can quickly fill your hand, after which the design will be applied without unnecessary movements and smudging. In addition to floral arrangements, try creating popular animal colors such as zebra, tiger or python. They have been trending for a long time and are easy to apply.
Step-by-step instruction
Having done a standard manicure and prepared the nail plate according to the above principle, you can begin painting. To do this, you need to follow simple recommendations:
- Squeeze some paint onto the palette and close the tube tightly.
- Wet the brush in water and remove excess moisture with a napkin.
- Dip the brush into the paint, adjusting the saturation and density of the color with water.
- Make sure to always keep the brush wet during the process.
- If the drawing does not work out, remove the errors with a cotton swab.
- Wait until the pattern is completely dry and apply topcoat.
- Dry the nails in a UV lamp, and at this time put the brush in water.
- Wash the instrument thoroughly in hot water and then dry it carefully.
What you need for a manicure
Before you start designing your nails with acrylic paints, place the following items close to each other: acrylic art paints of different colors (a few pieces will be enough to start), dots, a thin paint brush, a clear topcoat, colored varnish, a container with water for cleaning brushes, a palette for mixing paints, a napkin for blotting the brush, nail polish remover, a cotton swab for correcting the design and cleaning up mistakes.
Acrylic paints
For more complex designs, you can also prepare pebbles, beads, rhinestones, and seed beads.
Tip: for acrylic manicure, it is better to use synthetic fiber brushes.
Drawing
Pre-workout
Before you start doing a step-by-step manicure with acrylic paints, you need to learn how to use a brush correctly - understand how it is more convenient to hold it, how hard to press, how much paint to take. Therefore, for girls just starting to learn the basics of performing manicures with acrylic, it is better to start by practicing not on nails, but on any other surface, for example, on a piece of cardboard or plastic.
Cover the selected surface with colored varnish and wait until it dries completely. Apply a little paint to the palette and mix several shades. Try to draw simple lines on the surface first with different brush angles and different pressures, taking different amounts of paint.
Then complicate the task: draw a nail plate on the surface, apply varnish to it, let it dry and try to complete the chosen pattern.
Once you feel that you have become more confident in using the brush, and the drawings have become clearer and brighter, you can begin to perform a manicure with acrylic art paints on real nails.
Video
Modern nail art uses a wide variety of materials, using which you can create an almost imperceptible delicate and light pattern, as well as bright, eye-catching designs, make the coating translucent with light lace, or decorate your nails with paintings worthy of the title of masterpiece. One of these materials is gel nail paints.
Gel paint or gel nail paint is a thick, plastic substance with high pigmentation. This substance does not bubble or spread. Just like acrylic used for nail extensions, it polymerizes under the influence of ultraviolet lamp radiation for a maximum of two minutes. The properties of this substance allow you to create super nail designs. When working with gel paints, the master can take his time, fearing that the material will harden, and carefully draw every detail of the design or element of the pattern. Gel nail paint is a universal material. You can paint with gel paints on both natural and extended nails of any shape and length. You can make both Chinese and elegant French manicures with gel paints, and also use them for aquarium design. In 2020, French nail design is a combination of poorly compatible design elements, colors and patterns. The classic white tips of the nails are giving way to dark, black, foil, silver colors, various intricate ornaments and patterns that highlight the free edge of the nail. Today, making a French gel paint does not mean drawing simple white or colored stripes on the free edge of the nail, but also skillfully choosing patterns, rhinestones, sparkles, foil for them, in a word, it is interesting to play with the classic version of this type of nail design, beloved by many girls.
The difference between gel paints and gel polishes
Gel paints and gel polishes are often confused with each other. They are similar only in the presence of a gel in the base and some consonance in the names. As for the differences between these materials, they are as follows:
- Gel based paints do not require stirring. Gel polishes need to be stirred, even if they have not been used for just one day.
- Gel paints have a very dense consistency, which does not allow the coloring pigment to sink to the bottom of the jar, and also ensures economical consumption of material.
- The paints have high pigmentation, which means the most saturated and bright colors. To obtain a rich color using gel polishes, you need to apply them in several layers, which is reflected in the thickness of the nail coating.
- Gel paints can be used to paint the finest and smallest elements and details of a design.
- The paints have a rich color palette.
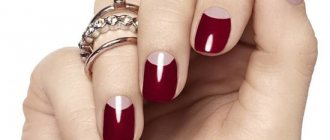
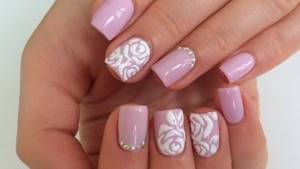
Ideas for manicure with gel paint
There are not just a lot of ideas, but a lot: French manicure, relief design, flat images. A great idea would be to use foil, stickers, beads, and rhinestones. Using gel paint in nail tubes or jars, you can create both a simple two-color sketch and complex options: natural landscapes, cultural objects, people, animals, any household items. The more experience a nail design master has, the richer his imagination, the more options, including innovative ones, he will be able to offer his clients.
What do you need to design your nails with gel paints?
In order to make designs on nails with gel paints you will need the following set of tools:
- Thin brushes. These can be either manicure brushes or art brushes.
- Dots. This tool is used for drawing colors, patterns, and dotted images.
- Palette. Using a plastic palette, a piece of plastic or foil paper, you can mix paints and get new shades and colors.
- UV lamp. Without this lamp, the gel nail paint will not harden or dry, which means that no nail design will work.
- Buff or polisher. It is used to remove the glossy layer from nails.
- Degreaser or cleanser.
- Primer.
- Gel polish base and top coat.
Which gel paint is best for manicure: review of brands
It is best to choose a gel paint for a job experimentally, because for some one option may be ideal, but for others it may not be suitable at all. Based on descriptions and reviews of other masters, you can determine a circle of favorites, among which you can look for your ideal.
Emi (Emy)
The paints are available in branded 5 ml tubes. The product has proven itself to be of high quality, as it provides good, dense color coverage and does not provoke allergic reactions. The products are manufactured in Germany; the line includes a large number of colors in a warm and cold palette. Sold both individually and in ready-made sets. The manufacturer’s great pride is the paint for creating a mirror-like silver or gold coating. The compositions have all the typical characteristics of gel paints - they do not spread, cover tightly with color and quickly polymerize in a lamp.
Kodi Professional (Kodi)
Every manicurist knows about the Kodi Professional brand - products under this name are widely known as specialized, professional and very high quality. Gel paints are available in small black jars with a screw cap (4 ml). The product is based on the company's modeling gel; its consistency does not allow it to spread and makes it possible to draw the finest lines. The paint does not leave a sticky layer after polymerization. You can create both flat drawings and work with three-dimensional designs and casting.
RuNail (Runail)
The release form is round jars with screw caps, the volume for this category of products is quite large - 7.5 ml. The composition is easy to apply, gives a dense color coating without glitter or pearlescent. There is no unpleasant odor, which makes working with paint comfortable and enjoyable. The product is intended for artistic painting, creating flat design and French. At the moment, the proposed palette includes 15 noble shades, which can be safely mixed if necessary. Another plus is the affordable price for high quality.
Miranda (Miranda) for painting and casting on nails
Gel paint is available in jars with a screw cap, volume 8 ml, reasonable price. The product is packaged hermetically, nothing leaks or overflows during transportation. It is immediately worth noting the saturation, even if we are talking about delicate shades. The manufacturer offers a wide selection of colors, both pure and with glitter and shimmer. The consistency is standard, dense, but easily applied to the brush in the required amount. It polymerizes quickly in the lamp and gives a rich coating. The consumption is very economical.
CANNI (Canny)
The manufacturer offers you to choose paint from a very large palette of shades, which are most closely matched to modern fashion trends. The product formula is safe, does not contain aggressive components and does not provoke allergies. The paint does not have an unpleasant odor, it is pleasant to work with, and due to its dense texture it is also very convenient. The volume of one jar is 5 ml. The colors, like other products in this line, are rich, and drawing fine lines is very easy. The product has all the necessary quality certificates, including international ones.
Step-by-step instructions for painting on nails
The texture and properties of gel paints for nail design allow you to create beautiful designs not only in a beauty salon, but also at home. For this purpose, it is necessary to carry out all hygienic procedures with the nails, treat them with a buff, degrease the nail plates, apply a primer, then a thin layer of base, which must be dried in a UV lamp. After this, gel paint or gel polish is applied. Next, you can apply drawings and patterns to the surface of the nails. Let's take a step-by-step look at how to paint on nails using gel paints:
- Take thin brushes (to reduce the thickness of the brush to the desired size, you can carefully cut off the bristles with a blade) and select the colors of paints that you will use. You can mix colors both on the palette and on the nail plate, getting an interesting avant-garde design.
- When a drawing or pattern is drawn in detail and completed, it can be supplemented with sparkles, rhinestones, stickers, and foil.
- Having applied all the decorative elements and made the finishing touches, you can dry the resulting drawings in an ultraviolet lamp.
- To secure the nails, they are covered with a topcoat, from which the sticky layer is removed after drying.
Executing the procedure
How to use gel nail paint? The procedure for decorating the plates is as follows.
After applying the base and drying your nails under the lamp, you can begin to create a unique manicure:
- You need to cover your nails with colored gel polish, then dry them in a UV lamp for 2 minutes.
- If necessary, the procedure can be repeated (apply a second layer).
- Cover the nail plate with top coat. An important step is polymerization, which removes the sticky layer from the top coat.
- Open a jar or tube of gel paint of the desired color and put the required amount on the brush. For painting you will need special tools that allow you to create high-quality nail designs.
- Apply a design to your nails. If it is complex, then it is advisable to dry each element in a UV lamp. If a UV lamp is used, then it is necessary to dry for 2 minutes, and if an LED lamp is used, then 30 seconds - 1 minute.
If necessary, at the end of the procedure, apply a top coat, and then dry it.
It is important to know not only how to use gel nail polish, but also the rules for removing it. To do this, you need to file off the top coat and pattern, and then remove the gel polish with a product intended for this. A correctly performed procedure ensures a high-quality result.
Using gel paint you can create original designs of different types. The product is used to obtain a strict jacket, painting with curls and flowers, as well as casting. The main thing is to follow the staining procedure.
It is one of the ways of self-expression. In recent years, spectacular images with acrylic paints on nails have become increasingly popular.
This type of manicure is performed in beauty salons, but this does not mean that it cannot be done at home. The technique for performing it is quite simple and, if desired, every woman can master it. With a little effort, and by trial and error, having learned to work with an acrylic paint set, you can create a stylish, exclusive manicure on your nails.
Using acrylic paints you can create entire paintings!
Once the technique of manicure with acrylic paints has been mastered, you can begin to master more complex watercolor designs.
We paint flowers on our nails with acrylic paint - a video tutorial to help you:
Some acrylic paintings may seem very difficult and impossible to complete. However, after practicing on simple patterns, you can proceed to more complex ones. To do this, you need to know some nuances, with which you can create real works of art on your nails:
- – material with a liquid consistency. To prevent it from flowing, painting is done on a support.
- It is better not to mix paints of different brands.
- You should not apply the pattern with a natural brush; it is better to use a special synthetic brush designed for painting with acrylic paints.
Acrylic paints dry quickly enough; there is no need to use a UV lamp.
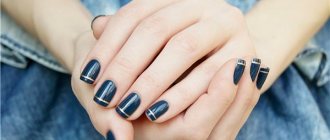
Options for designs on nails using gel paints
Nail design is not difficult to create, but this process will require some experience. Masters use different techniques to create original patterns, from which a beginner can choose the simplest method in his opinion and gradually develop his skills, bringing it to perfection. Nail design step by step for beginners looks like this (we will omit the description of standard hygienic procedures for preparing nails and covering them with base and gel polish):
- The simplest pattern that a novice master can master is the application of horizontal thin stripes, curls, and “lattices.” For this purpose, gel paint for a French jacket is perfect, which is also considered one of the simplest types of design.
- By dipping the dots into gel paint, you can decorate your nails with a dotted pattern. You can use paint of one color or several colors for this. The dots can be carefully connected to each other and get an interesting pattern.
- By drawing a smile line on the free edge of the nail, you will get a beautiful, delicate jacket. If you make a “reverse French” or an inverted French, the design of the nails will also be very original. In this case, the contrasting color fills the hole space of the nail.
- By carefully placing small dots with dots so that they form a geometric pattern, you can get a delicate, beautiful manicure - a “veil”.
Having mastered simple drawing methods, you will gradually be able to learn more complex techniques of drawing on nails. Many of them do not require good artistic abilities at all. All you need is imagination, precision and the desire to experiment.
Depositphotos/kanzefar
The industrial use of acrylic paints began quite a long time ago, but nail art design specialists appreciated their advantages only in this decade. This is due to the appearance on the Russian market of new high-quality acrylic paints with a thin, but at the same time opaque texture. Since then, manicurists can no longer imagine nail art without acrylic paints.
Want to learn how to use acrylic nail paints? Read on!
How to choose paint
You can buy it at any cosmetic store, the choice is very large, but you need to choose the one that’s right for you. It should be dense and fit well on the nails, but this does not depend on the price.
They are sold in sets or individually. But don’t rush to buy a whole set at once; it’s better to buy one and try it.
Only after trying several options for acrylic paint, you will be able to choose one that you like and that is really good for yourself. I wish you good luck with this! Subscribe to my blog. Bye! Bye!
The modern woman adds more and more aesthetics to her image. She takes care not only of her body and face, but also of her hands, which, as you know, give away a lady’s age in the first place. The skin of your hands should always be moisturized, velvety, and your nails clean and well-groomed. New nail care technologies have come to the aid of ladies. Now, with the help of acrylic paints, you can change your nail design for each new outfit and do it yourself, without the involvement of a manicurist. First you need to understand the huge number of products on offer, choose the one that suits your needs, price and quality - and you can try to apply drawings using multi-colored acrylic paints.
Types of acrylic paint
Acrylic nail paints are produced on an industrial scale, they comply with GOST, are environmentally friendly and odorless, which is very important for people with allergic reactions.
The thinner consistency is packaged in tubes of 5-8 colors, which can be mixed to create new shades. Thick acrylic, which is half diluted with water before use, is packaged in jars. In order to obtain a homogeneous creamy mass after mixing, you need to use the base from only one manufacturer, otherwise you will get the effect of “marble crumbs”, when white pellets will be visible through the main tone.
The most durable and popular among buyers is the Qumaxi company, which produces acrylic paints in luminescent tones and unusual shades that do not require mixing. There is ready-made metal, gold and silver paint here.
Another manufacturer is LadyVictory. It also produces paints in rich shades, in a wide range of colors. The advantage of paints is their glossy tone after complete drying. After you have applied acrylic to your nail as a base color, you need to let it dry completely. Typically, one layer dries within 1-2 minutes, then it is coated with varnish or gel and dried under an ultraviolet lamp.
Acrylic is applied to nails using a brush. If you want to amaze your loved ones with a nail masterpiece, we advise you to purchase a set of column or squirrel brushes, which have all sizes, from the thinnest with a few bristles for outlining, and ending with thick flat brushes for the base or main background.
How to mix acrylic paints
The texture of the paint can be transparent, translucent and dense. Any of these types can be mixed with each other, obtaining an incredible range of tint tones. At the peak of popularity this season are pastel colors with a matte surface, which are obtained by mixing bright colors with white. Before you start working with color, try a few blends on the palette to achieve the desired consistency and tone.
You can purchase paints with metallic shades. They come in white and gray colors and can also be mixed with primary colors to achieve a pearly tone.
To give your nails gloss, you shouldn’t add varnish to the paint, since the top is still coated with gel or transparent varnish with the addition of a fixative. In the nail industry, this technique is used not only for additional shine, but also to strengthen the nail, making the nail plate more durable.
Floral design is still fashionable, so a set of acrylic paints should also include green. Almost all colors are mixed with white; it runs out the fastest. And, if possible, along with the kit you need to buy several tubes of white acrylic for future use.
Acrylic painting technique
Since acrylic is water-based, it is considered a universal and simplest material for nail design. Stroke and bright strokes can be applied to the nails with paints that are not diluted; a protective coating is applied on top, which makes the texture of the strokes take on the effect of oil paint.
The watercolor technique is used if all nails need to be painted (primed) in one tone. To do this, dilute the desired paint on the palette with water using a pipette, mix thoroughly, and then apply it to the entire area of the nail plate.
In the modern sliding technique, acrylic is mixed in equal proportions with a building gel, the nail is covered, after which it needs to dry under an ultraviolet lamp. The image is somewhat reminiscent of a three-dimensional picture, it is very bright and durable.
The same composition can be used to create a classic French manicure, applying acrylic and gel in layers to the base and tip of the nail.
To make the image on the nails three-dimensional, the gel-acrylic sculpting technique is used. It is quite complex, but if you wish, you can master it, the main thing is to achieve the desired density and desired color in mixing. The design is molded by hand, one or two parts are attached to the nail, dried under an ultraviolet lamp, and for additional strength a fixative is applied to the finished nail design.
How to remove acrylic paint
As you can see, using acrylic nail paints is easy. A woman does not need to have the skills of an artist to apply the simplest tone, a few strokes and dots of a different tone, so that her nails always look attractive and well-groomed.
After complete hardening, acrylic is not washed off with water. To remove the coating, you will need to use nail polish remover or solvent if your nails were dried under a UV lamp. Acrylic modeling will not be washed off by any abrasive compound, so it is first cut off with a large nail file, and then the entire base is washed off with a solvent.
Acrylic has one drawback: if you constantly open the tubes, it dries out quickly. To make the consistency viscous again, add a few drops of solvent for oil paints and mix.
When applied to nails, acrylic may get on the skin of your hands; after work, wash them thoroughly with soap. All materials (brushes, palette) are also washed under running hot water until the material is completely hardened.
Nail design is a fashionable popular trend. Single-color nails have long ceased to be the only possible option for manicure design. Modern fashionistas like complex patterns and intricate designs much more. Acrylic nail paints are widely used to create these most complex and intricate designs. You can purchase them both in stores that sell manicure accessories and in art salons.
Acrylic nail paint sets
Acrylic paints have long been popular with professional and amateur artists. They are used not only for painting nails. Acrylic paints are perfect for painting ceramics, fabric, wood, and glass. Some masters even manage to use acrylic drawings in interior design. So, the main advantage of acrylic nail paints can be considered their versatility.
This material has many other advantages:
- Firstly, acrylic paints are affordable. At the same time, the quality of the material is always at the same level.
- Secondly, of course, a rich color palette. Bright colors and a huge number of their shades allow you to bring completely crazy ideas to life.
- One cannot fail to note the quality of the material. Acrylic paints applied to nails dry quickly and adhere firmly, without peeling even with regular contact with water.
Types of acrylic paints for nail extensions
As practice has shown, acrylic paints are best suited for nail design. Different types of paints allow you to create works that are completely different from each other:
- A huge group that includes almost all materials is water-based acrylic nail paints. They come in different consistencies. In nail services, materials of medium and weak consistency are usually used. The latter are simply ideal for delicate watercolor paintings.
- Popular acrylic nail paints Polycolor are created on the basis of a special viscous resin. Due to this, special brightness and color saturation is achieved. They are suitable for all surfaces without exception. Polycolor paints are characterized by extreme durability. They feel great in different climatic conditions and are not susceptible to chemicals.
- 3D acrylic nail paints are very thick and viscous. Craftsmen use them to make popular three-dimensional paintings. Works made with 3D paints look like real works of art.
Regardless of what type of acrylic paint is chosen, the master working with this material must adhere to the appropriate technology, using:
- special brushes;
- solvents (if necessary);
- palettes;
Technology of painting with acrylic paints on nails
To make a drawing with acrylic paints of high quality and interesting, it is better to first practice and draw it on paper. It will be quite difficult to erase individual elements from the nail (most likely, you will have to remove all the work and do it again), so you need to draw with a firm, confident hand. The drawing process itself requires compliance with several rules:
- Acrylic paint should be applied to a nail that has been cleaned of varnish and other materials and has been sanded.
- Apply a background to the nail (regular or). And after it dries, you can start drawing.
- Secure the finished drawing with transparent varnish. It is recommended to fix acrylic paints on gel nails with an appropriate material - the so-called finish.
Don't forget that after drying, acrylic paint changes color slightly and becomes darker.
- Advantages of acrylic paints
- How to apply acrylic paint correctly?
- Paint application technique
Acrylic nail paints have been used in industry for a long time. More recently, nail art professionals have discovered they have a lot of advantages that they have always been famous for. This is primarily due to the fact that acrylic products with an opaque and rather fine texture have appeared on the modern market, which has attracted the interest of specialists.
Nowadays, manicurists simply cannot imagine their work without acrylic paints.
And this is not surprising, because they are used in almost all master classes and individual work, due to their advantages over other means.
Advantages of acrylic nail paints
Compared to varnish painting, which was more common before the advent of acrylic paints, the advantages of the new technique are obvious:
- ease of use
- color saturation
- Density of application even in thin lines
- and, most importantly, complete
This is not to mention the fact that when using nail polish in art design, mixing colors to obtain new shades is almost impossible, but when using acrylic paints, you can mix anything without any restrictions.
Moreover, complete drying of paints occurs almost instantly, which allows you to avoid waiting time to apply a fixative, as is the case with varnishes.
We've sorted out the advantages. Now let's figure out how to properly use acrylic nail paints.
How to work with acrylic nail paints?
Acrylic paints are easy to work with and do not require special tools.
Most artists use nylon brushes with elastic bristles, especially for drawing thin contour lines. And for filling large surfaces, flat proteins or a column are suitable. Brushes do not require special cleaning when working; the main thing is not to forget to rinse them in water in a timely manner, since dried paint no longer dissolves and can deform the pile. Accordingly, you can say goodbye to the unique tool of the “nail creator”. How long does acrylic nail paint take to dry?
The specific drying time depends solely on the manufacturer. However, if you apply a pattern to your nails in a thin, narrow layer, the acrylic paint usually dries within a few seconds. Much more paint “hangs” on the brush, which increases the drying time to several minutes.
According to their covering properties, acrylic paints can be divided into several types: transparent, dense and translucent. Separately, we can also distinguish pastel paints, formed by mixing color with white. However, experienced craftsmen, as a rule, independently combine colors on the palette, achieving the required shade. Of the paints with additional decorative effects, nail technologists are especially fond of “metallics” and shades of pearls, which, even with a small addition to the design, give it a special and even chic look.
But whether the paint is glossy or matte does not matter at all, because according to design technology, any decorative coating is still additionally secured with a fixative, which gives the necessary shine and evens out the surface of the nail.
The basic colors, without which a true professional cannot exist, are red, blue, yellow, black and white. All the rest, as we know from a school drawing course, can be obtained through mixing. But since one of the most common motives for nail design is floristry, masters prefer to have green on hand as well. At the same time, it is not at all necessary to buy a large set; 6 colors are enough for full-fledged work. The only thing worth considering is that white color tends to run out faster than others, so you will have to purchase it in larger quantities and preferably from the same brand as the existing palette. This will eliminate the appearance of marble effect and unexpected extraneous shades when mixing.
Advantages and disadvantages
Advantages:
- Large color palette.
- The use of a coating
does not require large cuts of the plate surface. - Possibility of mixing several tones
to obtain an interesting shade. - During polymerization,
you can adjust and make changes to the design. - Used for applying designs
and completely covering the nail plate. - The dense texture
makes it easy to master the technique of drawing. - The manicure remains presentable
for 14-20 days.
Flaws:
- The layer is removed using mechanical force,
which can lead to damage to the nail structure. - The procedure for using the coating
requires the presence of an ultraviolet lamp.
Beauty requires not sacrifice, but help. Take, for example, fragile and brittle nails - they turn into strong and stable ones in a session of extensions. And what makes nails beautiful are gels and paints - for example, acrylic, which we will discuss in detail below.
Acrylic paint in nail art: from canvas to nails
As a child, to be a super girl, it was enough to put on a bow. An adult woman should be beautiful, as they say, to the tips of her nails. As for the “tips,” the attitude towards their beauty has changed radically recently.
An ordinary manicure is already considered boring, preferring more expressive methods of decoration - painting, rhinestones and more.
Huge laboratories are working to create materials to realize women's innermost fantasies. And in light of this, the growing popularity of “dense” acrylic paints seems surprising.
Acrylic paint is at least fifty years old. It was invented in the 50s for painting, but only today the material has become in demand in wide circles. The nail industry did not stand aside either, adapting the product to personal needs. And she did the right thing - acrylic paint is wonderful for everyone.
It is distinguished by high covering power, plasticity, brightness - like gel paint, only it dries without a lamp and quickly. It doesn’t smell, it’s not toxic, it’s environmentally friendly – you can paint your nails, even your children’s room. It is cheap, consumed slowly, stored for a long time - a very practical product.
All blots in the process of work can be immediately erased with HDSL, and wet acrylic designs on nails
Easily washed off with water - ideal material for beginners. The rest is a matter of technique.
Application techniques
The versatility of acrylic paints allows you to work with them in a variety of techniques.
Thanks to the density and ability to maintain the texture of strokes, you can achieve the effect of oil paints, but it is worth considering that without a miraculous “top” coating, such a design will be short-lived, and the applied colorless varnish will smooth out the surface. The watercolor design technique with acrylic paints is less common, but also possible. For such work, the surface of the nail must be primed with one layer of paint; as a rule, white is used for this. Otherwise, it will simply roll off the glossy surface. This primer will not take much time, since drying the layer does not require more than 3 minutes.
Sliding technique
, which nail technologists included in their arsenal not so long ago, allows you to get an almost three-dimensional image. Its base is acrylic paints mixed with construction gel. The color obtained in this way not only becomes especially bright, but also acquires volume, which is actively used in the technique of aquarium gel design and in gel bas-relief modeling. Unfortunately, this technique is not available to masters who do not have an ultraviolet lamp, because without it the gel will not harden on the nails and will not retain its properties. In general, the layer-by-layer application of the design, diluted with layers of transparent material, looks truly mesmerizing.
Glazing
nail designers use it more often than they think, even if they are not familiar with the term itself. In nail painting, this technique allows you to add a perspective effect even in a flat design. By the way, da Vinci used layer-by-layer application of translucent tones for a volume effect.
How to remove acrylic paint from nails, clothes and hand skin?
There are a few things to consider when working with acrylic paints.
Paints that are easily diluted with water before drying are no longer afraid of water after drying. Therefore, if they come into contact with clothing during work, Gel paints have been used for nail designs for many years, but questions about the material do not lose their relevance. What is the difference between gel paint and gel polish?
How to apply and remove designs from nails? Is it possible to paint nails with gel paint, or is the material only suitable for drawings?
Paint and shellac are often called interchangeable products, but this does not indicate their identity.
The following properties are considered characteristic of gel paints:
- Brightness - in manicure, paint is usually applied in one layer;
- Thickness - you can safely draw designs without worrying that the composition will flow or dry out;
- Uniformity - the pigment is evenly distributed in the composition and does not settle to the bottom.
At the same time, there is a similarity with gel polishes.
Both materials:
- polymerize under the influence of UV or LED lamps;
- stays on nails for a long time;
- allow you to create the most current nail designs.
Another advantage of gel paints is easy mixing of colors. The master, like a real artist, can create his own palette of shades, delighting clients with exclusive paintings and unusual combinations.
Popular manufacturers of acrylic paints
When choosing paints, pay attention to (“Lady Victory”). She has proven herself well in the nail industry because she sets the best prices for her products and is not limited to the same type of colors. Their palette is much wider than similar brands, and the shades are many times richer, which is extremely important in spring and summer. The main advantage of the composition can be considered the gloss included in the paint. After drying, the surface does not remain matte, it shines radiantly and reflects light.
An equally popular manufacturer can be considered “Qumaxi”. This is one of the most reputable and sought-after companies in the field of nail design. The main feature of their products is the presence of luminescent paints and extraordinary tones that do not require mixing. It is this manufacturer that you need to contact if you want to make the surface bronze, gold, metal or silver.
How to apply gel paint: paint your nails or paint on them?
When the material appeared, it was used for only one purpose: creating artistic decoration.
The experts themselves advise paying attention to two aspects:
- Preparing the nail plate.
- Maintaining the correct order of layers.
Preparing your nails for a gel manicure is a serious undertaking.
In addition to removing the cuticle and banal actions to correct the shape, you will need:
- cleaning the natural gloss of the nail with a buff;
- degreasing – fresher;
- “primer” for better adhesion - a primer without acids in the composition.
There are several options for applying layers:
- simple coloring – base for gel polish, 1-2 layers of gel paint, top;
- complex manicure - base, acrylic powder to strengthen nails, base, 2-3 very thin layers of gel paint, topcoat.
We must not forget that gel paint requires mandatory polymerization, so after each layer you must place your nails under a manicure lamp: under UV for 2 minutes, under LED for 30 seconds.
When painting your nails, it is best to use a flat brush to ensure even application. The paint is applied in a small amount and spread over the nail in the manner of gel polish.
To draw the designs you will need a thin brush. For paints with gel compositions, artists usually choose column brushes or synthetic brushes of size 0-2.
Paint with gel paints on gel polish
very simple. First, follow the steps of the classic gel manicure. Then the master creates a design of your choice using gel polish.
Further manipulations depend on the type of decor:
- volumetric lines are polymerized, but the top coat is usually applied not on top, but in front of the pattern;
- flat patterns require a finishing coat and sequential drying under a lamp for each layer (first the pattern, then the finishing layer);
- The “velvet” effect dries only after applying acrylic powder, no topcoat is needed.
Removal: how to remove gel paint from nails
The issue of removing gel paint from nails often becomes an element of controversy.
It would seem that the gel composition should be removed traditionally - in one of three options:
- sawing;
- remover with foil or clothespin;
- hardware.
In fact, gel paints are not affected by solvents. And all successful removals can be explained by the presence of lower and upper layers of gel polish on the nails. The remover dissolves gel polishes, and with them the intermediate layer with paint is additionally removed.
Those who choose this path should remember:
- mechanical cutting of the top reduces the time of foil wrapping - 5 minutes of waiting instead of 15;
- It is best to use a special Remover for gel compositions of paints and varnishes;
- At the end, you need to treat your nails with a degreaser and a buff to remove any remaining coating.
But still, gel paint is often removed from nails mechanically:
- A file with an abrasiveness mark of 100/180 grit;
- The cutters of the manicure machine are carbide or ceramic, corn or cylinder shaped.
The choice of method remains with the master and depends on the technical equipment of the manicure room.
VIDEO INSTRUCTIONS Gel paints today are the undisputed leaders among coatings in the nail industry. The cost of the material is comparable or even cheaper than gel polishes, the color palette will satisfy any artist, and the quality of the manicure directly depends on the skills and talents of the artist.
How to find your soulmate: tips for women and men
What happens if you stop washing your hair frequently?
15 shocking plastic surgeries that ended badly
Not all girls can boast of healthy and strong nails. The reasons for this are different - poor ecology, heredity, poor lifestyle, lack of microelements and vitamins in the diet and other factors. With the help of nail design and extensions, girls can hide most nail problems and attract attention to them with a beautiful design. Nowadays, various means are used to make designs on nails - polishes, gels, varnishes, but acrylic paints are the most popular. Their advantage is long-lasting paint durability, high quality and low cost of the material. Women can paint with these paints at home, even without professional skills.
Acrylic paints are often used on extended nails because the design lasts longer on them, but they can also be used on regular nails.
What is the best position to sleep in?
Is a man in love with you: 10 signs
What happens if you look into a person's eyes for too long?
Brushes
Acrylic paints Polycolor for nails or any others require special brushes. Brushes can be made of natural bristles or high-quality artificial ones. Natural ones are of high quality and high price. For infrequent and unprofessional use, it is more advisable to choose artificial ones, which, if handled correctly, will last no less.
The brush should be wide. This allows you to scoop mixed paints from the palette and get the desired element with one stroke. For comfortable work you will need a rectangular and beveled brush; it is better to have them in several sizes. However, a thin brush is one, etc. may also be required, you can even work with dots.
In order for the brushes to remain in good condition for a long time, you need to use a special product to clean them, although they can be easily washed with water. It is impossible to “soak” them for a long time either in water or in a product, as this destroys their structure.
Technique for painting nails with acrylic paints
- First, prepare your nails for applying a new design - move the cuticles, wipe off the old polish, and use a file to give your nails the required length and shape.
- Now you need to take care of your nail coating; it is better to use transparent or matte shades.
- Then you can start painting with brushes.
- Before applying paint to your nail, you should look at how much paint is on the brush, because too little or too much will ruin the whole job.
- If you have little experience in nail design, then don’t fight for complex and large designs; first, fill your hand with something simpler. Learn to draw the basics - lines, dots, ordinary flowers, and then make it more complex.
- You should mark the boundaries of the outline of the drawing, and then fill it with color. To draw the outline, use the thinnest brush, it will be easier to draw. Before painting the space in the outline, you need to wait until the paint on the borders dries, otherwise the colors will blur.
- Maybe when you first paint with acrylic paints, it will be unusual for you to hold a brush, so you should practice in advance with the force of pressure and the angle of inclination, since you should be comfortable when you work.
Types of painting nails with acrylic paints
- Art design.
It all depends on your skills and imagination. In addition to acrylic paints, you can use foil, lace, powder and other materials in this method. In the end you will have a flat nail plate with an interesting design. If you have a master make a drawing, it is worth discussing what kind of drawing you would like to see in the end, so that there are no disagreements. Recently, dried insects, small pieces of pebbles and dried flower petals have become very popular. - Volumetric painting.
Unlike artistic painting, volumetric painting allows you to get a three-dimensional drawing, and this gives a lot of space for your imagination, but at the same time it has disadvantages. The detail and labor intensity of volumetric painting makes it not an everyday manicure, but it is perfect for any event.
Examples of painting nails with acrylic paints
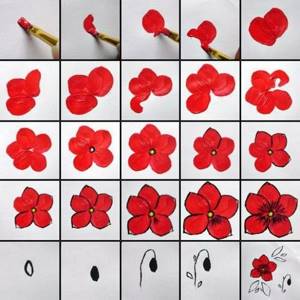
"Flower"
- This is both an elegant and simple design that is suitable for a romantic and gentle look.
First you need to draw the stem of the future flower, for this you need yellow paint. Draw a straight thin line from the lower left corner to the upper right corner of the nail plate. Apply it in a quick, oblique motion, pressing slightly on the brush. Then add white paint to a small brush. Place 5 dots next to the stem - this is the base of the flower from which the petals will come; you can make the base a round dot. After everything, finish drawing the flower, namely, draw blue petals with veins, and paint the core in yellow. You can paint a couple of flowers on one nail plate, but one looks better. When you finish painting, you should seal everything with colorless varnish. Flowers can be of different sizes and colors. "Zebra".
To visualize the future drawing, you should look at the coloring of the zebra and copy its cool stripes.
Cover the nail with white paint and wait until it is completely dry, then you need a toothpick, a needle or a thin brush. Dip it in black paint and draw horizontal stripes. In this case, they need to be made slightly curved, start moving from the right or left side from the very edge of the nail plate, and finish, slightly short of reaching the end of the other edge. Then repeat a similar stripe, starting from the other edge of the nail. It is worth making sure that there is a distance between the stripes so that the white background is visible. As a result, you can highlight the black lines with glitter and finish with clear varnish. "Dalmatian"
In this case, everything is quite simple - cover the nail with white paint, wait until it dries, and then take a toothpick, needle or thin brush and draw spots in random order with colored or black paint.
Finally, apply a clear varnish. "Tiger".
Take yellow as the main color, wait until it dries, and then, as in the previous painting, draw orange spots in random order to repeat the tiger coloring. After this, dry the paint again and draw a black curved line, at the end it should be a little thinner, and draw the same broken line to meet it. Do this over the entire nail plate and fix with clear varnish. All designs can be made with regular varnish, but acrylic paints will make the design more vibrant. In the end, it’s worth highlighting one more important rule: when you paint with dark-colored acrylic paints, then you should choose a whiter background, and vice versa, if the drawing is white, then make the background dark.
Acrylic painting technique
Acrylic-based paints help create many original designs, which is why their techniques differ significantly. Depending on the final task, the composition can be made translucent, completely transparent, or pasty. This allows you to create a unique painting, since the paints are easily diluted with ordinary water, due to which it becomes possible to instantly jump from one technique to another.
Oil technology
The most popular and easy-to-implement design is achieved using this method. The finished result will resemble strokes of oil paints, repeating the patterns of the brush. In this case, acrylic is not diluted, so a unique painting effect is created. The composition should be applied to the plate with a thin small brush, creating strokes of different sizes, shapes and textures. To improve the effect, just distribute several colors at different edges of the brush and stretch them over the surface of the plate.
Pastose technique
To paint using this technique, paints do not need to be diluted. The technique is similar to gouache paintings, where the strokes maintain the same shape, size and texture. As in the oil technique, impasto painting allows the use of 2-3 shades, collected on a brush and practically not touching each other.
Watercolor technique
Obtaining the final pattern using this technique is translucent or transparent. As you already understood, acrylic is diluted with water and resembles watercolor painting. The composition is used both for drawing the main background and for removing small particles inside the contour of the painting. For example, if you need to create streaks between two shades, you should use the acrylic technique. If you need to paint beautiful lilies, roses, peonies and other flowers on the plate, create them in delicate colors with diluted paint. It is important to understand that acrylic immediately hardens when it comes into contact with air. Water slows down this process a little, but in comparison with watercolor paints, diluted acrylic dries many times faster.