You need to lose weight not by summer or spring, but by the time when... After all, obesity and excess weight are not only an unsightly appearance, but also a direct threat to the health of the entire body.
The wall exercise is useful for those who want to gain slender legs in a relatively short time. Not every woman has the opportunity to visit a fitness center or gym, but thanks to this universal exercise, you can get significant results in losing weight in the thighs, buttocks and legs. The only negative is that doing fitness at home requires a lot of organization. Most often, women have hoops, jump ropes, and dumbbells at home. But what to do with the legs? The thighs and buttocks lose weight the slowest; fat in these problem areas disappears more slowly than on the stomach.
What is the “wall” exercise and what does it do?
Many women will ask what the “Wall” exercise is and what does it give? After all, you can do simple squats and achieve results. But not everything is as simple as it seems. The “wall” is much healthier for the body. You can improve blood circulation throughout the body. A big problem when losing weight is considered to be excess fluid in the body, due to which edema forms. Swelling of the lower extremities is dangerous. By doing this exercise, you improve blood circulation, swelling decreases, and muscles become significantly stronger. Problems with the spine are a problem not only for older people, but also for young people. Daily exercise with the wall is good for your posture, it helps reduce scoliosis and prevent the occurrence of intervertebral hernias. And, of course, such activities are a huge plus for the cardiovascular system. You will gradually lose weight without harm to your health.
Technique for performing the leg wall exercise
In order for the exercises to be only beneficial, but in no case harmful, you must follow the exercise technique. What to do first? You need to choose suitable sportswear. Items that are too tight or too tight are not suitable; clothing should be loose and breathable. You don't need any special equipment. There are walls in every apartment, and that’s exactly what will be the main link in the exercise.
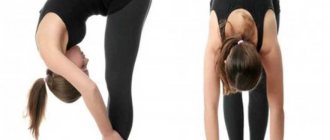
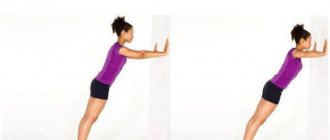
Do a warm-up, you can do bends or twists of your torso. Go to the wall, press your back against it and imagine that you are sitting on an invisible chair. Stay in this position for one maximum of three minutes. Straighten up, rest a little and squat again. The “wall” can be done while standing, lying down, twisting the torso to lose weight in the abdominal area.
Options and technique for performing the exercise
Before you figure out how to correctly do the “Chair” exercise against the wall, you need to understand that this is the same full-fledged workout as working out on a treadmill, manipulating weights, dumbbells, or barbell presses. Therefore, before performing it, you must do a warm-up. It will be enough to jump slightly, run, bend over, swing your arms and legs, and do stretching movements. Then the ligaments and joints will be prepared for static loads.
Classical
To perform the exercise, you need to choose a flat wall, preferably without a plinth. It is best to do it barefoot, if possible. The best regimen is three times a week, but if you want to get faster results, you can do the “Chair” every day, because isometric exercises do not require muscle recovery.
- Stand with your back to the wall, as close as possible. Press your heels to a vertical surface, legs shoulder-width apart, feet parallel to each other. The hands are lowered along the body, but for the first tests it is permissible to place them with your palms on the wall.
- As you inhale, you should lower yourself quite energetically into a squat until your thighs are horizontal, parallel to the floor. Please note that your shins should be strictly vertical and not at an angle. At the same time, the back of the head must not be lifted from the wall, the head must be kept straight, and the gaze directed forward.
- Hold the position for a few seconds.
- In a reverse motion, “slide” up the wall, rising to the starting position.
At first, you need to hold the position during the exercise for as long as you can stand it. Get ready for it to be difficult. If you can count to at least double digits, that's already a good result. For advanced athletes, you can perform the “Chair” exercise against the wall, according to reviews, for up to 2-3 minutes without much difficulty. To make your task easier, you can do the movement in several approaches, without having to move away from the wall.
Without a wall
When you have completely mastered the classic version, you can move on to the second level of difficulty - performing the exercise without using a wall as a support. Many people think that this is reminiscent of ordinary dynamic squats, but there are several nuances that make up the fundamental difference.
- Stand straight, feet shoulder-width apart, arms at your sides. The head should look forward, the neck should be straight, allowing for a slight natural arch of the spine.
- As you exhale, slowly squat into the desired position until your thighs are parallel to the floor. Stretch your arms forward in front of you.
- Fix your position. Count the seconds, making sure that your breathing is deep and slow and does not falter.
- Also rise straight, without leaning forward whenever possible, as if leaning on an imaginary wall.
Reviews
Veronika Ilyina, 25 years old:
Cool exercise. After giving birth, I gained a lot of weight, I am looking after my child, and I don’t have time to exercise at the fitness center. I am especially depressing about my butt and full hips. I read about the “Wall” exercise, I’ve been doing it for more than ten days, and the first results are there! I do 5-10 approaches twice a day, now I notice that I am visually becoming smaller. But I also follow a strict diet, I would recommend kefir diet, that’s what I’m on. There is no limit to perfection! I hope that in a couple of months I will be showing off my slender legs to my friends!
Ekaterina Guseva, 49 years old:
I've always been chubby. I have never experienced any complexes about this. But over time, I began to notice that my back hurt, and my heart began to play around. I went to the doctor. As a result, obesity of the second degree. I started following a diet, removed everything sweet and fatty from my diet (I used to really love cakes). The doctor recommended doing the “Wall” exercise. At first I was afraid. The weight is big. What if it doesn't work out? It was hard, I won’t lie. But after just six months of training, I became slimmer, and my back pain was forgotten. So, girls, try it, the exercise helps a lot.
Irina Kovaleva, 35 years old:
I don't lead a very active lifestyle. I really like to eat. Which affects my figure. My husband began to make comments, and I realized that I had to take charge of myself. Unfortunately, hips are my sore subject. My waist is quite thin, but my legs are thick with a massive butt. So tired of wearing skirts! I want to wear tight pants or shorts. My sister advised me to do the “Wall” exercise. I explained everything, I also read about him on the Internet. And this is a miracle! A month later I began to fit into my old trousers. Legs have become slimmer. I do the Wall every day, sometimes even twenty squats. It's hard at first, but it's worth it!
It’s easy to pump up your buttocks and legs in just a month if you do the simplest “Chair” exercise every day. The workout takes up to 10 minutes a day, and you can do it anywhere, as long as you can sit against a wall or even without one at all.
This is static training that does not pump up muscles, but makes them stronger and more resilient, strengthening joints and tendons. So, let’s figure out how to do this exercise correctly, what effect can be achieved, and what its features are.
Positive effect
Even though the Chair exercise is primarily intended for the legs and buttocks, you will notice benefits for the whole body. Here are just a few reasons to start practicing today:
- The shape of the hips improves, active stimulation occurs, the muscles tighten and become stronger. The “ears” disappear, the interthigh space becomes more pronounced.
- The buttocks tighten and become stronger. And although static training does not build muscle, fat deposits go away.
- Due to the tension of the abdomen, the lowered organs are raised, the internal muscles are gradually strengthened and correctly support them.
- Your posture becomes more beautiful, your back straightens. , and a way to get rid of it in the early stages.
- Blood circulation becomes more active, cells are supplied with oxygen, metabolism accelerates. Chinese experts recommend such isometric exercises to improve the functioning of the cardiovascular system.
- Develops a sense of balance and self-control.
One of the main bonuses of this exercise is the ability for people with flat feet to practice, and even get rid of it, but you must train barefoot. Not all workouts for the lower body are acceptable for this disease, but the Chair is completely safe and even recommended.
Load for the whole body
When performing the Chair exercise, it is important to know which muscles are working and which ones should be “turned off”. In fact, several muscle groups are involved, as well as the hip and knee joints. If you wish, you can add additional load to your arms and shoulders, but this is not for beginners.
List of muscles involved:
- Gluteal;
- All back muscles, upper, lower;
- Cervical;
- Calf;
- All departments of the press;
- Quadriceps (quadriceps femoris muscle);
- Arms and shoulders (optional).
Tension should only be felt in the legs and buttocks; the back and lower back should not hurt or be involved. Monitor your feelings. In fact, this is an analogue of the Plank, only the main load goes to the buttocks and hips.
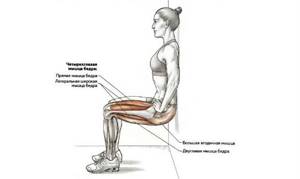
Working muscles in the “chair against the wall” exercise
In fact, there are a lot of muscle groups involved in the work, but each of them takes on a different degree of load. Thus, the greatest tension occurs in the front of the thighs - the quadriceps and sartorius muscles.
Next, the muscles of the back of the thigh and legs are slightly less loaded - biceps, semimembranosus, semitendinosus, gracilis, adductor magnus and the upper parts of the calf muscles (they are responsible for holding the hips in a bent position). The gluteus maximus muscles receive even less load due to body position.
Well, the least tension is observed in the abdominal muscle group (abdominal muscles) and in the back muscles: these muscles are more responsible for holding the torso and a little for the balance of the whole body. We can safely say that these muscle groups are stabilizer muscles. But this is subject to the standard execution of the exercise, when both feet are on the floor.
But if you try to lift one leg, straighten it, as described below in one of the ways to perform this exercise, then the picture of the stabilizer muscles will change: other muscles will be forced to join in the work or begin to tense more.
So, once again about working muscles:
- the front of the thighs - the quadriceps and sartorius muscles;
- back of the thighs - biceps, semimembranosus, semitendinosus, thin, adductor magnus;
- back of the legs - calf;
- buttocks – more gluteal;
- torso - all abdominal muscles (abdominal group - obliques, rectus, transverse) and back muscles (lumbar - lumbar major, erector spinae, lower back muscles).
And although other back muscles are slightly involved in the work, their contribution is so insignificant that it makes no sense to list them.
Execution technique
Before performing a squat, you need to warm up your muscles, for which a light warm-up is performed. Wave your arms and legs, sit down, do a few bends. You should not exercise in a sluggish state.
Choose a vertical, smooth surface that you can slide on: a wall, a cabinet, a door, or something else.
- Stand against the wall, press your back, shoulder blades and head against it.
- You can slide your hands along the surface, or keep them extended in front of you, but this is a more difficult option.
- Step back with your feet about half a meter, still touching the wall with your body.
- Lower yourself down as if you were about to sit on a chair until your thighs are parallel to the floor.
- There should be a 90-degree angle between your calves and thighs; if that doesn’t work, step your feet away from the wall a little more.
- Breathe deeply and sit there as long as you can stand it. You will immediately feel tension in your leg muscles.
- Stand up slowly, sliding up the wall (this is when your buttocks tighten).
- Rest for 15 seconds and repeat.
Everyone decides for themselves how many repetitions to do; it is important to feel the “burning” or “trembling” of the muscles. Don’t worry, they will recover in 1-2 days and it will be easier.
Watch a video with the correct technique for performing the Wall Chair exercise:
Variations of a high chair against the wall
You can improve the exercise if you are at an advanced level now or use modifications when you reach this level.
With weights. Ask someone or put some weight on your lap or your hips - a plate (disc), dumbbell, kettlebell or something similar.
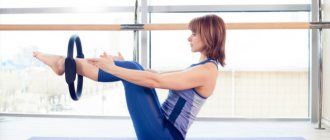
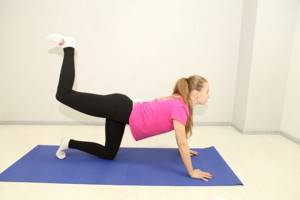
With one leg straightened. The supporting leg will be only one leg, bent at the knee at an angle of 90 degrees. The second is straight forward. We perform the exercise for each leg. You should not think that only the supporting leg works: keeping the leg straight is also difficult, especially the muscles responsible for balance - the abs, back and others - begin to be loaded differently.
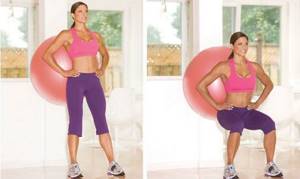
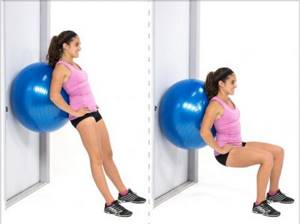
With fitball. It is based on a standard chair, but with a fitball behind the back. The only thing is that you need to press the ball against the wall with your buttocks, and when you lower yourself, rolling it, it will just take a position on your back.
With a wall squat. A static exercise can smoothly flow into a dynamic one when you lift and lower yourself. Simply lower yourself down until it is parallel to the floor (as in the case of a static chair), and then rise up without fully straightening your legs. Repeat as needed.
By the way, this exercise is called “wall squats”, and a static-dynamic modification follows from it - wall squats with a delay. It’s simple: we squat, hold the chair for 5-7 seconds, stand up, and then repeat, for example, 10 such squats.
How to give your muscles a stronger workout
If you can confidently sit in a rack for 3 minutes, you should try to train further, choosing more complex techniques so that your muscles develop and your strength and endurance grow. Progress to more challenging workouts gradually, again starting with small intervals.
With dumbbells
An option for those who also want to pump up their arms, and at the same time strengthen the training for their legs. Take dumbbells and exercise: you can hold them in your arms extended forward, upward or to the sides, and later you can do swings, bends, and whatever you want, while you sit against a wall or without it. The main thing is to control the angle of your legs and keep your back straight.
Without a wall
While you are leaning against the support, your back is used much less. Try squats just like that, and you will notice how the load increases. Try to sit without support for as long as possible, keeping your arms behind your head or extended forward. The exercise actively develops a sense of balance and coordination.
On one leg
The exercise is somewhat similar to the “pistol” exercise that everyone has been accustomed to since school. Squat with a straight back, one leg straightened forward, the other at an angle of 90 degrees, as before. Only instead of the squats themselves, you need to lock in the position. Then change legs. The load increases even more than 2 times, since you also need to keep the extended leg straight, which gives a varied load on the muscles in one exercise.
Making the workout more difficult
Increasing the load is usually associated with increasing the duration of the workout, but not in the case of the “chair”. When you have mastered the exercise and feel that the load is not enough, learn to perform the “chair” without support: the principle of execution is the same, but your back no longer rests against the wall.
Then you can make the load more difficult by raising your leg during the workout. They do this one by one: they raise either the left or the right leg, leaving it extended in front of them for 5-10 seconds.
Try not to fall: it is not easy to stay on one leg in this position; the load on the supporting leg seriously increases.
To weight yourself, take dumbbells in your hands and hold your arms outstretched in front of you - now the arm muscles are also trained. If you place your hands with dumbbells behind your head and hold them in the “chair” position, the effect will be 2 times higher.
How to make the “chair” exercise more difficult?
Real achievements in a short time
Numerous reviews online confirm that clear changes are visible in just a month. Not only the legs or buttocks are pumped, but also, in principle, excess weight is removed from the hips and abdomen, since these muscles also become tense. If you do this twice a day, you will achieve success quickly.
Look at the photos of the “before” and “after” results of the Chair: you too can achieve success. The main thing is to make the exercise regular. You will no longer be able to make excuses that you don’t have time to go to the gym, or that you don’t have time for a full workout.
Warm up for a couple of minutes, stand for 3 minutes, repeat morning and evening.
Is there a wall nearby? Do you have 5 minutes? Start your workout now!
Today we will talk to you about how to keep your leg muscles toned without leaving home and spending a minimum of time. The topic of our conversation today on the Koshechka.ru website is.
What's in the article:
A set of exercises for the hips
Daily exercises for your hips will quickly make them more attractive. This won't take much time. Exercises are performed in the mornings and evenings a couple of hours before going to bed.
As a warm-up, you should walk in place on the edge of your foot and on your toes for up to 3 minutes in each case.
Jump rope for a couple of minutes.
Exercises:
- 1 exercise. Stand with your toes together and keep your hands on your waist. Inhale, rise on your toes, raise your arms up. Having assumed the top position, hold this position for a short time and slowly return to the starting position. Do up to 10 of these lifts.
- Exercise 2. Squat on your toes. The position of the hands is at the waist, while bending the knees, pull them forward to maintain balance. The back is kept straight.
- Exercise 3. Stand on 1 foot and begin lifting on your toes. If it’s difficult, support yourself with a chair, but don’t lean on it.
It should be remembered that to effectively lose weight in your thighs and calves, you need to give your body sufficient physical activity: run, walk for a long time, maintaining an average pace, try not to use the elevator when going up to the upper floors.
In addition, do the following exercises daily:
- Sit on a stool , stretch out your toes and turn them alternately outward and inward with maximum effort.
- In a lying position , bend your knees and place your feet on the floor. Spread your knees in different directions without helping yourself with your hands. The feet cannot be lifted off the floor surface.
- In the same position , bend the joined knees in different directions without disconnecting the feet from the floor.
- Lying on your stomach , bend your right leg and lift it as high as possible. Do the same with your left leg.
- Sit down on the floor , rest your hands behind you, stretch one leg forward, the other back, so that they feel different in length. Try moving like this using your buttocks.
- Stand with your feet shoulder-width apart. Start squats with a straight back on the presented stool.
- Sit on the floor , bend your knees, clasp your shins with your hands, spreading your legs to the sides, then close your knees forcefully.
To achieve effective leg weight loss, each exercise is performed for about a minute with a 30-second break. A total of 3 to 4 approaches are done.
For the inside
It is very important to train the flexibility of the feet and joints, otherwise the process of losing weight in the legs will be complicated, since the insufficient range of motion in some exercises will complicate their implementation.
With the help of these exercises you can develop coordination and improve blood circulation.
It does not require much effort; the training is distinguished by the accuracy of the movements performed:
- to lift the tennis ball with your feet alternately.
- Swap the ball for a pencil.
- Place a pencil between your toes and write a phrase or draw something on a piece of paper. This exercise gives you an excellent workout and your legs will certainly lose weight.

Leg wall exercise: benefits for the body
If for some reason you cannot afford to exercise regularly, visit a fitness center or gym, and you are sorely short of time for everything, and you really want your legs to be slim and beautiful, then this is what will help you make your dream come true . Thanks to this exercise, provided you practice regularly and daily, you can quickly make your legs slimmer, strengthen the muscles of your feet and hips, and also cope with other equally common problems and ailments:
- reduce swelling and normalize blood circulation throughout the body. And as a result, get rid of varicose veins;
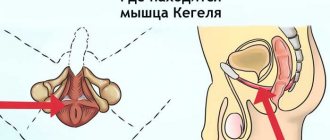
- relieve and reduce pain with a “floating kidney”;
- an exercise called the wall is also useful for the spine, it helps to straighten your posture;
- trains intervertebral discs (prevention of intervertebral hernia);
- strengthens the vestibular apparatus. Useful to know for those who experience frequent dizziness when raising their heads suddenly;
- strengthening the heart muscle and cardiovascular system.
Wall exercise: how to do it
So, you decided to get your legs in order yourself using this exercise. The final result depends on how correctly and efficiently you follow the recommendations listed below, so do not neglect them.
In order to avoid severe pain and injury during training, you should first do a warm-up. It may include walking on tiptoes, squats, bending, turning your knees to the sides with your hands, patting and rubbing your leg muscles with your hands. Warm-up should not take much effort and last more than ten to fifteen minutes.
Below we will provide a set of exercises for beginners and more advanced people. It’s better for you to master the simplest of them first. In the future, you can increase the load and try complex exercises and their variations.
As for repetitions, for the first time it is better if there are no more than three. Because after heavy loads, you simply won’t be able to walk the next day, much less exercise. Keep in mind that you shouldn’t take long breaks between approaches. Otherwise the result will be zero.
After your workout, be sure to stretch and warm up. This will only improve the result and help reduce pain the next day after training.
Exercise “Chair” against the wall: what muscles work, benefits
Some people believe that it is impossible to pump up a beautiful butt and thighs in a month without making Herculean efforts. If we talk about working people, this is completely impossible, due to the lack of free time and energy. In fact, this is quite possible if you combine dynamic exercises with static ones. Training can take no more than ten to fifteen minutes a day, and you can exercise in absolutely any place, even in a subway car, no matter how strange it may sound.
Many girls are afraid of strength training, so as not to build muscles like famous bodybuilders. They do not want to have relief that would be the envy of the most outstanding bodybuilders in the world and they can be understood. With the help of isometric exercises, including the “Chair” against the wall, you can make your body beautiful, with graceful curves, strong, resilient, while remaining tender and attractive. The famous strongman Alexander Zass, who bore the nickname Iron Samson, believed that thin but wiry, thin but hardy people are often much stronger than voluminous handsome men with “bulging” muscles.”
Leg wall exercise: variations
In order to perform a leg exercise using a wall, you will need a wall, preferably not slippery, and comfortable clothes. Go to the wall, press your back against it and sit down as if you were sitting on a chair. You need to spend at least three minutes in this position. But this may not work the first time, so try to stand there for a minute. Then rest for a few minutes and sit down again. Over time, you will be able to stand like this for ten minutes. But for the first time, five approaches per minute is quite enough.
Now let’s talk about what other wall exercises you can use to strengthen your leg muscles. However, it is worth noting that all of the following exercises are contraindicated for those with high intracranial and blood pressure. They can only do the wall squat exercise.
Now let’s look at the “advanced” wall exercise, designed for those who have stronger physical training.
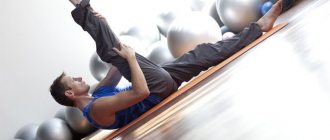
- You need to lie on the floor so that only your shoulder blades touch the floor, and your butt, lower back and legs touch the wall. Now you can start the exercises. Swing first with each leg, then with both legs so that your toes touch the floor. From the same position, try to imitate running or cycling.
Performing a wall leg exercise
, even without its many variations, you will be able to see the result after a few weeks. website. wishes you success on your path to improving your legs.
Bruslik Maria - especially for Koshechka.ru - a site for those in love... with themselves!
Svetlana Markova
Beauty is like a precious stone: the simpler it is, the more precious it is!
Mar 30 2020
Content
Each exercise option is aimed at training specific muscle groups. For women, the primary task is to train the hips and buttocks. Doing the chair exercise will help put stress on the leg muscles; it can be done against a wall or without additional support. The convenience of such squats is that you can do them in any place where you can sit down.
A set of exercises on a chair for weight loss
When planning to perform exercises, wear loose, non-restrictive clothing. You can work barefoot, but it is better to choose light, comfortable shoes, such as sneakers or moccasins. You can train in any convenient place: at home, at work during a break, instead of industrial gymnastics, and even by simply taking the chair out into the yard, in the fresh air.
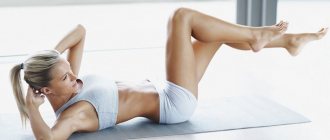
Ab exercises on a chair
During this simple complex you will have to try. After all, to get a good, quick effect, you need to constantly keep your gluteal muscles, in addition to your abs, tense.
Leg raises and turns
Start in a standing position, facing the back of the chair, at a distance of approximately 15-20 centimeters.
- Lean on the back of the chair with both hands.
- Rounding your back, lean forward as you inhale.
- At the same time, lift the knee of one leg, trying to bring it as close to your stomach as possible.
- Rise up onto the toes of your supporting leg, simultaneously moving your raised knee to the side and straightening your back.
- As you exhale, return to the starting position.
The exercise is repeated the same number of times in both directions. You can change the leg after one repetition, or you can divide the movement into approaches.
Buttock and pelvic lifts
For this exercise, in addition to a chair, you also need to take a regular gymnastic mat, which is used, for example, for yoga. If you don’t have one, you can use a beach blanket or simply fold a blanket or large towel several times.
- Lie on the floor with your back so that the chair is directly in front of your feet.
- Raise your legs and place your feet on the seat of your equipment so that your shins are just parallel to the floor.
- As you inhale, lift one leg vertically up.
- At the same time, lift your buttocks off the surface and lift them as much as possible.
- Hold the position for 3-5 seconds.
- As you exhale, slowly return to the starting position.
The exercise is bilateral, so it should be repeated first with one and then with the other leg.
Swing back
To do this exercise, you need to lean over the back of a chair and rest both hands on the seat of your improvised equipment. In this case, you need to bend your knees to make it more comfortable.
- As you inhale, slowly transfer your entire body weight to one leg while straightening it.
- At the same time, lift your free leg back and perform vigorous swings. From ten to two dozen will be quite enough, depending on the initial preparation.
- As you exhale, return to the starting position.
What is a chair exercise
We can conditionally divide all exercises in sports into dynamic and static. The first helps to increase muscle mass, their tone and contractile functions. The static chair exercise is aimed at strengthening the muscles, not its growth, increasing the strength of the tendons of the legs. This type of exercise makes you stronger, but does not increase muscle mass. The basis of the training is the technique of martial arts, where preference was given to strength rather than volume. The chair will give your hips and buttocks a beautiful shape, but will not make them larger.
What does the chair exercise do?
The benefit of this sports movement is to strengthen and work out a large number of muscle groups. Such squats strengthen tendons and ligaments, which play an important role in attaching muscles to the skeleton. Another name for the high chair is the wall exercise, it promotes:
- increasing spiritual concentration while maintaining breathing control;
- normalization of blood circulation, pressure;
- foot training, helps correct flat feet (if done barefoot);
- promotes the return of organs to the desired position during prolapse (for example, a “floating kidney”).
What muscles work
The movement during such training is very simple, but during its execution several large muscle groups are involved at once. The chair is a basic (multi-joint) exercise, it works the hip and knee joints, and you can additionally use your arms and shoulders. Listed below are the muscles involved when squatting into a chair:
- gluteal muscles;
- the quadriceps or quadriceps, which is located on the front of the thigh, gives the legs a beautiful shape;
- hands;
- back: upper, lower and neck;
- calf muscle;
- press (all departments).
Chair - exercise for legs
This movement will be most effective if performed regularly and with the correct technique. Statics is an excellent option for strengthening the muscle corset and tendons. The leg wall exercise involves the hips, buttocks, back, and abs, so you should prepare properly before exercising:
- warm up all the involved parts of the body well, do a warm-up;
- clothing should be comfortable so as not to restrict movement4
- choose a wall near which there is enough free space for the lesson;
- lean your back firmly against the surface, imagine that you really want to sit on a chair;
- lower yourself until your thighs are parallel to the floor, your knee should be at a 90-degree angle;
- stay in this position for 1-3 minutes, then return to the starting position;
- rest for 20-30 seconds and repeat the movement.
Chair for buttocks
This is the initial option for training the buttocks, because the wall takes some of the load off these muscles. Such classes are well suited for those who are just starting to train and want to tone their body and strengthen their muscles. Wall squats for your butt won't help you get a bigger butt, but they will give you a nice shape to this part of your body. The movements are performed as follows:
- Stand against a wall with your feet shoulder-width apart.
- With your back firmly against the surface, begin to move as if you were sitting in a seat.
- Keep your arms extended in front of you.
- Lower yourself until your knee forms a 90-degree angle.
- Lock the position and hold it for 1-3 minutes.
- Slowly rise up.
- Do the required number of repetitions.
Exercises for the buttocks: six best exercises to strengthen the muscles of the buttocks at home
The buttock area is one of the most problematic areas for women. But in order to keep them in great shape, you can just do exercises, which include ordinary squats, leg swings and lunges. And to make the task easier, we suggest you familiarize yourself with the six best exercises to strengthen the gluteal muscles at home. We tried to choose the most effective and interesting exercises for you.
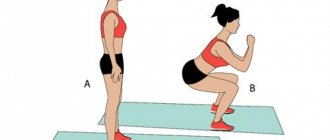
1. Classic squats
Starting position - feet shoulder-width apart, knees slightly bent. Turn your socks slightly to the sides. Bring your arms in front of you and bend your elbows, with your palms at head level. Squat down slowly, trying to pull your buttocks back and arching your lower back. Imagine that you are sitting on a chair that is slightly behind you. When performing the exercise, take your time and make sure that your thighs are parallel to the floor when squatting. The knees did not go beyond the level of the socks, and the socks pointed towards the knees. Repeat as many times as possible, 2-3 approaches.
2. Straight lunges
Stand up straight, put your hands on your waist, watch your posture - your back should be straight throughout the entire time of performing lunges. As you inhale, take as wide a step forward as possible. In this case, the “stepping” leg should bend 90 degrees, and the second leg should remain in place. As you exhale, return to the starting position. Do 2-3 sets of 10-15 reps. Remember, the wider the lunge, the better the gluteal muscles are pumped.
3. Plie squat
Place your feet wider than your shoulders and bend your knees slightly. Turn your socks out to the sides as far as possible. Fix your arms as in classic squats. As you inhale, slowly squat until your thighs are parallel to the floor. As you exhale, return to the starting position. When performing the exercise, tilt your body forward, thereby moving your pelvis back. Watch your back - it should remain straight. Perform 2-3 sets of 10-15 times.
4. Bridge
Lie on the floor, face up. Pull your legs as close to your buttocks as possible. Stretch your arms along your body. As you inhale, lift your torso up, while tightening your buttocks, and hold at the top point. As you exhale, slowly lower yourself down. To increase the load, you can bring your knees together while your body is at the top. Repeat the exercise 15-20 times, 2-3 approaches. 5. Brazilian butt Lying on your back, bend your right leg at the knee, straighten your left leg and lift your lower body off the ground. At the same time, your shoulders should remain pressed to the floor. Spring 15-20 times. Then switch legs and repeat the exercises. Two approaches per workout will be enough. 6. Crab Sit on the floor, lean on your hands behind you, bend your knees. Lift off the floor and then lift your right leg as high as possible. At the highest point of the lift, move your leg to the side and hold for 10-15 seconds in this position. Slowly return to the starting position, but do not touch the ground with your buttocks. Do the exercise with the second leg. To begin with, 10 lifts on each leg will be enough.
By performing this complex at least twice a week, you can maintain the beauty of your buttocks for a long time.
What are the benefits of the chair exercise?
Every person tries to choose a comfortable and at the same time effective exercise for training. The chair is well suited for both of these parameters; it helps not only strengthen muscles, but also tendons and ligaments. You can perform training in any convenient place where there is a wall. The benefits of the chair exercise are as follows:
- You can independently adjust the number of repetitions. The muscles should begin to “burn”, this signals that they have received the necessary load.
- The chair is an extremely “unpretentious” movement. No additional equipment or special training equipment is needed. At first you will only need a wall for support, but as your strength increases you will be able to perform the exercise without it. Minimum required space – maximum result.
- You can train using this method every day; some people even do a chair in the morning and evening. Muscles recover quickly after static load
- You will minimize the likelihood of injury during training, the knee joints will remain intact and unharmed (which cannot be said about squats with a barbell). Physical activity should not only be effective, but also safe.
- The exercise is a good prevention of spinal hernia, like all back workouts.
Benefits of exercise
- As a result of training, the gluteal muscles are strengthened, the butt becomes toned and elastic.
- The back receives the necessary load: posture is leveled, neck pain goes away - this is an excellent prevention of osteochondrosis .
- The "chair" can be performed by people who spend a long time in a sitting position. During your work break, try doing the exercise: you will feel how, after the workout, the tension associated with improper posture when working goes away.
- The exercise is aimed at increasing endurance.
- The body actively copes with tension, as a result, fat is broken down - exercisers also note the effect of losing weight.
- The leg muscles are strengthened: walking will no longer seem tiring.
- This exercise is suitable for the whole family. Get the kids involved and practice together. This is a great opportunity to show the younger generation the effectiveness of sports by example.
The benefits of chair exercises
How to do the chair exercise correctly
With any workout, it is extremely important to maintain proper technique. If you place your foot incorrectly and do not straighten your back, this will not only reduce the effectiveness of the exercise, but can also lead to injury. Wall exercises are not particularly difficult, but you should still know how to do them correctly. You should always start with a warm-up to warm up your body and prepare it for the load. Perform bending, raising your toes, squats, turning your knees to the sides.
The exercise technique has a classic version and can be performed with additional objects and movements. The first option is good for beginners; as your skill grows, you can move on to using dumbbells or squats on only one leg. In this case, the number of repetitions is not so important; what matters more is the time you can hold your body in a static squat. After training, you should definitely warm up and stretch again.
Basic exercise
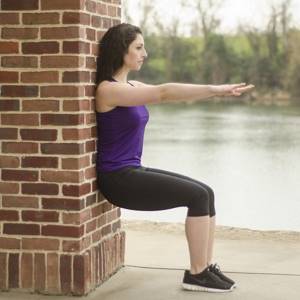
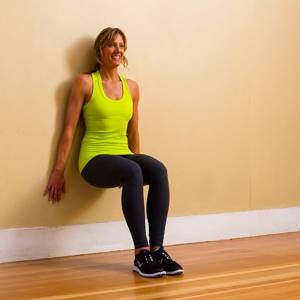
This is a classic option for making a chair against the wall. All of the muscle groups described above are involved, perfect for those who are just starting to train. If wall squats come first in your routine, be sure to do a warm-up. The exercise technique is as follows:
- Stand close to the wall (preferably without a plinth), press your heels, keep your feet straight (it is better to do the workout barefoot) at shoulder distance.
- Keep your arms along your body, do not place them on the wall.
- As you inhale, lower down, leaning on the surface.
- Lower until you sit in a chair (imaginary). Your thighs should be parallel to the floor.
- Keep your neck and back straight, the back of your head pressed firmly against the wall.
- Fix the position, tensing all your muscles. Breathe evenly and count the seconds to yourself. For the first time, 30-40 is enough; over time, increase the time in static mode to 2-3 minutes.
- Keeping your back and neck straight, rise up, pushing yourself out of the chair. At this stage, the muscles of the buttocks and thighs will work more.
With fitball
This is one of the variations of static load training. Squats with a fitball against a wall differ only in that its use helps to more actively pump up the stabilizer muscles of the back. The exercise technique completely repeats that described above with one difference: a fitball should be placed between the wall and your back. All other training details remain the same. This fitness ball does not take up much space in the apartment, it can be used for other weight loss workouts.
Without a wall
This performance technique is borrowed from the eastern style of martial arts wushu. The wall-less chair exercise is very similar to the mabu step. Externally, the movement is similar to dynamic squats:
- Keep your feet shoulder-width apart, your shins perpendicular to the floor, your thighs parallel, and your feet straight.
- As you exhale, lower to the “sitting on a chair” position.
- Keep your back and neck straight.
The main difference is that a wall is not used for additional support. In this case, it is recommended to stretch your arms in front of you. Keep all your muscles tense, breathe evenly, counting down the seconds. When you feel like you can’t stand anymore, begin to rise up, maintaining your body position. Stretch well, bend over a couple of times and proceed to the next approach.
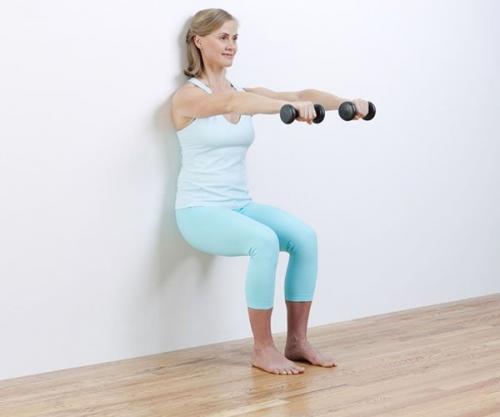
With dumbbells
Be sure to do a short warm-up before starting your workout. Squats with dumbbells in your hands are a complicated version of the chair exercise, which is aimed at additional stress on the shoulders and arms. The load also increases on the main muscles involved in the movement: quadriceps, inner thigh, back stabilizers, soleus. The movement is performed like this:
- Lean your back against the wall (you can do without it).
- Place your feet at shoulder level and begin squatting.
- Extend your arms in front of you while holding the dumbbells.
- When you get a 90 degree angle at your knee, stop the movement.
- Stay in this position for 1-3 minutes.
- As you inhale, begin to rise to the starting position.
With a leg raise
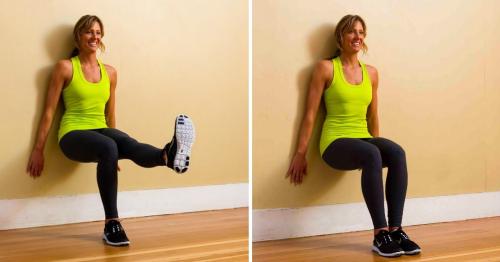
There is a certain similarity here with the “pistol exercise” that everyone did in physical education at school. The main difference is that the squat was performed completely to the floor - this is a dynamic load. A chair with legs raised is a static load that transfers all the stress only to the right or left leg. The technique for performing it against the wall is the same as in the classic version. The difference is that one of the legs should be extended forward and kept as parallel to the floor as possible. Be sure to alternate legs during your workout to distribute the load.
Chair against the wall exercise. How to do the chair exercise
Classic exercise technique
Start your workout with a light warm-up to warm up your muscles and prevent injury. Then come with your back to the wall at a distance of 40-50 cm. Feet should be directed straight forward and stand shoulder-width apart. We press our backs against the wall, stretch our arms along it and lower ourselves until the thighs are parallel to the floor. Imagine sitting on an invisible chair.
The neck and back should be straight and the back of the head pressed against the wall. Lock yourself in this position, tensing your body. Breathe evenly and control your timing. You can just count slowly. For clarity, we recommend looking at the photo or
Chair with fitball
A more complicated version of the chair requires the use of a fitball. The exercise uses the same muscles, but is more active on the back. The technique is similar, but there should be a fitball between the wall and your back.
If you don't already have a gymnastic ball, you can buy one at any sports store. You can keep it on the balcony, and with its help you can perform many useful exercises. And from the article on our website you will learn how to choose a fitball for a home of the right size.
With dumbbells in hands
This exercise additionally loads the shoulders and arms, and also increases the load on the leg muscles. It is performed in exactly the same way as the first classic exercise, but you should have small dumbbells in your hands - 1-3 kg. Stretch your arms forward and keep them parallel to the floor. The main thing is not to forget to breathe, since many people hold their breath during exercise - this is a very common mistake.
With leg extended
There is an exercise called a pistol - squats with one leg extended forward. The high chair can also be performed using a similar technique. You do everything the same as in the classic version of the exercise, but extend your leg forward. Try to keep it straight and strictly parallel to the floor. It will be difficult at first, but with regular training, you will master this technique. In this exercise, the load on the quadriceps of the raised leg increases, and the abs are also strongly involved in the work.
Chair without wall
Another version of the chair exercise, which is not at all difficult to perform correctly, but you need to practice. Standing straight, sit down as if sitting down on a chair. Your thighs should be parallel to the floor and your shins perpendicular to it. Stretch your arms forward to maintain balance. Breathe evenly and count slowly or time the time on a stopwatch. Try to increase the exercise time by at least 5 seconds with each workout.