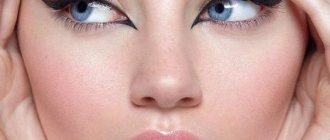
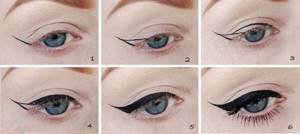
Basic scheme for drawing arrows on the eyes
The basic scheme for drawing arrows on the eyes is quite simple. It will help beginners create smooth lines and “not reinvent the wheel.” Let's look at it step by step:
[/row]
- First we draw the bottom line: it starts from the outer corner of the eye and continues the line of eyelash growth. At first, it is better not to make the notch too long - 0.8 mm - 1 cm is enough;
- From the center of the upper eyelid (guide by the pupil), draw a line to the created “tail”;
- Draw a connecting line from the inner corner of the eye to the top of line 2;
- We paint over the resulting voids in the resulting outline. The arrow is ready!
You can vary the length of the tail, the thickness of the arrow and its ending depending on your preferences and goals.
[/vc_column][/vc_row]
[vc_empty_space height=”20"]
At first, you will often have to redraw the arrows again, erasing the previous version, but over time you will get better at it and learn how to create the desired outline the first time!
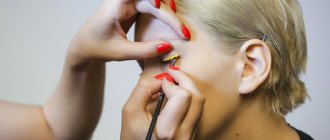
Step-by-step instructions for creating arrows
To make the arrows look beautiful, you need to know some subtleties, which we will talk about now.
The image shows how to create winged lines using eyeliner, but if you are more comfortable with a pencil, the technique remains the same.
Follow the instructions step by step and you will succeed:
- It will be easier to draw a rising line from the outer corner of the eye, as in Figure 1, if you apply a pencil (ruler, spoon, whatever is more convenient) to the lower eyelid along the line of its curvature, and repeat this curve with a pencil or eyeliner;
- From the beginning of the last quarter of the upper eyelid, draw a line and close it with the end of the already drawn rise of the arrow, giving its edge the desired shape;
- From the outer part of the eyelid, draw a contour line, as in figure 3, and end it on the middle part of the “tail”. If you are going to draw a thin arrow, move along the eyelash growth line, slightly lifting the arrow starting from the middle of the eyelid;
- Shade the outline carefully.
This video offers step-by-step instructions for creating arrows on the eyelids, and also shows the types of arrows.
Video source: AlisaBlack
From this video you will learn the secrets of creating beautiful wings on your eyes.
Video source: Ira Blanc
How to choose the right arrow shape

Depending on the location of the eyes and the shape of the face, the following recommendations can be distinguished:
- For close eyes. It is recommended to create arrows, the top line of which starts not from the inner corner of the eye, but from the middle of the upper eyelid. This will visually widen the eyes. Forms No. 3 and No. 6 from the photo above are also good;
- In the impending century.
In this case, a special approach is required, which is discussed in detail in the following video lesson: [v[vc_empty_space height=”20"]
How to draw arrows on the eyes with a pencil step by step? Photo
1. Carefully line the lash line:
2. Mark the end and beginning of the arrow with dots, compare them, make sure that the dots are symmetrical on both eyes. Draw a smooth dotted line:
3. Connect the points with a continuous line from the inner corner of the eyelid to the outer:
4. After drawing the lines on both eyes, make sure they are symmetrical. Blend them if you want wider arrows:
5. Draw the lower eyelid, getting as close as possible to the lash line:
Carefully remove excess using a cotton swab. After drawing the arrows, you can continue applying makeup.
Arrows can have a wide variety of shapes. Here are some popular examples:
- A classic thin arrow across the entire eyelid, it can be either with a short or an elongated end, while it is always smoothly curved upward;
- An arrow across the entire eyelid with a curved tip - it can be quite wide, making the eyes a little cat-like;
- “Cat eyes” - arrows across the entire eyelid have more elongated tails;
- Arrows from the middle of the eyelid can go to the outer corner of the eyelid, or maybe to the inner one, for eyes that are too wide-set. Such arrows make the look more languid. They are quite easy to apply. The corner is usually slightly curved upward, but can also be long;
- Arrows with double tails - help to “open” too narrow eyes;
- Invisible arrow - drawn only along the eyelash growth line, with a very thin pencil, used for drooping or rounded eyelids;
- A rounded arrow is drawn so that when the eyes are open it looks solid. This is another way to draw arrows on the looming eyelid.
- Double arrow - done on the upper eyelid and combines two colors; the second is usually very bright. Experiments with such arrows are becoming more and more popular.
How to draw arrows on the eyes
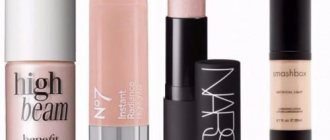
It is very difficult to answer the question “what is the best way to draw arrows” - everything here is purely individual. The modern cosmetics industry offers numerous products, each of which has its own advantages and disadvantages, and you need to choose from them according to personal preferences only through a series of trial and errors! We will outline the main types of funds:
Eyeliner
For those who are looking for a way to learn how to draw arrows on their eyes, eyeliner will be an excellent help - an ageless classic, with the help of which fashionistas have created their arrows for decades in a row! Today at least 2 types of eyeliners are known:
[/ro[/row]
[/ro[/row]
Liner / Marker / Felt-tip pen
[/ro[/row]
Pencil
Before drawing arrows with a pencil, you need to consider some features of using this tool:
We draw arrows with a pencil along with a step-by-step video lesson from Elena Krygina:
[vc_[vc_empty_space height=”20"]
Shadows
Before drawing arrows with shadows, it is important to create a base for the shadows using a primer and prepare a thin angled brush. Let's look at the application step by step:
- Guided by the diagram above, we line up the body of the arrow, starting from the inner corner of the eye and ending with the tip. To do this, you can use a small amount of pigment so that in case of an error you can easily make a correction;
- Carefully connect the resulting points, trying to create an accurate, even line;
- Paint over the spaces;
- It is better to paint eyelashes only after the arrow is ready.
To make the color more saturated and bright, you can apply shadows to the finished arrow, made with a pencil or eyeliner.
Combinations of funds
To create perfect arrows, all means are good. You can easily combine several cosmetic products, for example:
- Gel eyeliner + shimmer shadows or metallic shadows. By working the arrow on top with shadows, you will add shine and brightness;
- Pencil + eyeliner. It is much easier to erase a pencil in case of a mistake. Therefore, a beginner can create an arrow first with a pencil, and then work on the finished version with eyeliner. In addition, the pencil ideally masks the gaps between the eyelashes, so it will be an excellent addition to the eyeliner in filling the space between the eyelashes;
- Pencil + matte shadows. An arrow drawn with a sharp pencil will look beautiful if you shade it a little with black shadows. Be careful to blend only the outer edge of the outline!
Arrow drawing technique
Which product to use to draw perfect arrows is up to you to decide. But mastering how to create eye makeup using different products will help you create a variety of makeup without focusing on one look.
Draw arrows with a pencil
Do not forget that you should start applying eye makeup only after the eyelid skin has been cleansed and prepared for this procedure. As mentioned earlier, you can use a primer or powder on which cosmetics will be applied.
To begin, line the interlash space. With it, the eyelashes will look fuller and thicker, and the arrows will blend more harmoniously with the eyelid. Just run a pencil along the very roots of the eyelashes on the upper eyelid - from the inside to the outside. The pencil should be well sharpened and also dried for about ten seconds - to do this you just need to not blink while holding the product in the air.
Next, draw the tail of the arrow. It should be very neat and delicate, and a successful result should be immediately repeated on the second eye to achieve symmetry. In order to make the tip as pointed as possible, you should apply the pencil to the outer corner of the eye and sharply make a precise stroke going towards the temple.
After this, you can draw the outline of the eyelashes, painting it with a pencil and finally connecting it to the tip. In order to achieve even lines, we advise you to slightly pull the skin of the eyelid from the outside towards the temple. But do not use too much force, otherwise the unevenness will become even greater.
At the end, you can increase the arrow to the required size: move the pencil from the inside to the outside, and at the end add mascara to the eyelashes.
Using eyeliner for arrows
Those girls who have sufficiently honed the skill of eye makeup with a pencil can move on to a more complex cosmetic product - eyeliner with a liquid or gel texture. With it, the classic thin arrow will turn out graphic and clear, and make-up in the “cat eye” style can be done without difficulty.
For a thin arrow, draw a line from the outer corner parallel to the edge of the eyelashes, and then connect the resulting tip and the contour with a smooth line. Next, you should paint the space between the eyelashes on the upper eyelid for additional volume of eyelashes - this should be done using a black waterproof pencil. To complete the makeup, place a bright highlight under the eyebrow and add mascara. The image is ready!
For a wide arrow, choose gel eyeliner and a special thin brush. The first step is to draw a stroke from the outer corner of the eye to the crease of the upper eyelid. It is important to ensure that this line runs parallel to the base of the eyebrow. Now mentally divide the contour of the upper eyelashes into four parts: step back one part from the outer corner and draw a line to the very tip. From the inner corner we draw a line to the middle of the one that was drawn in the previous step. Fill all empty stripes with eyeliner. The space between the eyelashes on the upper eyelid must be painted over, and then the eyelashes themselves must be covered with a thick layer of mascara.
How to draw arrows using available tools
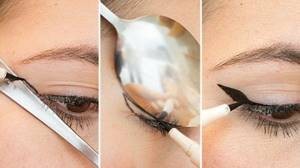
Before drawing arrows beautifully the first time, for some time for beginners, arrows without blots are a real dream. Only training and a few interesting life hacks will help fix the problem, which will tell you how to draw arrows evenly, using available tools for this:
- Spoon. With a spoon it is easy to create graphic corners of the arrows. Use a teaspoon as a ruler, placing it firmly on the eyelid in the desired position and tracing it with eyeliner.
- Scotch. Thin transparent tape is a good helper in creating a beautiful arrow. Glue a small piece to the lower corner of the eye so that you can draw the bottom line. Make sure that the tape is applied symmetrically on both eyes! Also, in order not to spoil the result, it is not recommended to remove the tape until the cosmetics are completely dry.
- Stencil. Today there are many different stencils, with the help of which even experienced makeup artists sometimes draw arrows. You can buy them at any beauty salon, and the principle of their operation is in many ways similar to eyebrow stencils.
- A plastic card. Drawing arrows with a plastic card is quite easy if you manage to fix it well. Otherwise, if your hand shakes, your makeup will be ruined.
It’s not difficult to create straight arrows using improvised means. However, the best assistant here is experience. By training daily you will achieve excellent results.