LiveInternetLiveInternet
Master class TECHNIQUE “TERRA” Part two.
Thank you very much Babo4kanayablo4ke. I quote.
The first part can be found here
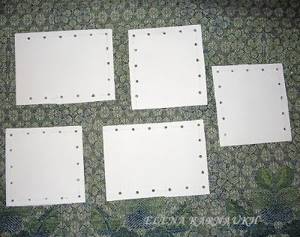
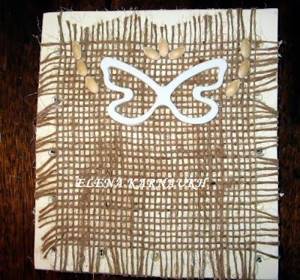
Five homemade plaster and putty boards are reinforced with cotton fabric, decorated on both sides and connected to each other in a box with a leather cord. Box size 20cmx15cmx15cm. Materials: building gypsum, water-dispersion putty, black acrylic paint, dark silver, light silver, white, burlap, inflorescences and leaves of astilbe, sedge, chrysanthemums, hydrangeas; clematis boxes, hazelnut, ornamental sedge roots, melon seeds, elements of a Vietnamese curtain (apparently bamboo), semolina, dragonflies and butterflies (decorative elements on a self-adhesive basis), birds. (Part II). First my brain started boiling!!! Because we had to figure out how to fasten the boards together? It will not be possible to glue them together, because... they are very thin! I decided that I would tie them together somehow! How? I'll think about it later, but in order to knit them later, I need to make holes. So, first, I sawed the boards with a hacksaw so that one of them was the bottom, and the rest were the walls. But since I still “disposed” of the hamster supplies so that there was a minimum of material left for further storage, the walls turned out to be of different heights! Well, okay, then I’ll figure out how best to adapt these different sizes! I cut more small squares - like legs for my organizer. Then I drilled holes one from the other at an equal distance: at the bottom along the entire perimeter, at the walls on three sides, stepping back from the edge a couple of centimeters.
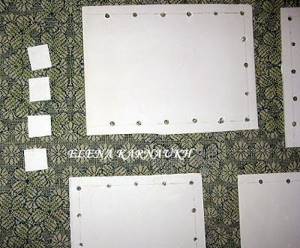
Then I glued burlap onto all the boards on both sides with PVA glue, spreading it out a little at the edges. When gluing the burlap, I tried to move the threads apart so that they did not obscure the drilled holes.

Next, what will be inside the organizer was decorated on top with butterflies and dragonflies on self-adhesive tape, melon seeds and elements from a Vietnamese curtain (probably bamboo).
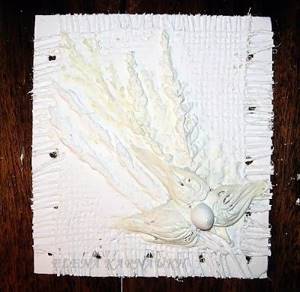
These elements (rings) were too big for me, so I soaked them for a while in warm water, and then braided them raw the way I needed them, then dried them. This spiral was made like this: I wound the loose and damp “bamboo” around a pencil along its entire length, secured it with threads and dried it. I pasted it for a Super moment. I kept putting off the moment when I would have to start TERRA directly! It was very exciting to get started, however!!! So, I found time so that no one and nothing would bother me, surrounded myself with all sorts of “tops” and began to get wise! First, I estimated my drawing on each side and decided where it would be placed. I applied a not very thick layer of a mixture of putty (1 cup), PVA glue (1/2 cup) and sifted, washed and dried river sand (2 tablespoons) to the approximate location of the compositions. At the same time, I used a spatula to rub the edge of the stain and, as it were, reduce it to nothing, so that later the putty would not stand out against the background of the burlap. Next, on the still damp putty, I placed the elements of my compositions and pressed them a little with my fingers so that they would sink a little into the putty. I waited for all this mess to dry completely. I was most worried about the hydrangea, it’s too tender! But it’s okay, I got stuck like a native! It even looks like a hydrangea! Now I had to try the very process of “smearing”, as I understood it. I put a little putty (mixture) on a flat brush (bristles) and, as it were, painted my “herbariums” on top, ultimately making sure that they and the background looked like a single whole, and not separately glued elements. At the same time, I depicted something in all sorts of different ways along the edges of the background so that it would not be flat and boring. I was satisfied with the intermediate result: all the elements were decently legible, remained convex and, importantly, rigid, like a thin shell! Hydrangea also passed the “smearing” test and remained similar to hydrangea: so airy. Then I ruined everything, but more about this sad moment very soon!
All this time I wasn’t just creating! I was painfully wondering how I should connect my future structure? I decided that I would join it with linen twine - which means it all should look in eco style - which means I’ll smear it with bitumen! Although all my experiments with bitumen ended in complete failure, I still decided to take a risk and went to paint my boards with white acrylic.

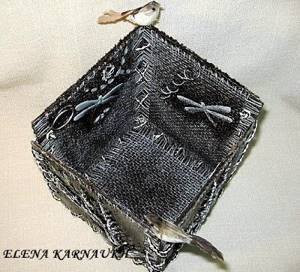
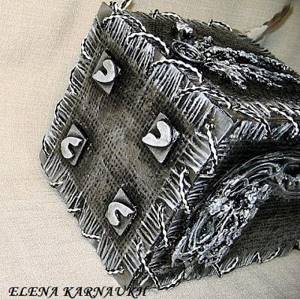
Thank God that although I didn’t paint the inner sides with butterflies, I was just fiddling with the bitumen late at night. She waited for the white acrylic to dry, coated the top with acrylic varnish, that too dried, and then smeared everything with bitumen. After a couple of hours, I walked over the boards with a cloth soaked in white spirit, highlighting the bulges. It turned out to be the creepiest!!! Universal dirt! The result was the texture of a dirty, sometimes smoky bone, on which some dirty grass had stuck! I didn’t even take a photo of this disgrace! In the morning I finished washing off the bitumen, but it had already floated into all the cracks, from which I could no longer pick it out! But the main thing is that the airiness in the herbs has gone, they have become thick sticks, and the hydrangea has become some kind of shapeless piece of I don’t know what! But I had to paint it all with another layer of black paint! Which is exactly what I did this morning! Why did I decide to paint it black? Because there was no time to reinvent the wheel, and I followed the beaten path: on a black background - lightening from dark silver to white. A kind of imitation silver that has never let me down! Each board was covered with black acrylic on both sides. Then I went over it with a sponge using slightly dark silver, then to make the relief stand out even more, I tinted everything with light silver, and the most protruding parts with white acrylic.
I really liked what came out of the inside of the future organizer: the burlap “lay down” beautifully, the butterflies and dragonflies.
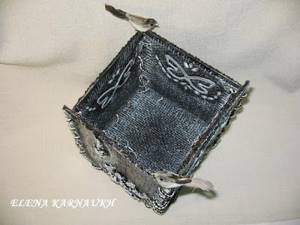
But from the front side everything looked very rough! As they say: feel the difference! In order to somehow correct the situation, I had to pick up my favorite white outline and walk it very thinly both along the “herbariums” and along the edges of the burlap - to make everything more elegant! Well, in general: what has grown has grown!!!
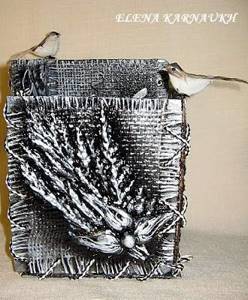
Now we had to figure out how to fasten the structure! I went to the store and bought a black and white leather cord. The process of threading the cord into the holes, which after many layers of paint have shrunk in size, is a separate story! I spent more time on it than on the entire decorating process! But the design turned out to be surprisingly strong, and the lace fit like order! Two birds were taken from the hamster supplies, and I lightly brushed their feathers with black acrylic so that they matched the overall color scheme! It was they who delighted my child when I came to him with the finished work and with the question: “Well, how?” The child exclaimed: “Cool birds!” Everything else turned out to be just a background for the birds!!! That's it!!!
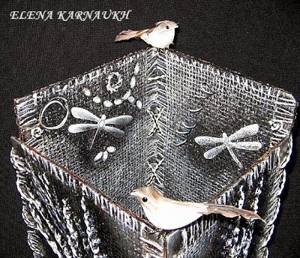
For those who are interested, a separate description of what the herbariums were actually made of: 1. At the bottom right is a hazelnut, around it are three clematis boxes (I learned that over time they fluff up like cotton and become like lumps of cotton wool), astilbe and sedge inflorescences.
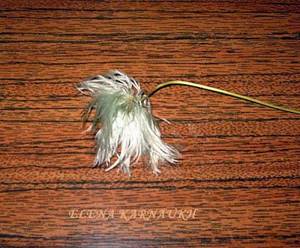
2. Astilbe inflorescences, chrysanthemum flower with partially flowing leaves, astilbe leaf.
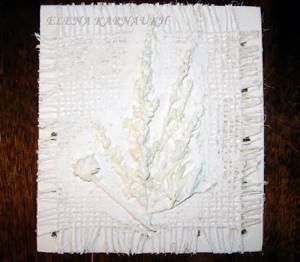
3. Sedge leaves, astilbe inflorescences, hydrangea bouquet. 4. Leaves and inflorescences of sedge, tubers of garden sedge, chrysanthemum flower (the leaves were preserved), astilbe inflorescence. 5. This is the bottom: on the legs are some elements found in a bag with dragonflies, there were 4 of them, but I didn’t dare throw them away, I glued them for shock absorption.
PERMITTED POTS OF TERRA COTTA
I'm adding some bright spring colors to my interiors, hoping that spring will arrive early. I'm SO ready to put away my winter clothes and I'm SO ready to wear my light blazers and flats.
Oh joy.
Today I'll show you a quick tutorial on how you can make these cute untied terracotta pots .
In February we went to Florida and stopped to pick oranges at a fun orange farm. The boys and I had fun picking oranges and playing at the farm. The oranges we had there were phenomenal. They seriously had the best oranges ever! We loved them so much that we took the oranges home and Hub decided to plant those seeds so we could grow those oranges.
Yeah...I can't wait to see those oranges