Simple exercises for a beautiful voice
On sound concentration. Such techniques for improving vocals are suitable for children and beginning adults who are faced with the problem of dull, ruined singing.
- Closed lips on the syllable “M”. It is necessary to take a sharp breath through the nose, while making sure that the larynx is lowered. The sound “M” is sung while exhaling with the mouth closed. The larynx should still remain down. Lower and relax your lower jaw: your teeth should be open and not touching each other. The lips are closed, but not compressed, and the tongue should not be tensed either. It is necessary to obtain a long and even sound. You can start the exercise with any note convenient for you, gradually moving up a semitone;
- The syllable "Mi-i-i". The first part of the syllable is sung exactly the same as in the first task. When singing the vowel “I”, try not to tense your jaw and lips, otherwise it will turn out stiff and unnatural. If you feel that this letter is completely subordinate to you, you manage to cope with the requirements of the lesson, you can move on;
- “M-I-E-A-O-U-O-A-E-I.” Here it is important to achieve a uniform sound, so that each vowel sounds in the same singing position and with similar articulation. Try to get a sharp sound, hold your breath. There must be support, otherwise there will be wheezing and breathing, which spoils the sound. It is important to concentrate it on the tip of the front teeth for good resonance.
Voice exercises to give strength, depth, and improve the timbre of singing. The lessons are recommended for all beginning vocalists seeking to improve the quality of their singing skills. The presented methods for controlling the voice allow you to eliminate trembling, nasality, add power and drama to the song, and enhance vocals.
- “RO-O-O-O-O-O.” Feel free to open your mouth wide and lower your lower jaw. This is what will give the necessary volume to the vocals. Relax your lips to get a sound halfway between the articulation of “O” and “A”. Use a mirror to control - when pronouncing “R”, the larynx should be slightly raised, and when singing “O”, lower it slightly. Pretend to yawn, feel it. The sound should rise from the chest;
- "RO!O!O!O!O!" A sharp staccato on the exhale and then an equally quick inhalation. As you exhale, watch your abs - the muscles should contract sharply and strongly. This method of singing is called the “active exhalation technique.” The higher the rise, the deeper the sound becomes. We do not close our mouth, leaving the neck and jaw in a relaxed state. The vocals become like a groan, as if the singer continues to sing this exercise through force.
A Few Secrets to Increasing Range
When working on your vocal range, the first thing you need to pay attention to is breathing. Deep breathing imparts a certain strength to the voice. Breathing exercises strengthen the vocal diaphragm. A vocal teacher will help you choose a set of exercises that will suit your vocal range. But, if in the morning or after training your voice becomes hoarse, you should consult a doctor.
Before you start doing exercises to raise your voice, you need to learn a few rules:
- you need to learn how to articulate and breathe correctly;
- if your throat is too sensitive and your voice quickly becomes hoarse, consult a specialist;
- It is not recommended to eat nuts and ice cream before classes;
- Tobacco smoke and alcohol consumption greatly affect the range of the voice. And smoking can cause laryngeal cancer.
- the room where the chanting will take place must have good air humidity.
What famous vocalists advise
All professional singers with a high vocal range warm up their voices before performing. For this they use special exercises. For example, Vitaly Kozlovsky uses an exercise called “Sinister Laughter” - the laughter of villains in old cartoons. You need to laugh a little sinisterly. This is a fairly easy and enjoyable exercise. It must be performed standing with a straight back and straightened shoulders in one breath. You should repeat this exercise only three times. And the voice will gain strength.
After singing, to immediately rest the vocal cords, singers perform a calming exercise. In the room where the voice will be warmed up, the air should not be dry. It is necessary to monitor your diet. For example, after consuming dairy products, the voice becomes less clear as milk washes mucus from the vocal cords. Pay attention to nutrition. You don't need to work hard before going to bed. Since the processes of the gastrointestinal tract will cover the vocal cords with mucus. In the morning your voice will be hoarse. Those who have calm, clear breathing and a large lung capacity have a high vocal range.
Exercises
- take a lying position so that your back is straight and your legs are squeezed at the knees;
- placing your hands on your stomach, take a deep breath, yawn as you exhale. In this case, the abdomen should move up and down;
- it is necessary to pause between inhalation and exhalation;
- in the same position, “laugh with your belly”;
- Having assumed a sitting position, repeat one of the exercises indicated above.
At the initial stage of training, dizziness may occur. But don't worry. This means that your training is over for today. Once your lungs become larger, you can train longer.
It is also very useful to maintain a high vocal range by drinking one chicken egg every morning. The mucus of the gastrointestinal tract is replaced. The mucus of a chicken egg white is very similar in its properties to that produced by the glands. In the morning the glands do not work well. Therefore, it is worth replacing the mucus in order to start training in the morning.
Now you know how to raise your voice. And it sounds good when you are healthy, cheerful and in a good mood.
How to learn to sing voice exercises with maximum benefit?
Working on your voice, exercises and training for singing at home and video clips for watching are convenient because you don’t have to travel anywhere and spend money. But even if you are sincerely ready to daily improve your singing level from scratch, you will not always be able to adequately compare and evaluate the results of your work, check intonations, and clearly understand the assigned tasks.
Much more effective training will begin with the advent of a professional trainer. Exercises to open, warm up and strengthen your voice will not only be understood and performed correctly. The teacher will offer an optimal set of vocal exercises for beginners based on your weak points that need to be worked out and developed, give valuable advice, check your performance and simply encourage you at the right time.
Why are women's voices used more often?
There are several theories about why female voices are preferred in voice interfaces. It is believed that Joan Elms was chosen as an announcer because in the 50s, US military aviation was “the domain of men” - a woman’s voice in the cockpit sounded unusual and immediately attracted the attention of the pilot. In addition, it was easier to hear: if the equipment began to act up, then the male one quickly became inaudible due to the lower timbre. Convair and other airlines of the last century had something right: studies have shown that people perceive men's and women's speech differently. Scientists from the University of Sheffield conducted an experiment during which men listened to recordings of different voices.
The researchers found that the subjects' brains interpreted sounds differently: women's speech caused activity in the temporal lobe of the cerebral cortex (its areas responsible, for example, for processing music), and men's speech - in the occipital lobe. One of the conclusions of the study: a woman’s voice sounds more understandable, partly because it is processed by a “profile” part of the brain - as a result, it is “easier for the brain to decode” female speech.
Another study was conducted by psychologist from the University of Glasgow Phil McAleer. He recorded the speech of 64 men and women (they were asked to read aloud a short text). After that, everything except the word “Hello” was removed from the received records. McAleer then asked 320 respondents to rate these “Hellos” on ten criteria, such as “trustworthiness,” “aggressiveness,” “confidence,” and “warmth.” It turned out that women's voices evoked more confidence in the focus group. This was influenced by two main factors. The first is pitch: participants noted that a high-pitched voice sounds more friendly. The second is intonation: when a woman lowers it at the end of a phrase, the listener has a feeling of confidence.
Voice Processing 18+ Effects - phone app
The Android application “Voice Processing and Voice Editor - 18+ Effects” allows you to add bass, speed up speech, raise or lower the timbre, change a woman’s voice from a man’s and vice versa. There are many frivolous effects included that are sure to amuse users of all ages. There is a reverberation function, thanks to which the sound becomes more spacious and rich.
Voice Processing Application
The app also contains advertisements. To remove it, you need to purchase a paid subscription. Some features need to be purchased separately. At the same time, it is difficult to unsubscribe from the paid version. A large number of purchased reviews on the official app page on Google Play spoils the whole impression.
Vocal Mixing: 9 Tips for Great Vocal Sound in Your Mixes
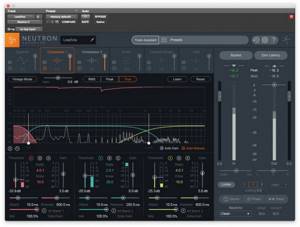
Mixing vocals is a painstaking process for the most patient. If you turned the equalizer knob too much, the voice lost its character; if you turned it too low, it started to interfere with other instruments; if you applied compression, the vocals got out of the mix and began to sound somehow alien. Especially for those who have taken up vocal processing, the iZotope company published a note on its blog about voice mixing using the Neutron 2 plugin. From this material you will learn what frequencies vocals live in, how to emphasize the strengths of any voice, get rid of sibilants and eliminate common problems with vocal tracks.
Sometimes it's not clear what needs to be done with vocals to make them sound great. Mixing turns into a tedious shuffling of equalizers, limiters, compressors and a dozen other processors. We don't know what the vocal issues are in your mixes, but we offer nine tips for mixing vocals.
All of this advice is meaningless if the vocals themselves are poorly recorded. To avoid recording mistakes, check out our guide to recording vocals at home and our list of common problems.
Other materials in the series
Drum Mixing: 7 Tips for Clean, Balanced Drum Sounds
Guitar Mixing: 8 Tips to Improve Your Guitar Sound in the Mix
Bass Mixing: 8 Tips for Tight, Clean Low-Ends
Vocal frequency ranges

Vocals are an individual thing, each voice sounds differently. Much here depends on the timbre of the voice and the range available to the vocalist. Despite this, there are several ranges that you need to go through when taking on vocal mixing.
Bottom
In the low-frequency region, the voice is often filtered selectively and carefully, and most problems with low end and hum can be solved by the microphone itself. During recording, activate the low-cut filter switch - this will eliminate unpleasant effects even at the recording stage. Typically, filtering systems installed in microphones cut off the signal around 75 Hz, eliminating only the main problems.
Further problems with the low end can be eliminated already in the DAW - depending on the voice, you can filter vocals up to ±100 Hz. Rely on your ears: if the voice itself is pronounced in the lower frequency range and has lost its character after trimming, weaken the filter. Female vocals can be filtered even more.
If the vocalist's voice is reminiscent of languid vocals a la Leonard Cohen or Barry White, don't get carried away with filtering. This type of voice needs more low frequencies.
Fullness and volume around 150 Hz
If your voice lacks fullness, look for it around 150 Hz. Some singers themselves sound thin and “on-the-nose”; their voices lack meat. Boosting this range will add more richness to the sound.
Plasticity and emptiness in the region up to 500 Hz
If a vocal track suffers from a lack of volume and a plastic (boxy) sound, explore the zone up to 500 Hz. If the problem is not detected at this limit, go higher to 800 Hz.
When trimming, always use a very narrow Q (shape of the EQ curve). The reason for this is simple: targeted problem solving. A curve that is too wide can accidentally cut off excess in adjacent ranges, which will deprive the voice of naturalness.
Nosality around 1 kHz
If the voice sounds like the vocalist is singing "on the nose", reduce the zone within 1 kHz. The main thing here is not to overdo it: cutting this range too much will make the sound much worse - it’s better to let him sing in his nose than to sound like he doesn’t understand how at all.
Presence around 5 kHz
If the vocals can't cut through the mix, add presence around 5 kHz. Boosting this area will bring the vocals to the forefront a little and help the voice find its place among the other instruments.
Harshness, hiss and sibilance around 7 kHz
The singing of some vocalists is distinguished by a large number of sibilants - hissing and whistling overtones on the letters S, Ш, Ж, З, Ш. Due to the fact that these sounds have too much dynamics and attack, they hurt the ear. When a singer gets too close to the microphone, it naturally enhances low frequencies and sibilance. Due to the fact that the vocalists never stand still during recording and are constantly moving, even the coolest takes are sometimes filled with low notes and harsh sounds.
We have already talked about the low end, but as for sibilants, in the male voice they live in the range from 3 to 7 kHz, in the female voice - from 5 to 9 kHz. You can only find the exact locations through experience, but you need to look within these limits. First, weaken the zone around 7 kHz - this way such sounds will become less clear and will stop rushing forward uncontrollably. You can also eliminate such sounds using a de-esser or compressor set to the sibilant zone.
Frequency ranges of all instruments
Audio frequency table: main frequency ranges and frequencies for equalization
Using Track Assistant in iZotope Products

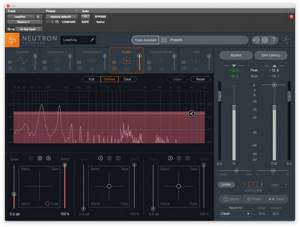
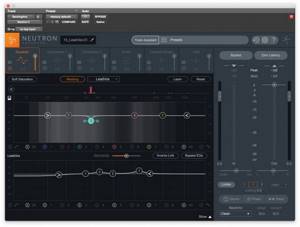
Usually on the vocal track there is an equalizer, a couple of compressors, a gate, a de-esser and something else. If you are a beginner and not a big master of signal processing, try plugins from iZotope, for example, iZotope Neutron 2. This move is convenient for two reasons.
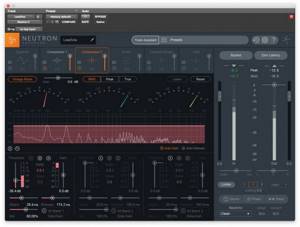
Firstly, it contains equalizer, compressor and other effects modules - you can replace a pack of plug-ins with one. Secondly, Neutron has added a great feature - Track Assistant. The smart assistant automatically analyzes the signal coming from the track and selects modules and settings to improve the audio.
What's good: Track Assistant is not a tyrant and is a rather accommodating guy. If you didn’t like what the artificial intelligence chose, remove the modules or change their settings. At the same time, using Track Assistant you can see the existing problems of the recorded vocals - convenient for beginners who are just getting the hang of mixing.
Adding a tube patina to help vocals cut through the mix
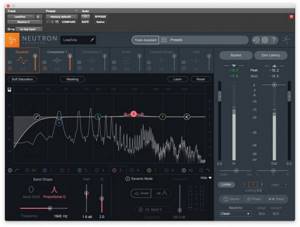
Tube microphones, amplifiers and compressors are popular because they add pleasant harmonic distortion to any signal. The same iZotope Neutron 2 includes an Exciter module with an XY regulator. By moving the pointer across the panel, you can get tube-like distortion or a slight touch of vintage saturation (or both at once).
Control of the exciter module is quite simple: the Drive control is responsible for the amount of processing, Blend for the ratio of the original and processed signal, XY for the ratio of distortion types. In addition to them, there are three pre modes: Full, Defined, Clear. Depending on your selection, the exciter will change frequencies around the lower mids (the fullness and meat of the vocals we talked about) or the upper mids (presence).
Eliminate breathlessness and background noise
When a singer stands in a vocal room, the headphone mix can bleed through the ear pads and cups and be picked up by the microphone. Sometimes there's nothing you can do about it: it all depends on how loud the mix is playing, how close the vocalist is to the microphone, what headphones are used. All that remains for you in this situation is to cut out all the regions where echoes of the mix are heard instead of silence.
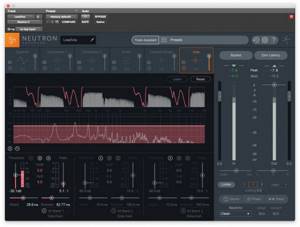
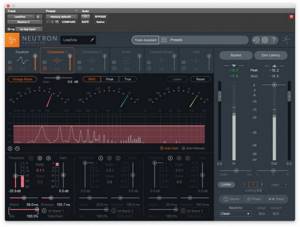
If you can’t remove such moments, you need to lower their level so that they are not noticeable. The gate will handle this. In the same iZotope Neutron 2, the gate module can be flexibly configured by specifying a different response threshold for those places where the vocalist is silent and where he sings.
Unlike most gates, the gate module in Neutron 2 is very visual: the interface reflects the entire track in great detail and a special threshold line. The line works similarly to automation curves - you can configure the gate’s operation even on a second-by-second basis.
Microphone frequency response as a hint when mixing
When musicians start mixing vocals, they don’t always know where to start and what exactly needs to be done with the vocal track. In fact, everything is somewhat simpler: if you do not take into account the characteristics of the voice, then the microphone itself and its frequency response will tell you a lot about further actions.
Let's take the popular Shure SM57 as an example. This microphone has a slightly sibilant sound due to the powerful boost in the upper mids, ranging from 3-7 kHz. The boost in the upper mids comes in handy at gigs when it's important for vocals to cut through a dense live mix. Gain around 5 kHz is a real gift for the vocalist and sound engineer, since the voice will be clearly heard in the monitors.
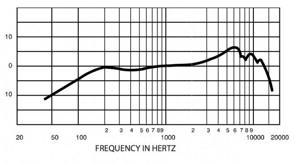
However, in a studio environment, such amplification will become a problem, especially if the vocalist’s voice itself is quite sharp and sonorous. Superimposed on the sound characteristics of the SM57, the upper mids will become simply killer due to the “double” boost.
By looking at the microphone's frequency response and knowing the singer's vocals, you can confidently attenuate the 3-7 kHz range to curb the upper mids. While it's common practice to boost frequencies within these limits to help the voice break through the mix, with harsh vocals and the SM57 this will only harm the project.
The conclusion is simple: before mixing vocals, study the frequency response of the microphone that was used to record your voice. This will give you lots of useful tips on where to start.
Backing vocals revealed
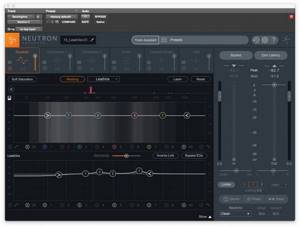
If the vocals and backing vocals are recorded by one person, then building a balanced vocal picture often turns into a challenge. Due to the identical timbre, some layers of vocal harmonies hide other layers, and the differences between vocals and backing vocals disappear. You can correct the situation using the Masking function in the iZotope Neutron 2 equalizer.
The essence of the function is similar to sidechain. The sound engineer points the equalizer to the second backing vocal track, and the plugin balances the settings so that both signals are clearly audible. If you have a copy of Neutron on both the main and backing vocal tracks, the EQ can even show problem areas where masking and unwanted merging of signals occurs.
Equalization before compression
When unwanted frequencies in the signal enter the compressor, they disrupt its operation: the processor may over-reduce gain. That is why it is better to place the compressor behind the equalizer - this way you will cut off all unnecessary things before it goes for further processing.
Developers of multi-effects and complex processing tools know this - in most presets the EQ will always come before the compressor. Remember that the EQ's job is to correct the signal, and the compressor's job is to beautify it.
Vocal extension and artificial backing vocals
To achieve a very spacious and wide vocal sound, you can use Björgvin Benediktsson's technique. When working with voice, Benediktsson creates three vocal buses, each of which processes the voice differently.
Bus 1
Double track tire (duplicate tire). This bus accommodates the delay, as well as Waves Doubler and/or Waves ADT Reel To Reel plugins. The purpose of this tire is to create a double track feel. It will be useful if you do not have the opportunity to record backing or duplicate the main line of the voice. A very short delay here serves as a life hack that expands the sound.
Inside the stereo delay, set the channel ratio so that the delay on the left is 21 ms, and on the right - 29 ms. Use the pitch shifter to raise or lower the vocals by about 10 cents. The sound should be natural and similar to ordinary backing vocals.
Bus 2
Bus for additional reverb. Works which runs parallel to the main reverb bus for instruments. The difference is that reverb for instruments glues the elements of the mix together, while reverb for vocals helps find the ideal sound for the voice.
The specific bus settings depend on what sound you are looking for. Vocals with a lot of long, drawn-out notes (like Celine Dion's "My Heart Will Go On") will benefit from a big, long reverb. If the vocal track is fast, with a lot of words, then a small and short reverb is needed - the length and volume will quickly mix everything into mush.
Benediktsson places a compressor, stereo delay and reverb on the bus itself. Compression further compresses the signal and adds power to the sound, delay is adjusted to a long delay and serves as a complement to reverberation, expanding the stereo image. For reverb, Björgvin uses the Valhalla Room plugin or EMT 140 Plate emulation. Working together, the effects create a sense of depth and space in the vocals.
Bus 3
The third bus is the source of surround sound. To this track, Björgvin adds compression and a stereo expander plugin (such as Waves S1 Stereo Imager). The vocal track signal is routed to this bus as much as possible (the voice must remain readable). As a result, the three buses together give a very rich and wide sound, which is difficult to achieve when processing only the vocal track.
Sound and bus expansion
Broadening Your Mixes: 7 Easy Ways to Make Your Mixes Bigger and Bigger
Audio Signal Flow: What Buses and Sends Are, and Which Path the Signal Takes in Your DAW
A mixture of different types of compression
Often, sound engineers combine several compressors, using them in parallel. The decision is correct: why limit yourself to one compressor when you can use everything at once? In the same Neutron 2 there are two compressor modules - the user can use them separately or together, one after another or separately, and adjust the ratio of the original and processed signal for both compressors. Exactly the same effect can be achieved with any two or three compressors.
Let's say you're using both Neutron 2 compressors. Activate the first module as a multi-band digital compressor and the second as a single-band vintage compressor. Set up the first processor to produce a fully processed signal and handle vocal dynamics. The second compressor can be placed behind the first as a decorative tool for the compressed signal - the Wet/Dry ratio in this option can be set to 60/40.
Complain
Voice FX - will help you create a male voice on your phone
Changing your voice in real time is not easy. However, even for such a non-trivial problem there is a solution. The Voice FX app can handle it.
Voice FX Features
The version for iOS phones is available on the Apple Store. A similar program for Android is available in the Google Play store.
Functions:
- Will make a male or child's voice from a female one.
- Applying effects.
- Voice recording and subsequent editing.
- Live streaming with changing timbre.
You can switch the voice from female to male and back. Unfortunately, the application is not very sophisticated. The effects are not very convenient to use.
Use your chest, not your voice
Now that you understand the difference in vocal tone, we need to make sure that your voice is projected correctly. This will help both to make your voice louder and to create a dominant, authoritative voice. There are two vocal projection environments: your chest and your head. The chest voice uses the diaphragm to speak. This produces a more resonant, deeper and more attractive tone that it contains. They can literally cut through loud environments without shouting or straining. The head voice uses your throat to speak. This creates a thin, light and annoying tone. It will not carry far and this is the reason for situations where a person struggles to be heard. He then compensates by screaming, which actually harms his vocal cords.
Voice Changer & Recorder - male voice converter for Android
The Voice Editor application for Android is available on Google Play. Through it you can process sound cut from any audio file. There is also a function to change the voice during a call. All effects are available absolutely free of charge. Developers make money by displaying advertisements.
Voice Editor
The result is easily saved to your phone and Google Drive. Subsequently, you can set it as your ringtone or send it to your friends. Just don't use this program to do sensitive work because it occasionally malfunctions. It sometimes slows down, interferes with the normal functioning of other applications and randomly turns off.