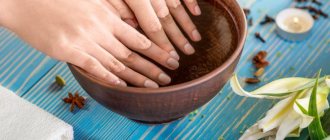
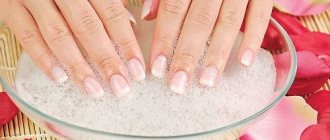
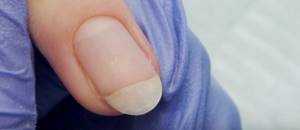
They say that people pay attention to their hands first. The color of nail polish, rings, watches, the shape of nails - you immediately get a general impression of a person. No matter how expensive the jewelry, a bad manicure will ruin everything, but well-groomed hands will elevate you in the eyes of your interlocutor. Therefore, everyone who takes care of themselves takes care of their nails. If going to beauty salons is expensive or you don’t have enough time, you can learn how to do a hardware manicure at home.
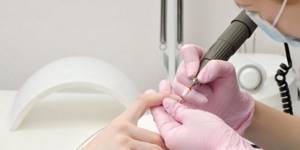
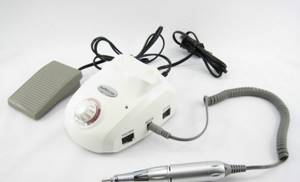
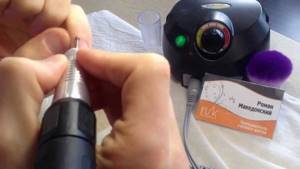
Hardware manicure is a manicure technique in which the master processes the cuticle and nail plate using a milling machine and cutter attachments. The device can perform all stages - from removing the old coating to polishing the cuticle.
Hardware manicure and its advantages
Hardware manicure is a type of manicure in which manipulations such as removing the cuticle, treating the side ridges and sinuses of the nail are done using an electric machine (apparatus) and replaceable attachments (cutters) of various shapes. This method of treating nails and the skin around them is now the most common among masters.
And this is easy to explain by its obvious advantages:
1. Security. Unlike classic manicure, where cutting tools are used, the likelihood of injury is virtually eliminated.
2. Long lasting effect. Nails look well-groomed and tidy for two weeks. And by regularly moisturizing the cuticle, this period can be extended.
3. Cost-effectiveness in the long term. Of course, you will first have to spend money purchasing the necessary tools, but in the end it turns out to be a very profitable investment.
However, with all the advantages, it is worth noting that you will first have to carefully study the theory, watch a single video lesson, or even take specialized courses on performing hardware manicure. Because first you should learn how to select the right attachments for the required manipulations, set the required speed for this in order to avoid injury to the nail plate.
Device for hardware manicure
On the shelves of specialized stores there is quite a decent range of devices for hardware manicure. They differ in price and appearance, but when buying, you need to pay attention not to these parameters at all. Oddly enough, with regard to this product, cost does not play any role at all - even the cheapest models can work on par with expensive ones. You just need to evaluate the technical characteristics of the device:
- Speed revolutions per minute . You need to figure out why this device will be needed at all - to perform only regular manicures or to also care for nails and skin of the feet. Experts recommend choosing the range of 20,000 - 30,000 rpm.
- Operating conditions of the device . Such equipment is divided into two types - stationary and portable (portable). Plans regarding visiting friends and acquaintances for a hardware manicure involve the purchase of a portable device. Its weight is only about 2 kg.
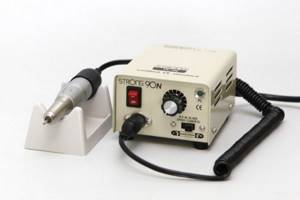
Strong 90/102 - manicure device without pedal, 35000 rpm, 64 W
- Availability of guarantee . The fact is that modern manufacturers are cunning and often produce such equipment without the possibility of repair. Craftswomen have to turn to “Kulibins” who are looking for replacements for parts that have fallen into disrepair, or buy new equipment. Therefore, only the presence of a guarantee will give you confidence that you can turn to service centers for help at any time.
- Attaching attachments . The mechanism must be light and reliable - the nozzle is inserted literally with one click, even at high speeds it rotates in a precisely specified projection and does not “float”.
- Reverse is a function that may not be present in every equipment model. And it is needed during treatment of the surface of the nail plate, when its shape and size are adjusted.
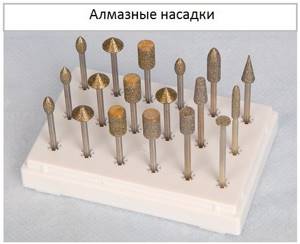
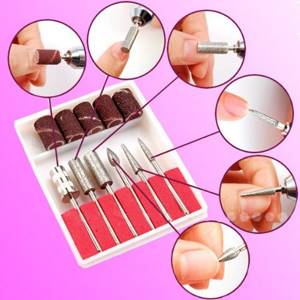
The second important criterion when choosing equipment is attachments, which are divided into drills and milling cutters. The only general rule for them is that the diameter of the shank, which is inserted into the device itself, should be 2.35 mm.
It is believed that any manufacturer must comply with it, since a lower value will cause strong sliding, “swinging” of the nozzle while polishing the nail plate, and a higher value can damage the clamp. There are several different types of attachments for hardware manicure:
- Diamond - can be with artificial and natural chips. In the first case, shedding of the surface will occur intensively and after 3 - 4 months you will have to buy a new nozzle.
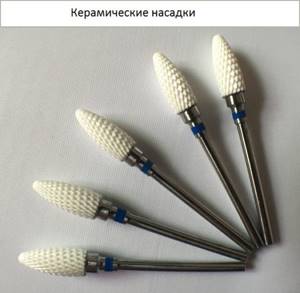
- Ceramic - characterized by the presence of small “pits” and bulges on the surface, which provides an excellent result after nail treatment. Such attachments can be used for all manipulations within the framework of a hardware manicure; they just cannot be used to clean the area under the nail.
- Polishers - can be silicone or natural. In the first case, they are used to work with extended nails, but natural polishers do an excellent job with a “clean” nail plate. They can be used “dry”, or you can use special cosmetic oils that will nourish the nail and make it shiny, like after applying a protective coating.
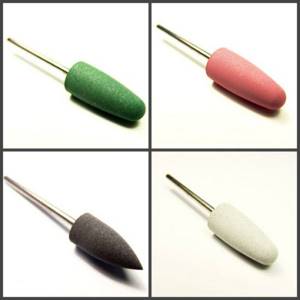
Nail polishing attachments (polishes)
Separately on sale are cutters that are made of fairly rough metal and are used for the initial, aggressive treatment of the nail and the skin around it.
When choosing equipment for hardware manicure, experts recommend paying attention to the following models:
- Aurora, Strong, Marason and Escort - made in Korea, the cost ranges from 6,000 to 17,000 rubles;
- Podomaster and Xenox - manufactured in Germany, price from 6,000 to 51,000 rubles;
- Charisma - China, cost 7,000 rubles;
- Khorsa - made in Russia, price ranges from 10,000 rubles and above, depending on the category and functionality of the equipment.
Watch the video review of the manicure device Harizma h10402:
There are models with lower prices, but it is hardly possible to check their quality, much less obtain a guarantee for the product. In principle, even devices costing 2000 - 3000 rubles can delight you with their work throughout the year.
What tools are used for hardware manicure?
The necessary tools can be divided into basic and additional.
The main things you will need to purchase are: • A machine or milling cutter for hardware manicure,
• Nozzles or cutters (often as accessories with the device).
Below we will talk about each of them in more detail. Additionally, it is recommended to have:
• An exhaust hood for collecting small particles that fly during operation of the device,
• Disinfector and sterilizer,
• Consumables (orange sticks, cuticle oil, brush, personal protective equipment, etc.)
Tool processing
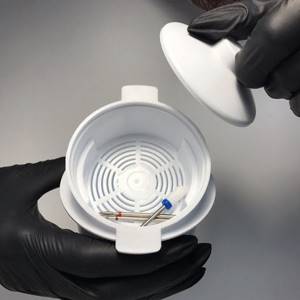
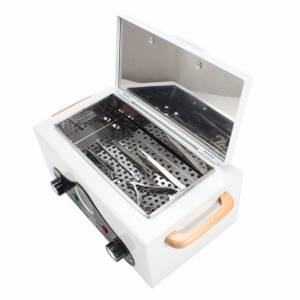
After using the attachments, special treatment is required to disinfect and clean the instrument. This processing is carried out in three stages:
- Disinfection. It is aimed at destroying pathogenic microbes and destroying the toxins they produce. Disinfection is carried out using special products designed specifically for manicure cutters. If you try to use hydrogen peroxide or any other skin antiseptics, you will only damage the surface of the attachments. Therefore, it is better to immediately abandon such drugs. Savings on normal antiseptic will result in the purchase of new cutters. Likewise, the use of disinfectant sprays is not recommended. After all, manicure attachments have a porous abrasive surface. The spray applied to it will not be able to penetrate into hard-to-reach places. As a result, harmful microorganisms will remain in them, which will then get onto the skin of the next client. If you have already purchased a suitable antiseptic, prepare a container for disinfection and dilute the product in it according to the instructions. After this, immerse the nozzles in the solution for the time interval indicated in the instructions. Do not keep instruments in the solution for longer than prescribed. This will not make disinfection more effective. You will only contribute to the destruction of the abrasive surface of the nozzles.
- Cleaning from skin and nail particles. This stage is necessary to maintain the instrument in good condition. After all, a cutter surface clogged with dust has weak abrasive properties and does not cope with its tasks. Therefore, cleaning must be done after each manicure. But don’t try to do this before disinfection. After all, with particles of nails, the causative agent of fungal diseases can get onto your skin. Therefore, first treat the instrument with an antiseptic, and then clean it of dust. Cleaning can be done mechanically, manually or ultrasonic. For mechanical cleaning, a special washing machine with a disinfectant solution is used. That is, it simultaneously performs disinfection and cleaning, so pre-treatment with an antiseptic is not required. The same can be said about the ultrasonic sterilizer. Antiseptic treatment is only necessary for manual cleaning. In this case, after disinfection, the cutters are cleaned of dust with a special brush under running water. After cleaning and rinsing, the attachments must be thoroughly dried. This can be done with paper towels or warm air. It is advisable to dry the tools with warm air, since towels will not be able to remove moisture from the pores of the cutter.
- Sterilization to destroy remaining bacteria and viruses. Not all microbes die in disinfectant solutions. Disinfection with an antiseptic is necessary only for your safety when cleaning and rinsing the instrument with water. Next you need to carry out sterilization. It is performed in autoclaves, dry-heat ovens or special solutions (liquid method). In autoclaves, processing occurs under the influence of hot steam. This technique is necessary for instruments that penetrate the skin or come into contact with blood. The remaining attachments can be sterilized in a dry-heat oven. It should be remembered that the instruments must be thoroughly dried before placing them in the cabinet. Otherwise, corrosion may appear on them. When choosing a liquid sterilization method, carefully read the instructions for the drug. It should describe the rules for diluting the solution and the processing time for the instrument.
After sterilization, you should store the attachments in a container that protects them from moisture, dust and mechanical damage. An ultraviolet sterilizer is best suited for such purposes. But remember that it only ensures that your tools are kept clean. However, it cannot replace disinfection and sterilization.
How to choose a manicure machine
The choice of devices is now especially diverse.
But this tool is not cheap, so you should approach its purchase responsibly. • Firstly, you probably already know where you will use it - only for yourself or to work with clients on-line. Devices used for home use are smaller in size, power and speed of rotation of the nozzles - 20 thousand revolutions and 35-50 W of power are enough. For salon manicure, choose machines from 25 thousand revolutions per minute and a power of 100 W.
• If you need to go to a client’s home, then pay attention to a device with a built-in battery, or one that runs on batteries. It is usually lightweight and quite compact to carry.
• If you are a beginner, then first take a machine with a set of cutters selected for it, which are not so easy to understand given their huge variety.
• The machine must have a reverse function (rotation of the attachments in both one and the other direction).
• Clamping of attachments on the handle can be manual (you need to tighten it), semi-automatic or automatic. For the interior, it is better to take the latter option - it will save time on replacing cutters, but will also cost more.
• The strength of the noise it makes depends on the engine the machine is equipped with. In expensive models it is almost inaudible.
One of the most determining factors when purchasing a device is its price. Know that a high-quality device will not be cheap. If you are looking for a balance between price and reliability of a router, then pay attention to this model.
Contraindications to the procedure
Hardware manicure cannot be equated to procedures that affect the entire body. Therefore, any common diseases will not serve as a contraindication to nail care. The only obstacles can be problems with the nails and skin of the hands themselves. Such obstacles include:
- Inflammation of the periungual ridges.
- Fungus on the nails.
- Mechanical damage to the nail plates.
- Brittleness and excessive thinness of nails.
In the first three cases, the procedure can be postponed until the tissue is completely restored (the inflammatory process disappears, the fungus is cured, a healthy nail grows back). However, if the nail plates are naturally thin or brittle, hardware manicure is contraindicated. After all, grinding weakened nails can lead to their destruction and new problems.
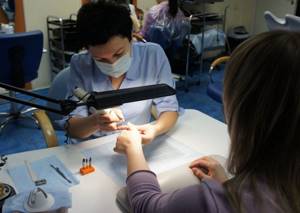
Master class on performing manicure with a machine
1. The first step is to prepare your hands. They need to be washed with the product, dried and disinfected with an antiseptic.
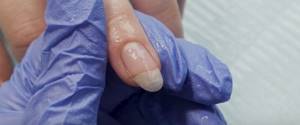
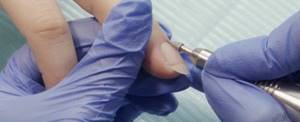
2. If there is an old coating on the nails, then we proceed to remove it. To do this, select a cone-shaped nozzle from the set. We hold it sideways in relation to the nail and, without strong pressure, remove the gel polish layer by layer. We work on the sides of the nail and at the cuticle with the tip of the cutter.
3. Correct the shape of the free edge. Here you can work with either a milling cutter or a file that is more familiar to you.
4. Let's start processing the cuticle.
a. We lift the cuticle. The keratinized skin can be lifted either with a cutter (for example, a rounded cylinder) or with an orange stick. The movements are smooth and do not put pressure on the skin. The cutter constantly moves parallel to the nail and does not stay in one place so as not to make a cut. Use reverse in your work: the hand moves to the left, and the router rotates to the right and vice versa. First, the nail is processed in one direction, then the reverse is switched and we work in the other.
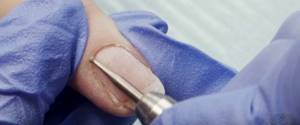
b. To get deeper into the sinuses of the nail and remove the pterygium, change the cutter to a needle-shaped one.
c. At the same time, we grind the side rollers.
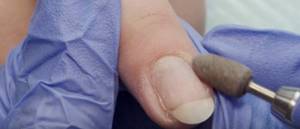
d. We cut off the raised cuticle with a finely abrasive ball-shaped nozzle. The movements are performed in the shape of a smile from one side roller to the second.
e. We complete the cuticle treatment by polishing the skin with a soft conical nozzle with a rounded end.
5. Shake off excess dust with a brush.
6. To complete the hardware manicure, apply oil to the cuticle area and rub it in in a circular motion.
Milling cutters
The master class on proper hardware manicure, presented in the video, involves the use of at least five different cutters for comprehensive processing. These include cutters for correcting the length of the free edge, adjusting its shape and polishing the entire plate. There are also cutters for removing cuticles, corns and calluses on the feet and treating the skin of pre-nail ridges. If the master works with extended nails, then many other attachments may be required.
- Treatment begins with the removal of rough skin on the feet (if a pedicure is performed). It is carried out using the most highly abrasive cutter, usually a diamond;
- Then, both during manicure and pedicure, the removal of rough skin flakes from the pre-nail ridges begins. To do this, select a cutter in the form of a truncated cone, softer than the previous one;
- If you want to perform a completely hardware manicure, then the next step is to remove the cuticle with a special cutter, as the master class shows. However, this is quite difficult, and therefore some people skip this stage, removing the cuticle in the usual way - cutting, pushing or dissolving with a remover;
- Now you need to reduce the length of the free edge using a ceramic cutter. If you are working with extended nails, then at the same stage you can remove the old layers of gel from the bottom of the free edge;
- Using a sand or other non-rough cutter (for natural nails), adjust the shape of the free edge;
- Polish and level the plate. Depending on its condition, this may require from four cutters to one;
- Polish the plate with a cylindrical chamois cutter to a mirror finish.
You can evaluate how effective a hardware manicure is by looking at the photos before and after treatment. If it is performed by a competent master, the result is better than with a classic manicure. However, not all masters are fluent in this technique, and therefore often combine this type of manicure with a classic or European one.
https://youtu.be/HzvEdUe1vZE
[yandex3] [google3]
Errors when working with the device
Errors during training are not excluded, but they can be minimized if you know many of the nuances in advance.
• When working with the device, your hands must be dry; you do not need to apply any products or oils.
• When learning to use the device, do not set the machine to high speeds, as this often leads to nail injuries.
• Use cutters for their intended purpose. Many beginners choose bullet and flame cutters to lift cuticles. However, they leave cuts.
• Select the correct abrasiveness. If the cuticle is hard, then you can take a coarser cutter, and if it is thin and soft, then you should use a cutter with red or yellow markings.
• Let the device rest. To prevent it from overheating, the machine should be stopped during operation.
• When polishing, do not hold the cutter in one place or close to the edge of the nail plate.
• Clean the cutters after working with the machine. The attachments need to be disinfected and cleaned of sawdust. Otherwise, this will not only reduce their service life, but also lead to problems with nails and hand skin.
A few words about disinfection and sterilization
Speaking about hardware manicure, one cannot help but touch upon the topic of sterilization of instruments and their disinfection after work.
This must be done after each use of the device. Minimum treatment consists of placing the cutters in a special container with a disinfectant for 15-20 minutes. After this time, the nozzles are removed and washed under running water, after which they are wiped dry with napkins.
The second stage of instrument processing is its sterilization in a dry-heat oven at high temperatures. Special craft bags are used to store sterile instruments.
Only this procedure can guarantee the health of you and your clients!
How to do a hardware manicure at home
Quality nail care is always needed. Let's figure out how you can do a hardware manicure at home, saving on beauty salon services.
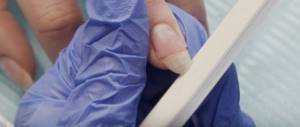
You should start by correcting the shape of your nails. Using a slightly abrasive file, we file down the sides of the plate and give it the desired shape. After this, treat the tip of the nail with a buff so that the tip becomes smooth. Using a pusher or an orange stick, push back the grown cuticle. If your nails are sensitive, give preference to a stick, it will be less traumatic.
Now let's start using the device. We hold it with three fingers, like a fountain pen, with a rotation speed of 7-8 thousand revolutions. First we use a cylindrical corundum nozzle, which we will work to the side and upward with emphasis on the little finger. This will avoid unnecessary cuts. With this attachment we must clean the cuticle from the nail and lift it for further removal. When processing the side rollers, we increase the pressure, since the skin there is rougher and is not so easy to clean.
Tools for hardware manicure at home Using the next cutter, a corundum bullet, we will clean the sinuses of the side rollers. Using a sharp nose, we try to clean it deeper under the cuticle and in the sinuses. Using the same nozzle, we polish the nail plate.
If the cuticle is well opened, take a nozzle with a corundum ball of coarse abrasive. Speed 4 thousand revolutions. The ball moves in this rhythm: pressed, pulled to the side, released. So, step by step, we clean off the entire cuticle. It is imperative to go along the top of the cut, so we will sand it and smooth out the skin, this will help prevent the formation of hangnails in the future. Finally, we polish the leather with a large corundum ball of extra-soft abrasive, smooth the leather with quick movements and cover all roughness.
Let's move on to processing the right hand. Now we hold the device with our left hand, resting on the ring finger. Next we use the same attachments and in the same order as with the left hand. Once the nails of both hands are clean, you can apply the polish.