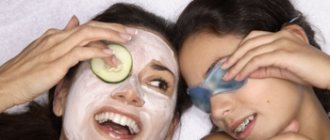
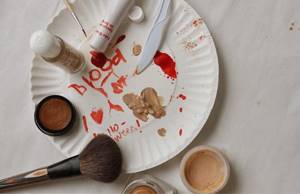
The autumn holiday Halloween is another great occasion for fun. Every year, October 31st becomes the day when ghosts, zombies and other evil spirits visit the earth. All Hallows' Eve is a massive costume party. You can dress up as a scary mythical character and compete with your friends to see who can scare who the most. In addition to the costume, it is important to think about the makeup. Let's look at unusual and bright Halloween makeup ideas.
A girl in the guise of a vampire can look not only terrifying, but also seductively beautiful. This is a very popular idea for Halloween, but don't shy away from it because of this. Everyone does makeup differently, so you won't end up in a crowd of clones. There are several options for applying makeup to embody the image of a vampire.
Option 1:
- the whole face is covered with a light tone;
- beautiful, spectacular makeup is applied to the eyes with arrows, shadows and false eyelashes;
- We paint our lips with burgundy lipstick, and apply bloody stains on top of it using red gloss;
- false fangs will be the final touch.
Option 2:
Option 3:
- cover the face with white makeup;
- Apply random make-up to the eyes and lips;
- With a black or red pencil we draw cracks all over the face: under the eyes, around the lips and on the forehead.
As you can see, vampire makeup is very simple and easy to do with your own hands. Choosing clothes doesn’t require much effort either. Any black clothing will fit perfectly into the look.
Zombie makeup - video
Method 2:
- Wear white or light blue lenses.
- Apply a porcelain tone to the face.
- Create the effect of circles under the eyes using burgundy and black shadows. Shade them under the lower eyelid and on top.
- We paint the arrows, emphasize the eyebrows with eyeliner.
- The corner of your mouth can be smeared with red lipstick. Gently blend the stain.
- You can add artificial wounds and dried blood on the hairline.
To complete the look, military-style clothing or any other clothing that is deliberately torn, frayed and soiled is suitable.
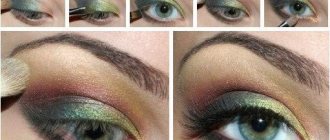
How to do makeup with rhinestones
Rhinestones can be glued to the lips, near the eyes and eyebrows. It should be borne in mind that too bright stones can highlight skin defects. Therefore, you can choose bright stones if there are no imperfections on your face. Note that a good foundation can effectively disguise all skin defects. If you use it correctly.
It is advisable to supplement the makeup with powder, since the matte base harmonizes best with rhinestones. When planning your makeup, mark the attachment points of the rhinestones using a cosmetic pencil.
The most successful areas for placing rhinestones are the middle of the forehead, in the corners of the eyes, and on the lower lip. Bad places are the crease of the eyelid, under the nose.
Glitter is appropriate both on the upper eyelids and under the eyes.
You can use not only rhinestones and stones in facial makeup, but also glitter, sequins, beads and other decorative details.
ideas - how to transform eye makeup with rhinestones
Other original Halloween looks
Let's consider alternative interesting ideas for a festive masquerade.
Makeup "Cheshire Cat"
- You will need “cat” lenses with an elongated pupil. Color - turquoise, shade of sea wave.
- We outline the eyes with a white pencil - at the inner edge, black - at the outer edge. We paint lush eyelashes.
- We will tint the eyebrows with blue shadows.
- Mouth: draw white teeth and black space between them. Take a look at what the cat looks like in the cartoon and imitate his famous smile.
- A blue wig will be the finishing touch.
Halloween Makeup “Skeleton”
You can copy the features of the skull on the entire face or on half of it. All you need is white and black makeup paint and a lot of diligence. A printed image of the skull or a visual exhibit will be invaluable.
It would be great to add bone designs on the brush. There are even clothes with the image of a skeleton - T-shirts and leggings.
Doll make-up in honor of All Saints' Day
This is another unusual version of makeup.
The images of animals are also very interesting
Putting on kitten makeup is fun and easy. You can buy cat ears or sew them yourself by attaching them to a headband.
Not all of us revere foreign traditions and know the meaning of All Saints’ Day, but every fashionista is obliged to try on one of the creepy images on the eve of November 1st. - a reason to appear in all your glory, demonstrate creativity and originality by choosing an unusual role and.
The image will be incomplete without appropriate makeup or even make-up; you need to devote a lot of time to designing your face. Let's learn how to do creepy and scary makeup while remaining attractive and stylish!
Halloween Looks
It will be cool if you copy the appearance of a famous and popular character. You don’t have to bother and become one of the many representatives of evil spirits or inhabitants of the afterlife - without the need for specifics.
Halloween makeup should be thought out and executed well. Practice applying makeup a few days before the event.
If you are going to become the living dead, your skin should be very pale:
Fantasy lenses help in creating an image for a themed holiday. With their help, you can make your eyes black or red, with cat-like pupils or completely empty. An equally successful purchase would be a wig; it could be long black hair in a Gothic style, gray hair like an old witch, or a bright red head like a heartbreaker witch.
Don't forget about manicure; you can cover your nails with black varnish. Don't neglect false nails, this way you can turn neat nails into sharp claws. False eyelashes will also come in handy, and instead of the traditional option, you can use lace imitation to create the illusion of eyes braided with cobwebs or covered in a veil.
Cover your lips with matte burgundy lipstick, you can use dark plum and blood cherry shades, and outline the contours of your mouth with black eyeliner. Traditional for Halloween - usually. Paint your eyelids with face painting, depicting pumpkins, bats, spiders on the web, tombstones and other gloomy symbols.
Halloween makeup
Even those women who know how to do beautiful everyday makeup can face certain difficulties when they decide to do their Halloween makeup at home
. If you have never applied special makeup to your face before, then it is advisable to first conduct a skin reaction test, otherwise, instead of terrible makeup, you can get a terrible allergy, and your whole face will be covered with red spots and itchy. A small amount of cosmetics should first be applied to the wrist, and after an hour, look at the reaction; if the skin remains unchanged, then you can begin to apply festive makeup.
DIY Halloween makeup
you should start doing it only when you have already put on a suit, especially if your dress has a narrow neck, otherwise you can then erase some of the makeup with the material and have to start all over again, but under time pressure.
First, your face must be thoroughly washed and dried with a towel.
The next step is to attach objects to the face that should change its shape; you can attach warts or make a false nose; lately, false scars have been a particularly popular technique. Next, the entire face must be covered with foundation paint, the color of which must be chosen depending on your character. Usually the face is made pale to create the image of a skeleton or a vampire, so it is covered with white paint. If you are the dead bride, apply blue, and if you are the devil, apply red.
When applying foundation, use a sponge, but a brush will help you add texture to your makeup in the right places. To highlight your eyes you need to use dark eye shadow, you can buy the cheapest dark eye shadow in the store and it will do the job. You will also use dark shadows if you need to highlight certain areas on your face, for example, sunken cheekbones or eyes. You can apply shadows with a thin brush or a special sponge.
An eye pencil will help you draw themed designs, such as a web on your cheek or a spider.
Once you have applied the paint to your face, you need to apply the final layer - baby powder, to apply it we will use a large blush brush. Thanks to the powder, the paint will not smear.
Halloween makeup at home
If pale skin and bloody lips don't seem very impressive to you, you can try bold makeup for Halloween - the photos show incredible ideas. You can cover your face and body with scars.
You will need a skin tightening liquid. You can buy it in online stores for just a couple of hundred rubles.
To do this you will need:
- makeup wax;
- silicone gel;
- dyes - cream or alcohol. This can be found on sale among professional makeup materials;
- cotton wool;
- tweezers;
- sponges;
- tassels;
- Foundation.
Stages of creating makeup
How to draw a scar with a pencil
The basis for the scar will be a line that must be drawn with a lip pencil of a rich pink-red shade.
. Choose the color of the pencil so that it most closely resembles a fresh scar. Sharpen the pencil well so it is thin, then draw a line. It can be wavy or straight and located where you want. We suggest you make the scar on the cheek, as this is the easiest place to draw.
Now take regular PVA glue and a thin lip brush. Apply a little glue to the brush and draw a thin line under your future scar.
. Try to draw a line so that there are no smeared parts, otherwise the scar will not look very neat. Wait a few minutes for the glue to dry.
Why is glue needed? It creates a convex scar surface
, which allows you to achieve a good visual effect. Without using glue, it will be very difficult to make a scar using only pencils and shadows.
Since the glue has a yellowish tint after drying, it is necessary to give the scar a pink color. For this you will need light pink eyeshadow.
. If there are none, then you can mix a couple of shades to obtain the desired color. Apply shadow to the scar line with a soft brush. Try to blend the shadows well so that they do not stand out against the background of the skin. Your facial scar is ready.
Original makeup options
If you're looking for a different Halloween look, we recommend checking out the doll costume. This is a lace dress, white pantaloons, fishnet socks and children's shoes with a strap a la Mary Jane. There are pigtails with bows on the head, but you will have to work hard on the makeup.
Halloween “doll” makeup can be improved. If a cute antique doll doesn't scare you, you might become a broken doll. To do this, you need to use liquid eyeliner to draw cracks in some places on the face, and also to depict material that has supposedly turned black with time. If you're looking for some truly creepy Halloween makeup, add bloody smears from the doll's eyes.
Halloween celebrations are becoming increasingly popular. The widespread image of a zombie is complemented by artificial scars and wounds, which are created using special makeup. But even without the addition of a suit and other attributes, they will look intimidating. Professional makeup artists can make scars look very realistic, but if you want to make them yourself, you can purchase a special kit that includes everything you need to create a scar. But if you can’t find a kit, you don’t need to give up this idea - scars can be made with simple cosmetic products.
Instructions on how to make up scars on your face for Halloween, as well as photos and videos, can be found below!
How to make a fake scar on your hands for Halloween
Another popular place to apply makeup to look like cut wounds and scars is on the hands. True, to create a frightening cut on your hand, you can’t do with just “decorative” and you need to use real makeup.
Halloween celebrations are becoming increasingly popular. The widespread image of a zombie is complemented by artificial scars and wounds, which are created using special makeup. But even without the addition of a suit and other attributes, they will look intimidating. Professional makeup artists can make scars look very realistic, but if you want to make them yourself, you can purchase a special kit that includes everything you need to create a scar. But if you can’t find a kit, you don’t need to give up this idea - scars can be made with simple cosmetic products.
Instructions on how to make up scars on your face for Halloween, as well as photos and videos, can be found below!
What will you need?
A detail such as an artificial scar can be combined with any costume and look, it all depends on your imagination and desire. But it is important to know that to create a scar or cut on the face, you cannot do with simple makeup.
For an interesting Halloween look, you need to prepare the following tools:
- PVA glue, but it’s best to buy silicone, designed for gluing false eyelashes;
- foundation;
- blush;
- set of shadows;
- brushes, cotton swabs, sponges for applying cosmetics;
- napkins (preferably thick) white;
- plasticine;
- red, blue food coloring.
It is worth taking care to protect the furniture and work surface from stains. Therefore, you need to cover them with paper or film. Before you start applying makeup, put on your costume in advance. If you want to create a scar not on your face or neck, wear an apron so as not to stain your outfit while doing your Halloween makeup.
Video: step-by-step makeup application to create a scar on your face for Halloween.
How to make artificial leather
A cut involves breaking the skin, so the first step is to create artificial skin to make the scar look more realistic.
So, below you will find ways to make up scars for Halloween at home:
- You can take the easiest path - make “decorative” leather from plasticine that matches the skin tone.
The disadvantage of this method is its fragility. Roll a “sausage” with the required parameters and attach it to the skin. To make it last longer, secure it to double-sided tape with glue. To make a cut, cut the plasticine. Paint the resulting blank and cover it with transparent nail polish so that the plasticine blank remains voluminous. - Using eyelash glue.
This is a simple option; it is used to create small cuts and burns. Apply glue to the area of skin where you plan to make a scar. If bubbles appear during the process, don't worry, this will make the cut even more terrifying. Then wait for the glue to dry. A hairdryer will help speed up the process, just use cold air for drying so that the glue does not spread. - Using glue and paper.
If you want to make the scar more voluminous, then you will need additional fillers in the form of paper or napkins. By the way, if you use PVA glue, it must be diluted. You can stick napkins directly onto the skin, but then it will be more difficult to remove the makeup. It is more practical to use double-sided tape. Cut a piece of tape that will be larger than the scar/cut. Place napkins soaked in glue on the tape in several layers. The more layers you make, the more voluminous the cut will look. Using a knife or toothpick, cut through the layers to make a cut. A toothpick will make the edges ragged. Next, paint the cut with paints and place it on the skin.
Video: how to make scar makeup for Halloween at home.
Scar decoration
To make the scar makeup at home the most realistic, you need to decorate it with suitable colors. Before applying cosmetics or make-up, wait until the glue has completely hardened, and then start applying make-up. The edges of the cut can be torn and shaped into the desired shape with your fingers.
To ensure that Halloween scar makeup done at home does not cause harm to the skin, you should pay attention to coloring agents: you can choose gouache or acrylic paints, but it is best to use makeup or regular cosmetics.
Important!
Dyes that are initially unsuitable for application to the skin can cause redness or rashes.
Also, for coloring, make a solution of red and blue food coloring. To make the transition more invisible at the site of the scar, use foundation - this way the boundaries of the artificial skin will not be visible.
Veeder: makeup for a scar on the nose for Halloween.
How to create an imitation scarring
You can make an artificial scar using professional makeup. To obtain a pattern similar to a real scar, you need to apply gray shadows to the skin, draw the contours of the scar with a red cosmetic pencil and shade it. Apply several layers of collodion or medical glue on top of this. After drying for five minutes, use a brush and lipstick to paint the scar in the desired color and disguise it with transparent powder. The result is an almost real scar without suffering or pain.
To create an artificial scar on the eyebrow, it is enough to shave off 2 to 5 mm of eyebrow hair, the result is a temporary imitation of a scar. In this case, the eyebrow is not damaged and the hair on it will grow back within a month.
Halloween celebrations are becoming increasingly popular. The widespread image of a zombie is complemented by artificial scars and wounds, which are created using special makeup. But even without the addition of a suit and other attributes, they will look intimidating. Professional makeup artists can make scars look very realistic, but if you want to make them yourself, you can purchase a special kit that includes everything you need to create a scar. But if you can’t find a kit, you don’t need to give up this idea - scars can be made with simple cosmetic products.
Instructions on how to make up scars on your face for Halloween, as well as photos and videos, can be found below!
A detail such as an artificial scar can be combined with any costume and look, it all depends on your imagination and desire. But it is important to know that to create a scar or cut on the face, you cannot do with simple makeup.
For an interesting Halloween look, you need to prepare the following tools:
- PVA glue, but it’s best to buy silicone, designed for gluing false eyelashes;
- foundation;
- blush;
- set of shadows;
- brushes, cotton swabs, sponges for applying cosmetics;
- napkins (preferably thick) white;
- plasticine;
- red, blue food coloring.
It is worth taking care to protect the furniture and work surface from stains. Therefore, you need to cover them with paper or film. Before you start applying makeup, put on your costume in advance. If you want to create a scar not on your face or neck, wear an apron so as not to stain your outfit while doing your Halloween makeup.
Video: step-by-step makeup application to create a scar on your face for Halloween.
How to make artificial leather
A cut involves breaking the skin, so the first step is to create artificial skin to make the scar look more realistic.
So, below you will find ways to make up scars for Halloween at home:
- You can take the easiest path - make “decorative” leather from plasticine that matches the skin tone.
The disadvantage of this method is its fragility. Roll a “sausage” with the required parameters and attach it to the skin. To make it last longer, secure it to double-sided tape with glue. To make a cut, cut the plasticine. Paint the resulting blank and cover it with transparent nail polish so that the plasticine blank remains voluminous. - Using eyelash glue.
This is a simple option; it is used to create small cuts and burns. Apply glue to the area of skin where you plan to make a scar. If bubbles appear during the process, don't worry, this will make the cut even more terrifying. Then wait for the glue to dry. A hairdryer will help speed up the process, just use cold air for drying so that the glue does not spread. - Using glue and paper.
If you want to make the scar more voluminous, then you will need additional fillers in the form of paper or napkins. By the way, if you use PVA glue, it must be diluted. You can stick napkins directly onto the skin, but then it will be more difficult to remove the makeup. It is more practical to use double-sided tape. Cut a piece of tape that will be larger than the scar/cut. Place napkins soaked in glue on the tape in several layers. The more layers you make, the more voluminous the cut will look. Using a knife or toothpick, cut through the layers to make a cut. A toothpick will make the edges ragged. Next, paint the cut with paints and place it on the skin.
Video: how to make scar makeup for Halloween at home.
Scar decoration
To make the scar makeup at home the most realistic, you need to decorate it with suitable colors. Before applying cosmetics or make-up, wait until the glue has completely hardened, and then start applying make-up. The edges of the cut can be torn and shaped into the desired shape with your fingers.
To ensure that Halloween scar makeup done at home does not cause harm to the skin, you should pay attention to coloring agents: you can choose gouache or acrylic paints, but it is best to use makeup or regular cosmetics.
Important!
Dyes that are initially unsuitable for application to the skin can cause redness or rashes.
Also, for coloring, make a solution of red and blue food coloring. To make the transition more invisible at the site of the scar, use foundation - this way the boundaries of the artificial skin will not be visible.
Veeder: makeup for a scar on the nose for Halloween.
Photo gallery of makeup ideas and images with scars, cuts and wounds
To make a scar or cut for Halloween at home, you do not need to have the skills of a professional make-up artist or special cosmetics. The main thing is to approach the work creatively in order to create a realistic image. Just don’t go overboard so that the painted scar looks aesthetically pleasing.
For inspiration, you can see photos of scar makeup for Halloween:
Halloween is a holiday where costume and makeup are equally important.
Halloween makeup should be scary and beautiful at the same time. You can easily create unforgettable Halloween makeup at home.
Costumes and makeup have evolved along with the holiday, but supernatural characters, evil spirits, vampires, werewolves, and zombies are still favorite themes (see photo).
Images of pirates and gangsters are popular among men. But the most popular makeup for the Joker (photo)
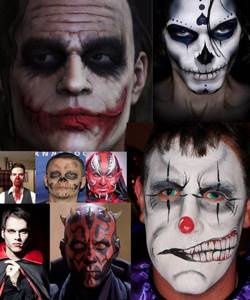
Very often the image of death or muerte is chosen for Halloween. You can do this makeup in black and white or multi-colored, as in the photo.
How to draw a scar on your hand?
Usually, to complete the image, scars are also drawn on the wrists or along the contour of the veins. The main thing is that the wounds on your hands last as long as possible, because during the celebration they can easily be damaged by water or clothing. Therefore, it is better to draw a scar on your hand using the latex technique. A rough scar that imitates cuts on the wrists can be created using regular chewing gum, which will become its base. To ensure that this makeup stays firmly on the body, use nail glue. Then apply foundation and draw an outline with red paint.
Zombie
At home, you can make light makeup for Halloween in the zombie style using available products (photo).
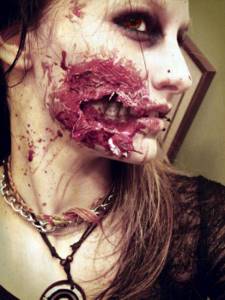
Make-up begins with creating a voluminous wound.
- PVA glue is applied to the face with a brush: along the cheek above the upper lip, along the edge of the mouth, going to the chin. Pieces of white napkins are placed on the areas covered with glue. A hairdryer can speed up the drying process. Those pieces that do not stick are carefully cut off with scissors. In order to create volume, the paper application procedure is repeated 5-7 times. Then the napkins are generously smeared with glue on top, special attention is paid to the edges so that they do not move away from the skin and are dried.
- The edges of the resulting artificial leather are separated from the inside and slightly torn to achieve the effect of a lacerated wound. Inside the scar, the outlines of the teeth are drawn with a red pencil. The remaining space is filled with red lipstick using a brush. Even darker lipstick creates the effect of the depth of the wound. To do this, the space between the teeth and under the artificial skin is carefully painted. Applying black paint along the edge of the wound will help enhance the picture.
- The teeth are highlighted with a white pencil. Shaded red lipstick will give them a bloody look. Outlining your teeth with black eyeliner will help make your teeth contrast.
- Vaseline or glitter is applied to the finished wound, with brown and purple shadows around it.
The second stage is to apply makeup to the remaining part.
- The entire face, including the neck and ears, is covered with white powder, except for the center of the scar.
- The eyes are painted with light brown shadows along the moving and fixed upper and lower eyelids. The cheekbones, sides of the nose, and temporal region are drawn with the same shade.
- Dark brown shadows are used to highlight the cheekbones and eyes (along the entire eye socket), while purple circles are formed under them. A wide strip of bright red paint is drawn along the growth of the upper eyelashes and along the lower eyelid, the border is carefully shaded. Apply eyeliner along the lower eyelash edge with a dark red pencil.
- Bruises are formed under the nose and anywhere on the face by shading red lipstick.
You can not stop there and apply makeup on your hand as well (photo).
Pieces of white napkins are glued to the back side in layers. After the free edges are trimmed with scissors, the area on top is coated with glue again and dried with a hair dryer. In the middle of the area covered with napkins, a longitudinal incision is made with scissors, and its edges are carefully folded back. Blow-dry again to set the edges in a raised position.
Apply foundation to the entire brush and rub in thoroughly, then spread the powder with a puff.
To prepare artificial blood you will need:
- gelatin;
- water;
- dye for Easter eggs (red).
Gelatin and coloring powder are dissolved in a glass of warm water. The resulting mixture is applied to the cut with a brush and randomly distributed over the hand with a cotton pad. To create thick blood in the wound, a little egg dye is added. This procedure should be carried out 2-3 times.
The hand makeup can be complemented by protruding bones on the hand. To do this, wooden skewers are inserted into the wound.
This is the simplest and easiest way to make a wound while creating your Halloween makeup.
We draw directly on the body
How to make a wound for Halloween? Take glue for false eyelashes. We outline the outline of the future wound on the skin. To speed up the drying process, you can direct a cold stream of air from a hair dryer onto it. Then use a cotton swab to apply a little foundation onto the glue and carefully blend it out. Pink and brown eye shadow applied around the “wound” will add naturalness and depth.
Blood is imitated with red lipstick. It needs to be applied in a thick layer inside the “wound” and slightly along the contour. Cracks and depressions in the glue are sketched with black shadows. Glitter is not used in this “picture”!
This method easily creates small, shallow wounds rather than cuts. To imitate very deep, picturesque bleeding scars, theatrical plasticine is often used. It is very easy to make a laceration or a puncture wound from a sausage or ball stuck to the body. A piece of yellow cotton wool placed inside the cut will look like pus. Gummosis is stained using the same methods as described above.
Halloween celebrations are becoming increasingly popular. The widespread image of a zombie is complemented by artificial scars and wounds, which are created using special makeup. But even without the addition of a suit and other attributes, they will look intimidating. Professional makeup artists can make scars look very realistic, but if you want to make them yourself, you can purchase a special kit that includes everything you need to create a scar. But if you can’t find a kit, you don’t need to give up this idea - scars can be made with simple cosmetic products.
Instructions on how to make up scars on your face for Halloween, as well as photos and videos, can be found below!
Two-faced image with a bloody scar
Santa Muerte style or holy death is a very popular makeup for Halloween.
You can make a scar at home without using professional heavy makeup. For this you will need: eyelash glue and paper napkins.
- Using a cotton swab, glue is applied to the face in a strip such as the planned scar. In this version, it divides the face into two parts and passes through the forehead, along the edge of the nasal septum, in the middle of the lips and chin. Small pieces of napkins are placed on the glue. Such actions with paper are repeated 3-4 times. In this case, try to apply the second and third layers of glue along the first line. Faster drying is achieved using a hair dryer. Hanging unnecessary parts of paper are cut off with scissors.
- For part of the face in the image of a demon, a white tone is used, which is shaded with a brush. The product is applied to the entire half, not excluding the ears and eyes.
- The second angelic half of the face is covered with foundation.
- The junction of the two halves, where the napkins are glued, is also carefully worked out with a foundation to enhance the contrast and color transition. Cover the angel part with loose powder. On the same half, a more expressive eyebrow is created using a pencil. On the upper eyelid, an arrow is drawn with a liner, the end of which slightly extends beyond the edge of the eye and rises. The lower eyelid along the growth of the eyelashes is highlighted with dark shadows. Light shadows under the eyebrow and flesh-colored shadows applied to the entire fixed eyelid will add relief to the eye.
- On the beautiful part of the face, applying blush makes the cheekbones stand out brightly. The upper and lower eyelashes are painted. You can use false eyelashes for a more expressive look.
- On the angelic half under the scar, a bruise effect is created using purple shades. For a softer transition of the bruise to the natural color of the skin, the border area is shaded with gray paints. Then the space under the scar and its edge are painted with red shadows.
- They return to work on the demonic part of the image. The entire area around the eye is painted with kajal or black shadows (the natural contours of the eye socket serve as the border), including the eyebrow. Around the painted area, curls are drawn with a liner, reminiscent of round daisy petals.
- The demonic side creates the effect of a slightly torn mouth with the seam sewn shut. From the corner of the mouth, a line is drawn with a black pencil all the way to the ear, and drawn, as if overlaying threads. Using black shadows, in the area where the seam crosses the cheekbone, creates a shadow effect.
- The lips are drawn with bright red lipstick, but only on the angelic half. The same red lipstick adds brightness to the scar: it is applied with a brush at the junction of the scar and the face. The effect of oozing blood will be created by regular lip gloss applied over lipstick.
- The tip of the nose is painted over with black shadow to create the effect of a hole.
- The curls of the demonic part are dotted with glue and decorated with mother-of-pearl beads.
This Halloween makeup is shown in the photo.
Ugly scars, bruises, black circles under the eyes, pale skin... - it seems that makeup for a Halloween party can only be done by professionals. However, if you wish, you can create it yourself at home. We share ideas and advice.
For memorable and bright makeup for All Saints' Day, it is not necessary to complete professional makeup artist courses or sign up for a beauty salon in advance. It is enough to have basic drawing skills and suitable cosmetics (for example, face painting). Armed with inspiration, free time and patience, you can create the desired image yourself. First, some practical tips:
- When choosing a character, it is better to immediately abandon technically complex, cinematic makeup: creating them requires certain experience, professional cosmetics and a lot of time. In addition, under too thick a layer of cosmetics, it will be difficult for the skin to breathe throughout the holiday party. Therefore, technically simple, but effective and bright makeup should be preferred.
- Before using special makeup cosmetics, you should check it for allergic reactions by applying a little to the inside of your wrist. If after an hour the allergy does not appear, then cosmetics can be safely used on the face. But before doing makeup, it is better to put on a costume, because then parts of the clothes can ruin the makeup, and you will have to start all over again.
- In order for cosmetics to stay on your face longer, you can use a special makeup fixing spray. Instead, good old baby powder is also suitable, which is used to lightly treat the face after the end of the make-up.
- If you plan to attach additional details to the skin that emphasize the image (warts, false nose, scars, chin, etc.), then this must be done before applying the foundation. It is advisable to dry each layer of makeup thoroughly, for example, with cold air from a hairdryer or fan.
- It would be a good idea to first draw the intended image on plain paper in order to clearly understand the order of applying lines and colors, and at the same time train your hand and remember the main stages of makeup. Let's look at the most successful and simple ways to apply makeup for Halloween.
This is perhaps one of the simplest makeup tricks that can be used to create various Halloween looks. A sewn-up mouth can easily become part of the makeup of a skeleton, a monster doll, a zombie, a ghost, or an independent thematic feature. The trick can be performed in different ways. The simplest: on a white base, draw vertical seams across the lips with black eyeliner.
For authenticity, real threads will be useful. But first, use eyeliner to mark dots above the upper and lower lips. Eyelash glue is applied over these points, with the help of which pre-prepared small pieces (no more than 3 cm long) of thread are secured. To make them stick better, they are secured on top with liquid latex.
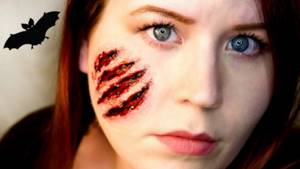
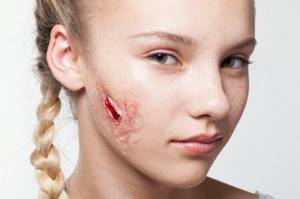
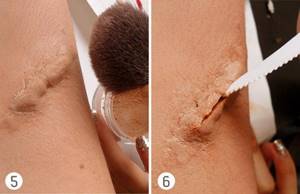
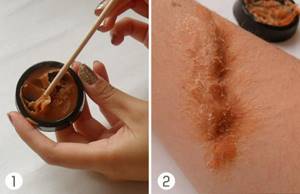
How to make Halloween scars - step by step instructions
- Using a pink pencil, as close as possible to the natural skin tone, draw a sketch of the scar. We clearly display its bends and reliefs.
- Let's paint over our drawing.
- Apply collodion (glue) to the skin inside the design. Give the glue a few minutes to dry.
- By tightening the skin with glue, the man-made scar acquired a natural relief.
- Apply the corrector evenly over the entire scar area.
- We even out the color with a foundation and carefully shade the borders with a sponge (small foam sponge).
- Using a brush, apply dark pink shadow to the scar. It is necessary to treat the internal areas; it is permissible to highlight the skin on the outside with a different color.
The terrifying detail of your unique makeup is ready. Removing this type of makeup is very simple: false scars will easily come off; the first time you try to get rid of them, you just need to pull the ends of the wound. Red marks or slight swelling on the freed skin will disappear without a trace within 10-15 minutes. You can complement your Halloween scars with pale lips, dark circles under your eyes, or swollen eyelids (as if after a long and desperate cry).
Pale, bloodless lips can be easily created using a pale lipstick and regular concealer. Apply a thin layer of lipstick, apply corrector on top, and distribute it evenly over the surface of the lips. To create the effect of tear-stained eyes, we will do the following simple manipulations: on the upper eyelid (just above the eyelash line), draw a thin line with a black pencil.
We lower the arrow down, thickening the line closer to the edge of the eyelid. Now, using a red lip corrector, we draw tear lines along the eyelashes of the upper and lower eyelids. To complete the picture, it remains to acquire bruises under the eyes. Take a dark gray shade of eyeshadow with a brush and apply it under the lower eyelid. The movements of the brush should be extremely careful, its pad should barely touch the skin.
The color should be a little more intense at the edges of the lower eyelid. Using a foundation two shades darker than your natural color, draw two thin lines from the eye sockets to the cheekbones. Lightly blend the foundation with a brush. Wearing such makeup is recommended for black brides, newly-made zombies or suffering vampires.
Since scarification came into fashion, many people began to think about how to make a scar. or scarification is a direction in bodyification, which began with the ancient tribes of South Africa. At that time, scars were not a means of decoration, but rather a way of informing another person. With the help of the scar, it was possible to determine which class the bearer belongs to and what his social position is in the tribe. What do scars mean now, and how are they applied to the skin?
An animated doll
Everyone has their own image of a scary doll. But the easiest way is to create makeup for him, focusing on the eyes and lips. Using a layer of white pencil increases the size of the eyes. Having generously outlined the resulting eye line with a black pencil, you need to glue large false eyelashes along it.
Natural eyebrows are hidden under a layer of makeup base and bleached with powder. Two thick black stripes are painted on top of them. If desired, black eyeliner can be used to add tears, a sewn-up mouth, or stripes extending from the eyes or lips. Rich pink blush on the cheeks and bright lipstick complete the look.
Sinister Clown
Due to the increased popularity of bloodthirsty clowns in movies, these characters are increasingly appearing at Halloween masquerades. If you want to try it on yourself, then first you should apply regular clown makeup on your face, and then adjust some of its details, giving the image the necessary accents. The asymmetry technique works especially well: for example, one eye can be made large and irregular with the help of black shadows and eyeliner by adding a colored lens. Or smear one of the corners of your mouth with red lipstick to represent a bruise.
A very simple option: generously highlight your eyes with black shadows and draw out your lips with bright red lipstick on a white background.
How to draw a scar on your face yourself?
To paint a scar on the face, you can use both theatrical makeup and ordinary decorative cosmetics. Let's start with a simple and affordable option that uses ordinary decorative cosmetics. You will need: foundation, sponge or cotton pad, lip pencil or lipstick. Using foundation, prepare the area for the future wound. Then use a soft coral or pale pink lip liner to draw an outline. For greater naturalness, the line should not be clear and even. Using a sponge or disc, blend the outline a little. Repeat the line using a pencil or lipstick a shade darker. Then blend again.
A voluminous ragged scar can be created using theatrical makeup, foundation, a toothpick, a brush and liquid latex.
- Using a brush, apply latex to your face, creating the base of the scar.
- Wait 1 minute for the latex to dry a little.
- Use a toothpick to create jagged edges and depth.
- Using thick red theatrical makeup and a brush, draw in the depressions and edges. Add depth to the scar with black paint.
- For greater realism, you can apply fake blood or red watercolor on top.
This method of application is durable, so you can use it to draw a scar not only on the face, but on any part of the body.
Vampire grin
One of the most popular and attractive characters at many masquerades is the vampire. It is chosen by both female and male representatives. It is important to remember that the surface of the face in this makeup should be almost flawless, smooth and pale.
In addition to false fangs and deathly pale skin, it is necessary to emphasize the eyes and, of course, the mouth with the remains of the blood of the vampire’s victim. Black eyeliner, lipstick and lip pencil in bright red shades, and the lightest possible powder will be used.
Bloodthirsty zombie
It is quite difficult to create professional makeup for corpses that have risen from the graves. It is hardly possible to do without layers of artificial skin, blood, additional pads and special cosmetics. But for home make-up, the task can be simplified a little. To emphasize flaky, sagging skin, you need to apply light powder on top of the liquid makeup base, or, conversely, apply makeup paint on top of the powder or powder base. The effect of skin decomposition will help to show blurry transitions of shades of red, white, gray, black and green.
The easiest way to demonstrate the bloodthirsty nature of the makeup is to use artificial blood. If you don’t have it on hand, there is a simple home recipe: add grated fresh beets with water, cook, adding a spoonful of sugar and vinegar for rich color and thickness. You can safely decorate your costume and makeup with this mixture. For example, draw a bloody wound on the forehead, smear the mouth and neck area with artificial blood. Complete the look with black circles under the eyes and cloudy insert lenses.
Prominent veins
They can complement the makeup of different looks, but such veins look impressive on their own. You need to stock up on black and white eyeliner, black eyeliner, black and silver eye shadow. To begin, create a wide layer of eyeliner and dark shadows around the eye line. Silvery liquid shadows in the inner corner of the eyes and under the lower lash line will add special expressiveness to the look. Then up and down from the eyes, using a black and white pencil, you need to carefully draw fine lines of veins. Complete the look with black lipstick and eyebrows.
Veins can be drawn not only on the face, but also on the neck and other open areas of the body.
Pale Skeleton
Skeletal makeup suggests emphasized geometry and strict lines. From the entire palette, two colors will be used: black and white. It is enough to highlight the black eye sockets, the tip of the nose and the corners of the mouth on a bright white base. Instead of carefully drawing the jaw, you can use the “sewn up mouth” technique. It is logical to continue the makeup in the neck area, emphasizing the line of the spine.
In a suit, it is original to use two T-shirts - white on top of black, or vice versa. But first, on the T-shirt that will be on top, you need to cut lines imitating a human skeleton.
Mysterious ghost
A terrifying girl from a well, a lonely guardian of an abandoned house or the ghost of an old witch... - these images will also be appropriate for the All Saints Day holiday. Unlike zombies, the makeup here is much simpler. On a white or pale gray base, accents are made on the eyes, black eyebrows and lips. You can create the effect of dark circles under the eyes by shading black eyeliner or eyeliner. The look will be complemented by colored lenses in blue, black or dull gray shades.
Unzipping face
This is a real trend among fans of scary makeup. Thanks to the neatly glued zipper to the face, the effect of unfastened skin is created, from under which bare muscles peek out. To begin with, you should choose a zipper that fits the size of your face and determine which part of the face will be bloody and which part will be normal. Then, using special glue made from mastic or liquid latex, you need to attach the zipper to the face and seal its fabric edges with napkins.
Red face painting is generously applied to the part of the face that will be bloodied. To add texture, this is done with a sponge or napkin. Faux blood and a little dark paint are added on top of the paint to make it more convincing. Using a zipper, you can reveal only a small part of the face: for example, one eye or just the mouth.
Swamp Witch
Getting the look of a witch is quite easy - you just need to enhance the dark shades in your eye and mouth makeup. But often at traditional Halloween masquerades there is an image of a swamp witch, differing from the usual one by the presence of green skin. To create such makeup, you will need to use green aqua paint as a base on the entire face and neck (and ideally on all open areas of the body). On top of it, eyes, eyebrows and lips are outlined in black or purple. If desired, you can draw a wart on your nose.
“Two-faced” makeup will look original when the face is divided into exactly two halves: regular and painted green. Dark purple lips and eye shadow can bring both sides of the face together. It is better to use green shadows on a flesh-colored background, and purple shadows on a green background.
What kind of Halloween look can you create with scar makeup?
Firstly, multiple scars made using this technique can be applied not only to the face, but also to the entire body, which expands the range of possible images. Secondly, horrific wounds and scars are integral components of almost all fancy dress costumes for All Saints Day.
If you don’t want to bother too much with a suit, then you should choose the role of a zombie or a victim of a maniac. Movie fans can choose an image from their favorite movies, for example, Harry Potter, Joker or Edward Scissorhands. Scars on the wrists will help create the image of a suicide, and a cut larynx will create the image of a dead man.
Pirates, robbers, maniacs and other wicked individuals also bear scars. For girls, the image of a militant Amazon or the heroine of Japanese legends - the Lady with the Scar, Kuchisake Onna - is suitable.
Today it is difficult to surprise anyone with tattoos, piercings in the most unexpected places and tunnels in the ears. The most advanced ones make themselves scarring or scarification. The custom of painting on the body with the help of scars came from the traditions of the equatorial peoples and became widespread among informal youth.
Unlike underdeveloped peoples, scars today are applied for aesthetic reasons; to many they seem beautiful, shocking, causing shock to others. So putting a scar on your body in the form of a certain design is considered very fashionable. But what is scarification, and how to make a scar on your hand or any other part of the body?