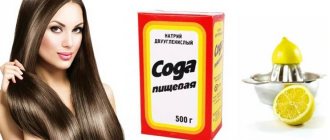
Artistic painting of nails today is becoming more and more popular. Just recently we told you about the technique of painting nails at home, and described some patterns that even beginners can do. But we forgot to mention one thing: the technique of painting on nails that we talked about is not the only one available to a beginner. You can draw intricate and bizarre patterns on your nails without special preparation in another way. The name of this method is water or marble manicure.
The main advantages of water manicure
- This technique is possible even for an absolute beginner who has no idea how anything can be drawn on nails; whose hand trembles when trying to draw even the simplest drawing
- Performing a marble manicure requires very little time, and →
- The drawings turn out simply fabulous, no one will even think that you drew them yourself, without the help of an experienced and sophisticated manicurist
- You will not need any special devices, tools or ingredients - just like special preparation. The information that you will find in this article will be quite comprehensive and will answer all your questions, and will also help you cope with the most common problems and difficulties that arise when you first try to use the water manicure technique
Water manicure is the easiest and most affordable way to decorate your nails with a masterpiece design, spending just five to ten minutes on it. And Lady Zaza magazine will tell you how to achieve such an incredible effect.
How to prepare your nails for a manicure
Preparing nails for applying varnish to create a marble design takes place in the standard mode, i.e. The first step is to get a quality manicure and perform the necessary hygiene procedures. You can choose the classic (cut) manicure method, its European or Brazilian version.
You can learn about all the advantages and disadvantages of this or that type of manicure by looking at a variety of photos and video materials. The main thing is not to forget to carefully work on the cuticle area, because in order to use ordinary water to create a spectacular manicure, you should make your nails and the periungual ridge as smooth and even as possible. This will allow the drawing to transfer well and not damage it.
When the nails are prepared, it is necessary to apply a base coat to them for better adhesion of the colored varnish to the surface of the nail. Ideally, you should set an overall neutral tone for your nails, i.e. cover them in one layer with some neutral colored varnish (for example, nude, white or pink). This will make the water manicure on your nails more rich and vibrant.
When the nail polish is completely dry, it’s time to start creating a marble water design, but before that, lubricate the periungual space with a rich hand cream or carefully cover it with tape - this will help protect the skin from pigment.
How to do water manicure at home
First, let's make a list of what we need to create a marble manicure:
- Varnish or special nail paints - at least three or four colors, more is possible, but not less
- Bowl of water at room temperature
- Long needle or thin toothpick
- Nail polish remover, cotton wool and cotton swabs
- Baby or other rich cream
Each of you can easily assemble such a simple set, right? It’s hard to believe that this will be enough to paint simply unimaginable patterns on your nails!
Well, we've given you a few minutes to prepare, now it's time to get started. We do not recommend following the scheme immediately: first familiarize yourself with the entire sequence of actions, understand and analyze the step, and only then try your hand. The main thing is to believe: you will definitely succeed!
Final touches
Each of your nails has an intricate design. Now the question arises, how to get rid of the remaining polish on the sides of the nail plate and what is the best way to do this.
First of all, get rid of the tape or adhesive tape if you used these materials to protect the skin of your hands. Most of the surplus will disappear along with them.
If you used a greasy cream, just wipe it clean.
In the vast majority of cases, there are still small areas of skin covered with varnish around the nail, or the color pigment itself has leaked under the tape. In this case, you need to arm yourself with cotton swabs soaked in nail polish remover and carefully clean the skin of excess nail polish.
A water manicure will be considered completely complete only when you secure it with a special top coat. This will protect the color pigment and preserve the design for a longer period. It is thanks to the top that the nails in the photo look bright, juicy, and shiny.
Marble manicure technique at home
- Get a hygienic manicure - remove old polish, give your nails the desired shape, remove cuticles. We paid special attention to the technique of trimmed manicure in the article “Manicure with water”, where you will learn a lot of useful information on this topic.
- Prepare all the necessary tools described in the previous paragraph. It will be inconvenient for you to run around and look for something missing when you start applying a water manicure, so make sure that you don’t have to do this in advance.
- Cover your nails with a layer of white or other light-colored varnish, which will be the main one in your manicure. For the first experiment, white varnish is most suitable, then you can try other options.
- Fill a bowl with warm water (room temperature).
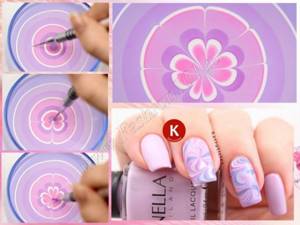
- Place one or two drops of a solid color polish into the center of the bowl.
- Along the edges of the first spot, add one or two drops of varnishes of other colors that will participate in creating the composition.
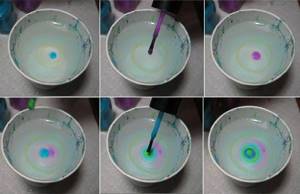
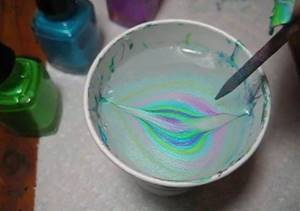
- Mix the varnishes with a toothpick or a needle so that fancy thin stains are formed. You can try to depict a different pattern in mind, but again, we do not recommend going too far in your experiments for the first time. First, as they say, you need to “get your hands on it,” feel the technique - and then try to bring something of your own to it.
- Lubricate the skin around the nail with a rich cream. You can often find a recommendation to wrap your finger with tape or adhesive tape. We won’t say that this advice is bad, but a rich cream works just as well, if not better - all you have to do is wash your hands so that not a single trace of nail polish remains on your hands.
- Dip your finger into the water under the stain. It is best to start diving from the very edge of the bowl, lowering your finger almost parallel to the water - so that the varnish stain does not smudge.
- Then slowly lift your finger to the surface of the water so that the polish stain is located directly on the nail.
- Remove your finger from the bowl and repeat the process with the rest of your nails.
If you have a large enough container that will allow you to paint all your nails at once, stretch the stain of varnish so that you can manicure your entire hand in one motion. The result will be even more impressive, as the pattern will be more intricate. At the same time, you will spend five times less time on the entire procedure!
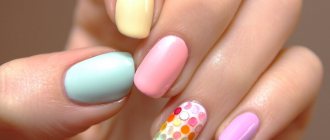
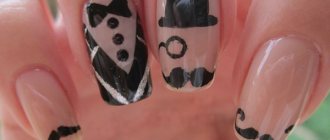
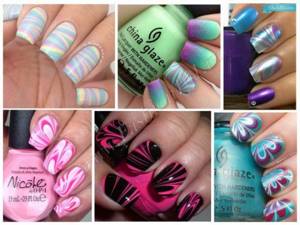
Watercolor manicure design ideas in photographs
We have already learned how to do a manicure using water. Now is the time to choose the right design and start applying your knowledge! Option 1
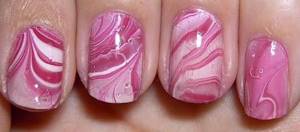
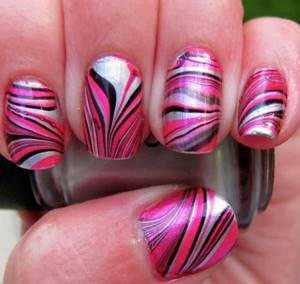
As you can see in the illustration, three colors were used to perform this manicure. The drawing turned out bright. It will perfectly harmonize with a red or crimson evening dress. Also perfect for summer manicure. Option 2

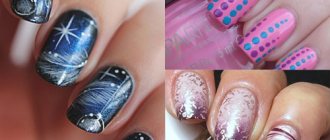
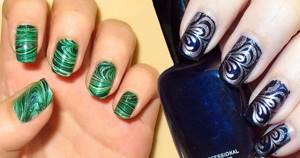
Beautiful nails, manicured in three colors: green, black and white. Proper mixing of shades gave the result originality and nobility. Option 3
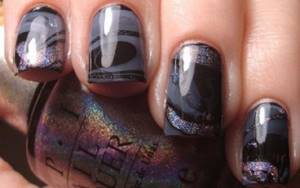
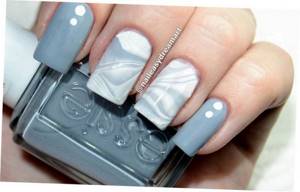
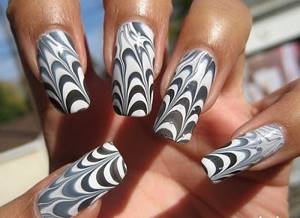
The unusual combination of matte and shiny tones looks very interesting. Black, gray and silver varnishes harmonize with each other, creating a charming image. Option 4
To complete such a drawing, the master needed two varnishes and several stencils. On several fingers a water manicure was performed on the entire surface of the nail. But on other fingers, most of the nail plate was covered with a stencil, resulting in an unusual French style. Option 5
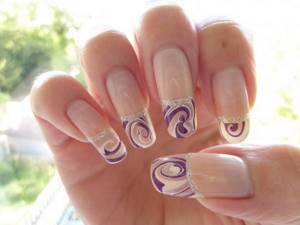
The manicure is made using only two tones. However, he looks very romantic. Option 6
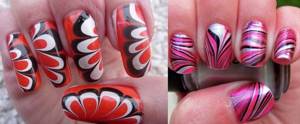
Bright, colorful manicure with a pattern reminiscent of flowers! Four shades were used for the image using the classic method of mixing tones. The proportions were respected, thanks to which the manicure remained clear and elegant. Option 7
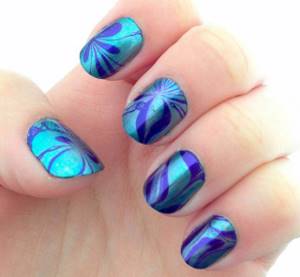
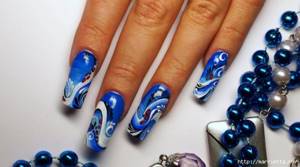
Of particular interest is the illustration on the right. The juxtaposition of a dark tone and a lighter silver create an extraordinary look on your nail. You can replace blue with any dark color, maybe even black. Option 8
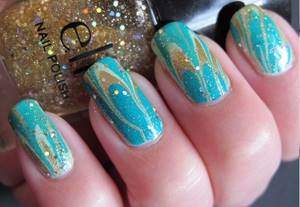
Three-color water manicure using a transparent sealer with glitter. It looks simply chic and goes well with light and blue tones of clothing. Option 9
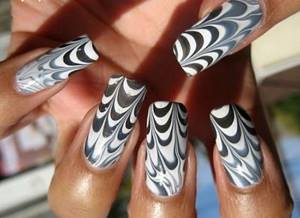
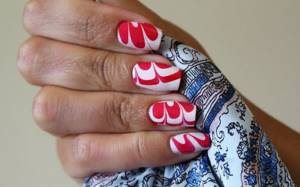
A very original version, in which only white and black colors are used. To achieve this result, the paints are mixed using circular movements. The result will be impressive. Option 10
Marigolds that are decorated with water manicure using four tones. Liquid varnishes were used. A transparent sealant is applied on top.
Secret tactics for water manicure
Although the procedure for applying water manicure is incredibly simple, many ladies encounter certain difficulties - and not only the first time, but also subsequent times. As a result, they decide that they are unable to overcome the difficulties and abandon the idea forever.
Lady Zaza magazine sincerely wants its readers to be able to use this excellent manicure technique without any problems, so we have done a lot of work especially for you: we have identified the most difficult moments that you may encounter and asked our experts how to solve them.
We present to your attention→
A Guide to Overcoming the Challenges of Marble Manicures
The drawing on the water turns out very beautiful, but on the nails it appears as a blurry spot of an unknown color.
Options to solve the problem:
- Water too cold or too hot. It should be at room temperature, which is quite easy to check: when you immerse your finger, you practically do not feel the water.
- The varnishes didn't mix well. You need to stretch them quite carefully.
Varnishes do not mix well, it is impossible to draw a design on water
Most likely, the varnish is either too thick or too old. To prevent this problem, you need to:
- Or use a varnish that does not contain acetone at all
- Or add a couple of drops of acetone to the water so that the varnish dissolves and mixes better
The design does not stick well to the nail
Perhaps a greasy cream got on the nail, so the design is slipping. If this is not the problem, most likely the water is too hot. Its temperature should be at room temperature, otherwise the varnish dries too quickly
The pattern forms on the water, but as soon as I dip my nails into the bowl, it smears
Before dipping your nails, you need to wait until the design is slightly fixed and crusted over. It will take about 10 seconds
The drawing lies crookedly, unevenly, leaving unpainted areas
The problem is most likely in the varnish (it is either too thick or fast-drying) or in the water temperature (we wrote about this above). Try to cover the nail before applying the design with one or two layers of white or other light-colored varnish, so the stains and gaps will be invisible, and the design, on the contrary, will look quite elegant and sophisticated.
Important nuances
Manicure on water opens up a great horizon for experimenting with style and colors. In order for such experiments to produce brilliant results, it is, of course, better to learn from the mistakes of others and not make your own. Here are a few tips that will help you quickly “fill up your hand” and spend less time on water manicure, achieving an excellent result:
- When choosing the color of varnishes, rely not only on compatibility. Please note that contrasting colors in this technique look more impressive. But don't overdo it. Lime-red nails may cause a slightly different reaction from others than you expect. You can use three or four colors.
- To treat the skin around the nail, it is better to use oil rather than cream. You can use any oil; in the case of olive oil, you simultaneously make a healthy mask. Do not use tape for protection - it will not protect the cuticle.
- Colored varnish can also be used as a base. This will help a lot if suddenly the pattern on the water does not capture some area of the nail.
- Use lukewarm water, about 30 degrees. In cold or hot water the varnish will behave unpredictably.
- Fill the vessel with water to the brim, this makes it easier to immerse the nail.
- After creating a pattern on the surface of the water, wait 3-4 seconds before immersing your finger.
- Water manicure at home can be done on nails of different lengths, as well as on extended ones.
As you can see, there are no special difficulties. If you perform all the steps correctly and clearly, you will be able to do a water manicure the first time. And over time, you can learn to dip two fingers at a time, which will save time and reduce varnish consumption. Don’t be afraid to experiment - it’s interesting, educational and promises unsurpassed results
Water manicure: video examples
To make the essence of the tactics clearer to you, we offer you several videos describing the most interesting marble manicure techniques:
https://www.youtube.com/watch?v=4-Fy2zA6B7Q
https://www.youtube.com/watch?v=JsEmuYZE4w8
Now that you have such a detailed guide to action, you can easily decorate your nails using the water manicure technique. And if you have any difficulties, contact us, we will find answers to all your questions.
Sasha Pavlova specially for lady-zaza.ru
How to use a water level correctly?
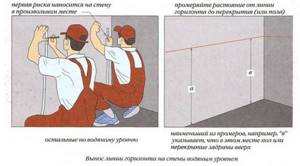
It is easier and faster to work with the device, with good flow of liquid in the tube. To do this, the hose diameter should be approximately 10 or 12 mm. As for the length, it depends on the dimensions of the room and can be either 3 meters or about 30 meters. For beginners, it is better to purchase models of water levels with rubber sliders for flasks. This makes using the device convenient. The weight of the tool is small - from 500 g to 1 kg, so even ladies can use it.
As described above, the device tube is filled with water, usually at room temperature. Next, you should carefully measure the level of this water in the containers. To make a mark at a given height, one tank remains in place, the second moves in the desired direction. It is necessary to strictly ensure that at this moment there are no even the slightest creases or bends on the tube. You should wait a few seconds until minor fluctuations in the water in the device disappear. Control marks must be made when the liquid level strictly matches in both flasks.
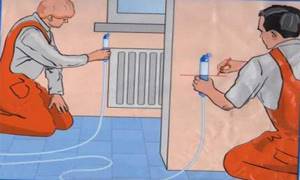
You should prepare in advance for working with a hydraulic level. After all, for this you will need not only the device itself, but also several other improvised tools, namely: a ladle, or better yet a small watering can, for filling the level with water; small funnel; tape measure and ruler; scotch; pencil. If desired, you can use dye to brighten the water. Well, of course, all work with the water level must be carried out with the assistance of an assistant. If you work alone, you will have to make a fixation for one of the flasks, for example, a hook or other fastening. This makes the level difficult to use. Still, the design of the tool is designed for two people to work with it.
To avoid errors in measurement, the water level should be thoroughly rinsed before use, as contamination may interfere with the accuracy of the marks.
It is not recommended to fill the hydraulic level with water directly from the tap, as in this case the liquid is enriched with a large amount of oxygen, which can affect the accuracy of the level and the easy flow of water inside the instrument. Therefore, professional craftsmen who set ideally even marks often use boiled water, which eliminates the air content.
Does not work?
It seems that all the rules have been followed, the manicure should turn out perfect, but alas, or are you not happy with the result? Let's discuss the problems when creating a water manicure.
- Do the varnish droplets spread or thicken?
Measure the temperature of the liquid. If it is about 40 degrees, then the problem is in the varnish, you used it too thick. Replace it with a more liquid one and continue the procedure.
- Different patterns?
After some time and a couple of trainings, you will be able to make perfect drawings, the main thing is to maintain the style.
- Does a drop of varnish sink?
It is likely that you are holding the brush too high relative to the water level. The maximum distance between the brush and the surface of the water is two centimeters.
- Is the pattern smeared?
Most likely, you quickly pull your finger out of the water or do not completely remove the remaining varnish.