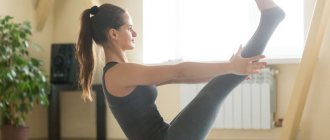
What muscles work during a reverse plank?
It is impossible to keep yourself in good shape without increased vital activity, but not everyone can play sports by visiting sports or gyms. There are gymnastic complexes, by performing which you can form the necessary parameters of your figure and get rid of excess weight at home, without the use of exercise equipment or sports accessories. The reverse plank is one such exercise.
Let's find out which muscles work during the reverse plank exercise:
- During this exercise, all abdominal muscles are involved: rectus, pyramidal.
- The external internal and oblique muscles are activated if the classic reverse plank is slightly modified.
- During the exercise, the lumbar muscles are stretched, including the quadratus lumborum muscle, one of the main components of the human muscular corset.
- Since you have to rely on your own limbs during a fixed pose, the muscles of the thighs are involved - flexors (anterior), extensors (posterior), medial (adductor), and gastrocnemius muscles.
- The muscles of the upper extremities work: large muscles of the forearm, brachioradialis and brachialis, as well as shoulder muscles - ulnaris and triceps.
That is, an exercise from one statistical position allows you to develop several muscle groups at once.
Benefits of reverse planks for the body
Thanks to the load on absolutely all muscle groups, blood flow accelerates, the saturation of organs and organic systems with oxygen increases, and the tone of the body increases.
By doing this exercise regularly, you can achieve the following results:
- Reduce the thickness of the fat layer in the lower abdomen, one of the most problematic areas of the female figure.
- Strengthen the muscles of the upper abdomen.
- Increase the tone of the back muscles, get rid of lower back pain, strengthen the muscle corset, and maintain correct posture.
- Thanks to this exercise, you can increase your own flexibility.
- The reverse plank allows you to strengthen the muscles of the upper limbs, preparing them for the load when working with weights.
To summarize, you can see that one exercise can help you get rid of excess weight, correct your posture and stop pathological changes that cause muscle pain in the lumbar region.
Related materials:
plank | exercises | Exercise | back | Hands | legs | Belly | Buttocks | press | shoulders | muscles
Articles
- Classics in fitness: body ballet March 16, 2011, 03:00
- Marathon “Everyone to the Beach!”: basketball, diary and home exercise March 30, 2011, 12:00
- Fitness with the stars. Blake Lively July 19, 2011, 03:00
Video
- Firm belly with Biotherm May 06, 2011, 00:00
- Idylle by Guerlain. History of creation October 25, 2011, 11:03
- New cream for hands, neck and décolleté area Re-Plasty Age Recovery from Helena Rubinstein October 28, 2020, 14:30
Contraindications to the reverse plank exercise

Sports activities have some restrictions.
You should train based on your own physiological parameters, health status and age factors. You should not perform the reverse plank exercise in the following situations:
- During pregnancy, regardless of the trimester, as it can provoke uterine tone due to overstrain of the abdominal muscles.
- If there is a history of a vertebral hernia or a recent compression fracture, destabilization of the skeletal system due to muscle tension can provoke a deterioration of the condition.
- After operations on the abdominal organs and cesarean section, since the muscles are intensely stretched during a fixed position, the sutures may come apart. After surgery, before intensive sports activities, you need to wait from 6 months to 1 year, depending on the individual characteristics of recovery.
- You should not choose this exercise after injuries to the elbows and shoulder joints of various types.
Injuries to the hands and wrists when performing the reverse plank are relative contraindications.
A slight modification of the exercise - resting on your elbows - allows you to effectively load the muscles of the whole body. When choosing a method for performing a reverse plank, you need to take into account your own health.
How to do a reverse plank
The exercise has several variations, it can be modified to make it easier to perform and some elements and turns can be added to enhance effectiveness. To avoid injury or slipping, before starting classes you should take care of your own comfort - lay out a rug or mat. Getting a fracture from falling from such a height is quite difficult, but bruises and abrasions that are possible when hitting the floor can also be very painful.
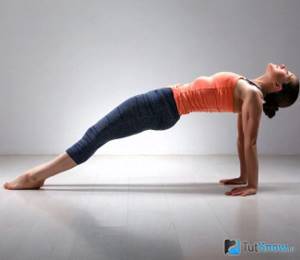
How to do a reverse plank correctly in the classic version
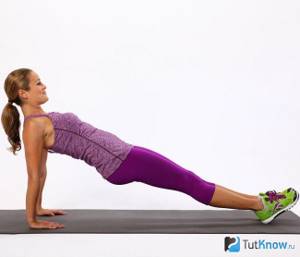
The classic version of the reverse plank, which beginner athletes unfamiliar with the basics of training can master, is done as follows:
- You need to lay out a non-slip mat on the floor. Then you should sit comfortably on it, stretch your legs in front of you and connect them together.
- The back is slightly tilted back, approximately 45 degrees, and the hands are supported behind the back so that the hands are in the same projection as the shoulders. The fingers of the hands need to be turned towards you.
- Then they rest their feet and hands on the floor and try to push the body up, towards the ceiling, by tensing the leg muscles, lifting the buttocks.
- You need to try to ensure that no bends or bulges appear on the body during deflection. Ideally, the body should be one line.
- The pose is fixed for at least 15 seconds. All this time you need to maintain one position, without relaxing your stomach or buttocks, otherwise there will be no point in performing this exercise.
- You should lower your buttocks slowly; it is advisable to allow yourself to relax only at the moment your buttocks touch the floor.
Experienced athletes who have mastered the reverse plank automatically repeat the fixed pose as soon as they lower themselves onto the mat. Beginners can rest a little after returning to the starting position.
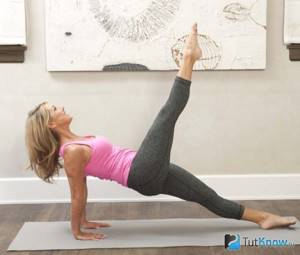
Modifications of the reverse plank on straight arms
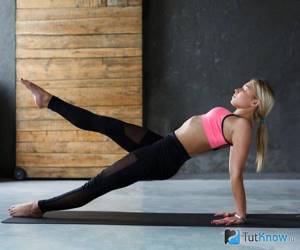
There are many modifications of the reverse plank on straight arms that promote the development of muscles of different groups.
With any change in the initial position, the intensity of the load is redistributed. Let's consider the options for the reverse plank:
- The simplest change in the starting position is to turn your hands with your fingers towards you before lifting the body; this forces the biceps muscle, rather than the brachialis, to tense.
- If you need to work out the shoulder joints well, then when performing the reverse plank, you need to place your hands as far as possible from the body. You shouldn’t immediately move your hands far away from the buttocks; the distance should be increased gradually. You should focus on nagging pain in the shoulder area. As soon as the ligaments of the joints are stretched so much that when performing a static pose no unpleasant sensations will arise in the shoulder area, the hands can be moved further.
- You can increase the stretch in your glutes and hips during a reverse plank by performing a hip raise exercise. When mastering it, you should rise from this starting position - you need to sit on the floor, lean your body back 35-45 degrees, lean on your hands with your fingers turned towards you, and bend your legs at the knees. The feet should rest completely on the floor. You should climb into the half-bridge without bending your body. Having mastered this pose, they begin to modify it. Hands are placed closer to the body, and legs are fully straightened. In the final pose, the body is significantly arched.
- A rather difficult version of the reverse plank, which increases the load on the supporting limbs, allows you to work the thigh muscles and take care of your own stretching. The starting position is the classic reverse plank. Swinging your legs forward can be done simultaneously with lifting into a fixed position or when you are already in it. It is easier to maintain balance if you bend the swing leg, it is more difficult when you lift the straight limb. The most difficult exercise is when the leg is raised very slowly and lowered just as slowly.
- The next version of the reverse plank will help get rid of the most problematic fat deposits for women, which are located on the inner and outer thighs. When performing this exercise, you must first fix the position at the highest point, and then move your legs to the side. The easiest option: rise to the reverse plank and do 3 swings with one leg, then lower, rest, rise again and do the same swings with the other leg.
- You can also work the oblique abdominal muscles by performing crunches. To do this, without changing the position of the body, rotate the pelvis in a fixed position.
- They complicate the reverse plank by lifting and stretching the arms in turn, while simultaneously swinging the legs and arms, both with the same limbs and those located on different sides.
- The reverse plank option with weights is rarely performed. In this case, take a dumbbell in one hand and, rising into a fixed position, pull the load with your arm bent at the elbow to your chest.
There are several other variations of the reverse plank exercise. You can stretch the leg muscles by resting on your heel during a fixed pose and performing foot movements, stretching your toes. To quickly tighten your abdominal muscles, add an exercise from the bodyflex complex to the main pose - deep belly breathing.
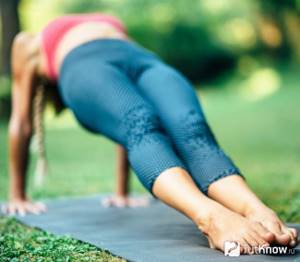
Technique of the classic Planck exercise: how to do it correctly
The standard “Plank” is performed while lying on the floor. The emphasis is placed only on two points - toes and forearms. Accordingly, the weight is distributed approximately in half. The rest of the body is in a hanging position above the surface. For the first time, it is recommended to work out the technique of performing the exercise, correct mistakes, and only then focus on the effectiveness.
Plank exercise - how to do it correctly? The classic method involves several steps:
- Choose a comfortable place to study. It should be a flat surface, not very hard. You can additionally lay a blanket or mat on the floor. It is advisable to have a mirror on the wall to look at the position of the body from the side.
- Take a lying position on your stomach. Rest completely on your forearms (not just your elbows). Your arms should be bent at right angles to your shoulders. Place your toes on the floor. Feet can be shoulder-width apart or joined together.
- Straighten your back by drawing an invisible straight line from the top of your head to your toes. The pelvis should not protrude upward. The buttocks are tense, the stomach is pulled inward. Check your body position in the mirror. The line should be smooth, the effectiveness of the exercise depends on this.
Hold this position for at least 10 seconds, ideally as long as you can. The limit of strength can be determined by a slight burning sensation in the abdominal muscles. Repeat 3-5 times.
You shouldn’t rush and load your body with long periods of hanging out right away. First learn to do everything correctly, and then work on increasing the time. Increase the duration of the approach gradually by 10 seconds, eventually reaching 2 minutes. When the 2-minute exercise becomes easy, you can move on to more complex variations. The number of repetitions and frequency of exercises is determined individually, according to how you feel. The main thing is to remember that regularity and perseverance are the key to quick and positive results after the Plank exercise.

Regularly performing the plank exercise will help you lose excess weight.
Recommendations on how to do the reverse plank exercise correctly
Static exercises - various planks - are currently gaining more and more admirers, both among athletes and among amateurs who engage in physical education to improve their condition and reduce weight.
However, calories are burned during a static position only if you take it by following the basic rules. Rules for performing the reverse plank:
- You need to immediately prepare yourself for the fact that the arm muscles will have to be strained at full strength. There should be no damage to the wrists of those who are trying to master the exercise, otherwise you can get a subluxation or dislocation of the wrist joint. By performing a reverse plank on your elbows, it is impossible to get a beautiful relief of the muscles of your forearms.
- It is better to introduce the reverse plank into a stretching complex, performing the exercise after the main workout, until the muscles and ligaments have cooled down. When fixing the main position, almost all muscles are stretched; if they are not warmed up enough, you can get a sprain or tear of the ligaments.
- When performing the reverse plank, you need to monitor the position of the body. You need to try to keep your body and legs in a straight line. The exception is a variant of the exercise with maximum hip lift.
- Having risen to a fixed position, you should simultaneously pull in your stomach and buttocks.
- In the first 2-3 days, it is enough to hold the basic reverse plank for 15-20 seconds. To make it easier, you can suck in your stomach and take a break from breathing. Only after learning to automatically breathe through the chest during a fixed position do they begin to increase the time of raising the body to 45-60 seconds.
- It is advisable to achieve continuous exercise for 3-4 minutes. This does not mean that you need to spend all this time in a fixed position - even trained athletes cannot do this.
- The frequency of the exercise is 2-3 sets of 3 times, 5-6 times a week.
- In the case when the legs begin to tremble, the reverse plank must be interrupted and rested. Rest should not be passive, you need to make sure that the muscles remain warm. Active rest involves breathing evenly, walking calmly, bending to the side, and lifting your legs.
- Don't try to stay in a fixed position for as long as possible. You should focus on performing the exercises correctly: your hips and torso should be on the same line, your chin should be pressed to your chest - your head should not fall back.
Proper execution of the reverse plank helps not only to get rid of excess calories and strengthen the muscles of the back, abdomen and upper limbs, but also to increase resistance to stress.
Since during a fixed pose you have to focus on your own sensations, making sure that all muscles are working at full strength, you won’t be able to be distracted by extraneous thoughts. Full concentration on your own feelings helps you gain peace of mind. As soon as the classic version of the reverse plank can be mastered to the point of automaticity, the exercise must be complicated. Otherwise, the progress of muscle strengthening stops.
How to do a reverse plank - watch the video:
You can’t limit classes to only static exercises. They have the desired effect only when supplemented with dynamic load.
Abdominal plank exercise

Exercises that involve working with your own weight are rapidly gaining popularity. They attract with their simplicity, accessibility, and the ability to control the degree of load.
Thanks to this direction, you can get rid of extra pounds, increase muscle tone, correct figure flaws and get a boost of energy. Planks are one of the most effective subsections in a wide group of exercises. If you do them every day, gradually increasing the load, you can count on serious positive changes in your health and appearance.
Guaranteed results:
- The abdominal muscles are strengthened. The plank is considered the ideal exercise for developing beautiful abs. This is the only type of profile load in which all the necessary muscle groups work simultaneously. In addition to external changes, it will be possible to note positive changes that will affect the level of physical fitness. The strength to work with heavy weights will appear, the height of jumps will increase, and the quality of abdominal breathing will change.
- Reduces the risk of back and spine injuries. During the process of doing planks, the muscles work actively, but without unnecessary load. If you do them regularly, the muscle fibers, weakened due to sedentary work or a sedentary lifestyle, will strengthen to such an extent that they can again support the spinal column. Back and neck pain will go away, and migraine symptoms will disappear.
- Metabolism accelerates. Practice shows that doing planks helps burn more calories than regular exercises aimed at strengthening the abdominal muscles. And for the most part, this ensures a more active metabolism, which starts in just a few seconds and lasts throughout the day.
- Posture improves. Strengthened muscles allow you to keep your back straighter, straighten your shoulders, and bring your shoulder blades together. A person who regularly practices planks will have a lighter and smoother gait. Beautiful posture is maintained in all body positions and prevents compression of blood vessels and nerves in the cervical spine.
- Balance improves. After several weeks of practice, even the most clumsy people begin to perform quite complex actions: standing on one leg for a long time, while performing some additional manipulations. It turns out that thanks to planks, coordination is normalized, which has a positive effect on other types of physical activity.
- The flexibility of all joints increases. This gives several types of positive results at once. The risk of dislocations, sprains, and any joint injuries is reduced. A person begins to feel more comfortable, freer, even lighter.
- The functioning of the nervous system improves. Many people notice that after doing planks, their mood improves, their muscles are filled with strength and energy, and their mood improves. In addition, exercises significantly calm you down, eliminate traces of stress, and unload your brain.
To achieve these results you only need to spend five minutes a day. During one session, it is recommended to consistently perform basic planks and variations with one leg lift, an exercise from the elbow position and lateral approaches.