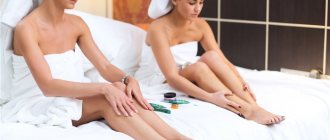
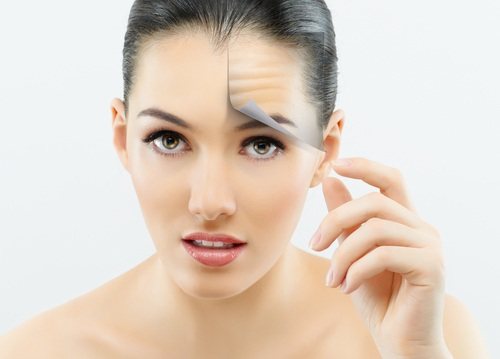
The popularity of Halloween is growing every year. All over the world on October 31, millions of people transform into evil spirits and cheerfully celebrate All Saints' Day. Traditionally, the image for Halloween should be frightening, so masquerade costumes, attributes and, of course, makeup are used.
If there are practically no problems with choosing a suitable suit
(you can buy it in a store or order it online), then to complete the look you will need to master the techniques of applying “scary” makeup. You will especially need such skills if you decide to transform into a zombie or a robber, your face and hands, which must certainly be decorated with bloody wounds and scars.
In this article you will learn how to draw a scar on your face or hand at home.
How to draw a scar on your face yourself?
To paint a scar on the face, you can use both theatrical makeup and ordinary decorative cosmetics. Let's start with a simple and affordable option that uses ordinary decorative cosmetics. You will need: foundation, sponge or cotton pad, lip pencil or lipstick. Using foundation, prepare the area for the future wound. Then use a soft coral or pale pink lip liner to draw an outline. For greater naturalness, the line should not be clear and even. Using a sponge or disc, blend the outline a little. Repeat the line using a pencil or lipstick a shade darker. Then blend again.
A voluminous ragged scar can be created using theatrical makeup, foundation, a toothpick, a brush and liquid latex.
- Using a brush, apply latex to your face, creating the base of the scar.
- Wait 1 minute for the latex to dry a little.
- Use a toothpick to create jagged edges and depth.
- Using thick red theatrical makeup and a brush, draw in the depressions and edges. Add depth to the scar with black paint.
- For greater realism, you can apply fake blood or red watercolor on top.
This method of application is durable, so you can use it to draw a scar not only on the face, but on any part of the body.
OLGA SEYMOUR - BEAUTY RECIPES. HOW TO REPLACE BOTOX?
Olga Seymour - beauty recipes. How to replace Botox?
Everyone wants to be young and beautiful and expert Olga Seymour , she will teach us how to replace Botox with natural products at home.
Today Olga will share with you a recipe for an excellent cosmetic product that can be easily prepared from simple and affordable products at home. This is a wonderful face mask with a Botox effect. A mask with starch perfectly smooths out wrinkles and tightens the skin of the face.
To prepare a mask with the Botox effect according to Olga Seymour’s , you will need the following components:
potato starch - 1 heaped tablespoon warm boiled water - 1 glass carrot juice - 5 tablespoons fat sour cream - 1 heaped tablespoon
Mix ingredients and apply to face
Another recipe, a replacement for Botox.
The recipe is very simple, and to become younger and more beautiful, you only need two components: Solcoseryl gel and Dimexide. You can buy them at the pharmacy and they are not expensive at all.
I’ve seen enough of the catalog of elite models, how beautiful, young, stylish they all are, how can I get behind? Very cute girls from different angles, one better than the other. In general, definitely - I will rejuvenate.
First you need to check how the skin reacts to these drugs, that is, do a sensitivity test. The testing location will be the bend of the elbow, testing time will be one day. Dimexide should be diluted with boiled water 1:10 and lubricated with it on the test area. If there is no swelling or redness during the day, you can apply Solcoseryl gel to this area and also check the skin reaction. If it is neutral, you can proceed directly to the facial procedure itself. Moreover, it is advisable to do it in the evening, just before going to bed.
To do this, you need to thoroughly cleanse your facial skin, then wash your face so that no cosmetic products remain on it. Dilute Dimexide in boiled water at room temperature in a ratio of 1:10. Soak a cotton swab in the solution and wipe the skin.
Next, you need to generously lubricate your face with Solcoseryl gel and from time to time moisten your facial skin with boiled water at room temperature for an hour, not allowing the gel to dry out.
Then you should wash your face very thoroughly, dry your face and apply a neutral cream. It is better if it is hypoallergenic. Now you can go to bed and have colorful dreams.
The next morning, your reflection in the mirror will make you happy. Fine wrinkles will disappear from your face, and those that are deeper will become almost invisible. This procedure should not be abused. It is enough to carry it out once every two months.
Although, there are exceptions to any rule. And those who want to get rid of existing scars on their face can use this recipe 2 times a month, but at the same time apply Dimexide and Solcoseryl strictly to problem areas.
This is how easy it is to make an alternative to Botox at home. The drug Dimexide has long been successfully used in skin plastic surgery, and Solcoseryl is an excellent activator of tissue metabolism. You can get rid of wrinkles this way, and there are also many positive reviews from women who have been doing this procedure for several years and look great despite their age.
And if you alternate this alternative to Botox with home lifting and face masks, then you can forget about wrinkles forever.
How to draw a scar on your hand?
Usually, to complete the image, scars are also drawn on the wrists or along the contour of the veins. The main thing is that the wounds on your hands last as long as possible, because during the celebration they can easily be damaged by water or clothing. Therefore, it is better to draw a scar on your hand using the latex technique. A rough scar that imitates cuts on the wrists can be created using regular chewing gum, which will become its base. To ensure that this makeup stays firmly on the body, use nail glue. Then apply foundation and draw an outline with red paint.
Oil scrub “Lakshmi”
Action
Excellent skin tightening, elimination of the orange peel effect, removal of excess fluid, disinfection and rejuvenation. In addition, this oil has a wonderful aroma that has a beneficial effect on the psycho-emotional state. After using this scrub, the skin is perfectly moisturized, so after the procedure you don’t have to use body cream for several days.
Preparation
In a glass or ceramic bowl, thoroughly mix half a glass of sea salt (fine) and half a glass of sugar. Then add half a glass of olive oil, previously enriched with twenty drops of various essential oils (orange, juniper and eucalyptus oils are best suited). Mix sugar, salt and butter with a wooden spatula, cover the bowl with plastic wrap.
While the butter, sugar and salt are infused, melt half a glass of honey in a water bath. While it is heating, grind the following spices in a coffee grinder or pestle:
- four spicy cloves (dried);
- a teaspoon of cinnamon;
- a pinch of coriander;
- 1/3 teaspoon turmeric;
- six cardamom seeds;
- one star anise (star anise);
- half a teaspoon of dried ginger.
After grinding, add all this to honey, which is in a water bath. It is necessary to heat the honey until it begins to emit a strong aroma of spices. Then add a tablespoon of ghee. It is best for the oil to be 78% fat.
Now we take a prepared (washed, wiped dry and treated from the inside with medical alcohol) glass jar with a lid. Pour salt and sugar enriched with oils into it, then pour honey with spices, mix with a wooden spoon and seal tightly. After a day, the cellulite remedy prepared at home can be used for its intended purpose.
Application and storage
Olga Seymour recommends using Lakshmi scrub oil once a week to massage problem areas. It will be enough for three to four procedures. Store the scrub in a cool place, but not in the refrigerator. It is most effective when used in a bath or sauna (applied before visiting the steam room).
How to draw a simple scar with a pencil?
The technique of making a scar with pencils is simple, but it requires some skill. To create a scar you will need: watercolor pencils (red, brown, black), water, a brush and napkins.
From today's master class you will learn how to make an artificial cut or wound on your hand at home for Halloween. Materials and tools can be found in the public domain, some can be bought in a store, some in a pharmacy.
For this you will need:
— paints: brown, red, blue, bloody; - paint brush; - cotton wool; - PVA glue; - foundation; - stack; - alcohol; - artificial blood.
We select a place on the body where the wound will be located. Just keep in mind that such makeup will need to be removed, and it will pull the hairs on the skin with it. So try to choose a less hairy area. We treat this area with alcohol. After this, apply a thin layer of PVA glue for as long as your wound will occupy.
Now we make a backing from a piece of cotton wool. It should be thin and the edges should merge with the skin. We attach it to the glue we just applied to the skin.
We cover this fleece with glue on top. There should be no glue clumps during the work. The edges of the wound should merge with the skin.
It is necessary to make two blanks from cotton wool for the convex part of the wound. These will be two walls at the top with a blunt end and a smooth end at the bottom.
We fasten the walls at a distance of about 0.5 cm from each other with the blunt end up. We straighten the translucent ends at the bottom in different directions.
This blank must be completely covered with glue on top so that it looks like a wound. The top edge of each wall should be very thin, so you can achieve the desired effect using a stack. The workpiece must dry thoroughly. This is the disadvantage of working with glue, since it takes a long time to dry.
The foundation should be chosen as closely as possible to match the skin color. Only after the glue has dried, we cover our artificial wound on the hand with foundation. Again, let it dry.
Now the most creative stage of creating the wound remains. You can use either special paints for makeup or for drawing. We paint all the recesses with dark brown paint. Borders need to be shaded. We paint all the most convex parts red. The rest of the wound can be left light, or you can add a few translucent bruises mixed with bloody paint. At the end, we fill the inside of the wound with artificial blood, which you can also make yourself from dye, water and gelatin.
At the end, we fill the inside of the wound with artificial blood, which you can also make yourself from dye, water and gelatin. Be sure to smear the blood along the edges of the wound and splash a couple of drops on the skin. This is how easy it is to make an artificial wound or cut with blood on your arm or other part of the body at home.
Let's remember that last time we showed,
The popularity of Halloween is growing every year. All over the world on October 31, millions of people transform into evil spirits and celebrate All Saints' Day in a funny way. Usually the image for Halloween should be frightening, so fancy dress costumes, attributes and, of course, makeup are used. If there are virtually no problems with choosing a suitable suit (it can be purchased in a store or ordered online), then to complete the look you will need to master the techniques of applying “scary” makeup. In particular, such abilities will be useful to you if you decide to turn into a zombie or a robber, whose face and hands must be decorated with bloody wounds and scars. In this article you will learn how to draw a scar on your face or hand at home.
How to get rid of scars advice from Olga Seymour
—Categories
- EMBROIDERY (618)
- 3D embroidery (27)
- smooth surface (25)
- beads (24)
- richelieu (10)
- on knitted fabric (8)
- programs (4)
- magazines, websites (31)
- cross stitch (302)
- ribbons (67)
- miscellaneous (80)
- tips (7)
- lessons (14)
- FOR CARS (21)
- tips (9)
- shops (3)
- MISCELLANEOUS TIPS (1)
- KNITTING (5525)
- flowers (120)
- tops, swimsuits (111)
- dresses, tunics (50)
- miscellaneous (48)
- programs (35)
- beads (15)
- coat (10)
- for the holiday (7)
- trousers, shorts (5)
- hats, scarves, shawls (215)
- children (661)
- for comfort (495)
- animals (18)
- magazines, websites (243)
- lace (432)
- mittens, mittens, socks, slippers (139)
- suits, skirts (475)
- pullovers, sweaters, boleros (637)
- tips (64)
- bags (121)
- fabric + hook (39)
- patterns, motifs (733)
- decorations (65)
- lessons, master class (625)
- fillet knitting (87)
- FOR LOVELY LADIES (117)
- tips (25)
- fashion (14)
- massage (8)
- HOUSEHOLDING (977)
- advice for all occasions (138)
- house plants (103)
- repair (34)
- miscellaneous (16)
- serving (7)
- vegetable garden on the balcony (5)
- equipment (1)
- interior (101)
- tips (132)
- washing (114)
- cleaning, housekeeping (171)
- HEALTH (2166)
- folk recipes (300)
- green pharmacy (95)
- eyes (33)
- animals (1)
- women's (8)
- treat colds (134)
- massage (33)
- calluses (9)
- nerves (7)
- body cleansing (158)
- liver, stomach, intestines (88)
- increase immunity (30)
- weight loss (29)
- kidneys (27)
- miscellaneous (320)
- heart, blood vessels, pressure (165)
- tips (50)
- joints (177)
- exercises (184)
- COSMETICS (1373)
- for hair (165)
- makeup (92)
- for eyes (29)
- for skin (127)
- for face (177)
- for feet (28)
- for hands, nails (61)
- for body (2)
- perfume (1)
- masks (231)
- miscellaneous (37)
- tips (20)
- COOKING (3970)
- meat, poultry (417)
- jam, compotes (54)
- dough (44)
- baked goods (29)
- for Easter (17)
- casseroles (5)
- technology (4)
- dumplings, pancakes (398)
- hot dishes (251)
- magazines, websites (7)
- preservation, preparations for the winter (483)
- drinks (114)
- first courses (44)
- pies, pies (357)
- various recipes (130)
- fish (148)
- salads, snacks (343)
- sweet tooth (113)
- tips (142)
- sauces, dressings (101)
- cakes, pastries, cookies, desserts (523)
- decoration of dishes, cakes (42)
- cold dishes (59)
- MY Cottage (1133)
- trees, shrubs (115)
- root vegetables (41)
- magazines, websites (16)
- grapes (15)
- interior (10)
- parasites, diseases (8)
- ideas (25)
- medicinal plants (3)
- lunar calendar (8)
- cucumbers (51)
- buildings (82)
- miscellaneous (112)
- seedlings (48)
- tips (210)
- tomatoes (81)
- fertilizers, fertilizing, pest control (70)
- flowers (149)
- berry (42)
- WISE (108)
- MISCELLANEOUS INTERESTING (1055)
- interesting (50)
- horoscope, numerology (48)
- for a diary (182)
- zodiac signs (23)
- cinema, video, television (69)
- books (13)
- computer, phone, camera (319)
- music (193)
- tips (5)
- NEEDLEWORK (1823)
- decoupage (20)
- salt dough (11)
- quilling (10)
- miscellaneous by topic (10)
- felting (3)
- macrame (2)
- patchwork (1)
- for comfort (42)
- magazines, websites (43)
- hairpins (3)
- toys (506)
- beads, beads (161)
- made of paper, cardboard (296)
- leather (8)
- made of ribbons, fabric, felt (371)
- made of plastic polymer clay (18)
- from yarn, threads (35)
- soap making (3)
- miscellaneous (111)
- tips (14)
- stencils, ornaments (15)
- decorations (54)
- cold porcelain (26)
- templates (16)
- DIY (6)
- SEWING (1046)
- children (83)
- alterations (25)
- pattern (20)
- animals (12)
- technology (8)
- for women (208)
- for comfort (120)
- magazines, websites (35)
- pillows (46)
- miscellaneous (31)
- tips (35)
- bags (110)
- lessons, master classes (224)
- hats, hats (18)
How to draw a scar on your face without the help of others?
To paint a scar on the face, you can use both theatrical makeup and ordinary decorative cosmetics. Let's start with the usual and affordable option, in which ordinary decorative cosmetics are used. You will need: foundation, sponge or cotton pad, lip pencil or lipstick. Using foundation, prepare the area for the future wound. Then use a soft coral or pale pink lip pencil to draw an outline. For greater naturalness, the line should not be clear and even. Use a sponge or disc to slightly blend the contour. Repeat the line using a pencil or lipstick in a darker color. Then blend again.
A voluminous ragged scar can be made using theatrical makeup, foundation, a toothpick, a brush and watery latex.
- Using a brush, apply latex to the face, creating the base of the scar.
- Wait 1 minute for the latex to dry a little.
- Use a toothpick to create jagged edges and depth.
- Using heavy reddish theatrical makeup and a brush, draw in the depressions and edges. Add depth to the scar with black paint.
- For greater realism, you can apply fake blood or reddish watercolor on top.
This method of application is durable, so it can be used to draw a scar not only on the face, but on any part of the body.
How to draw a scar on your hand?
Usually, to complete the look, scars on the wrists or along the contour of the veins are also drawn. The main thing is that the wounds on your hands last as long as possible, because during the celebration they can simply be destroyed with water or clothes. Therefore, it is better to draw a scar on your hand using the latex technique. A rough scar that imitates cuts on the wrists can be made using ordinary chewing gum, which will become its base. To ensure that this makeup stays firmly on the body, use nail glue. Afterwards, apply foundation and draw a contour with reddish paint.
How to draw a regular scar with a pencil?
The technique of making a scar with pencils is easy, but requires some skill. To create a scar you will need: watercolor pencils (reddish, coffee, black), water, a brush and napkins.
Vampire fangs prepared for Halloween, drawn blood or artificial lenses of the wildest colors have become familiar attributes of this holiday, close to formality. Such preparations for the holiday of chaos and horror can hardly surprise anyone, much less frighten anyone.
Therefore, the horrors of life - scars, cuts and punctures - are becoming increasingly popular at Halloween parties and parades of similar themes. A pretty girl with a half-cheek scar is much more terrifying than a skillfully made-up vampire. Particularly mysterious and terrible is the image of the revived victim of a maniac with traces of torture on his body and a wild desire to take revenge on the offender on his face. Fear, and that's all. Therefore, scars on Halloween provide a chance to amuse and frighten at the same time.
Scars can be added not only to the image of a victim or the face of a martyr. A touch of realism in the form of a deep furrow will not harm the mystical images of a joker, zombie or black bride. In the latter version, the white wedding dress, tear-stained eyes and deep scars under the veil create a truly creepy effect. The ability to make scars will be useful both for fans of the horror genre and for those who want to learn the tricks of the art of makeup.
For temporary scarring we will need:
- Corrective powder;
- Concealer;
- Various shadows;
- Corrective lip pencil;
- Collodion or medical glue.
How to make Halloween scars - step by step instructions
- Using a pink pencil, as close as possible to the natural skin tone, draw a sketch of the scar. We clearly display its bends and reliefs.
- Let's paint over our drawing.
- Apply collodion (glue) to the skin inside the design. Give the glue a few minutes to dry.
- By tightening the skin with glue, the man-made scar acquired a natural relief.
- Apply the corrector evenly over the entire scar area.
- We even out the color with a foundation and carefully shade the borders with a sponge (small foam sponge).
- Using a brush, apply dark pink shadow to the scar. It is necessary to treat the internal areas; it is permissible to highlight the skin on the outside with a different color.
The terrifying detail of your unique makeup is ready. Removing this type of makeup is very simple: false scars will easily come off; the first time you try to get rid of them, you just need to pull the ends of the wound. Red marks or slight swelling on the freed skin will disappear without a trace within 10-15 minutes. You can complement your Halloween scars with pale lips, dark circles under your eyes, or swollen eyelids (as if after a long and desperate cry).
Pale, bloodless lips can be easily created using a pale lipstick and regular concealer. Apply a thin layer of lipstick, apply corrector on top, and distribute it evenly over the surface of the lips. To create the effect of tear-stained eyes, we will do the following simple manipulations: on the upper eyelid (just above the eyelash line), draw a thin line with a black pencil.
We lower the arrow down, thickening the line closer to the edge of the eyelid. Now, using a red lip corrector, we draw tear lines along the eyelashes of the upper and lower eyelids. To complete the picture, it remains to acquire bruises under the eyes. Take a dark gray shade of eyeshadow with a brush and apply it under the lower eyelid. The movements of the brush should be extremely careful, its pad should barely touch the skin.
The color should be a little more intense at the edges of the lower eyelid. Using a foundation two shades darker than your natural color, draw two thin lines from the eye sockets to the cheekbones. Lightly blend the foundation with a brush. Wearing such makeup is recommended for black brides, newly-made zombies or suffering vampires.
It’s unlikely that you’ll be able to create an original Halloween look with just one costume. The specifics of the holiday require complete immersion into the terrifying character of the character, and here you can’t do without specific makeup. Today we will tell you how to make scars for Halloween - one of the most popular and spectacular elements of the appearance of many monsters and traditional Halloween heroes.
LiveInternetLiveInternet
Unfortunately, there are no rejuvenating apples, and wrinkles appear on our skin every year. Cosmetics are not cheap, and buying a “pig in a poke” is quite dangerous. What to do? The advice of the expert of the “Everything Will Be Good” project, Olga Seymour, will help with this.
Olga Seymour is known as a stylist, image designer, international style and makeup master (champion of Russia and Eastern Europe Image Make Up 2005, Fool Fashion Look coach, international judge), fashion historian. But not everyone knows about her serious passion for Ayurveda. She is convinced that the knowledge presented in ancient Indian treatises is of great value for modern Europeans. On the pages dedicated to the amazing properties of plants, Olga found many recipes that can improve the quality of life, and on the show “Everything Will Be Good” she reveals these secrets to us...
Olga graduated from KNU. Taras Shevchenko, Department of Psychology, Faculty of Philosophy. She is a certified specialist in the field of aesthetics and makeup (studied at the Cinecitta-Estetica Academy in Italy (Rome, 1997).
Olga is raising a 17-year-old daughter, Stefania. She studies at the Ukrainian Ballet Academy in Milan, majoring in classical ballet. She dreams of dancing at La Scala. Stefania is an aspiring actress: she starred in the leading role in the film “The Little Dancer.” The girl shares her mother’s passion for homemade cosmetics and helps test new recipes.
Olga is sure that it is not necessary to spend cosmic sums on expensive cosmetics - you can take care of yourself using homemade products!
Of course, the best remedy for wrinkles is everything that benefits the body, slows down the aging process and prolongs youth. By the way, you don’t have to spend crazy money on this. All you have to do is look in the refrigerator! Some products in it will help us look stunning! So, if you have yogurt in the refrigerator and peas in the kitchen, then you can prepare a great anti-wrinkle mask! By the way, every woman can do it at home.
Mix half a glass of yogurt with 2 tablespoons of ground peas. Stir until you get a smooth paste. Cover your entire face and neck with it and leave for 10 minutes. Then rinse off. Already after the first use of this mask, the result is visible. Repeat every day. This mask prevents the appearance of wrinkles and smoothes existing ones.
If you accidentally find leftover cheese in the refrigerator, it will also help get rid of wrinkles. But just remember, these must be solid varieties without additives. Fat cheese is suitable for dry skin, and vice versa: low-fat cheese is suitable for oily skin.
Mix 1 part of hard cheese, crushed on a very fine grater, with 1 part of cream (or liquid sour cream). Apply the resulting mixture to your face and leave for 15 minutes. Rinse off with warm water.
You will feel the effect of its use immediately after application.
The skin becomes velvety, more elastic and the complexion is evened out. Regular use of the mask eliminates fine wrinkles.
Lifting mask made from ginger root, apple and banana Ginger is also very useful in cosmetology. It is known for its antimicrobial properties and instantly tightens the skin. To prepare a lifting mask, grind 100 g of fresh ginger root, apple, banana. Mix everything with 1 tbsp. olive oil. Apply to cleansed facial skin, except for the area around the eyes and lips. Leave the mask for 20 minutes, rinse with warm water. ...against “bulldog cheeks” TAR MASK It is done even less often - 1-2 rubles per month. It removes sagging well!!! Grate 1/8 bar of tar soap on a fine grater, gradually adding water, beat into foam. Apply tar foam to the face (avoiding the area around the eyes), neck, décolleté. Leave until completely dry, without washing off, apply 2 layers to the lower part of the face (bulldog folds, chin, neck, décolleté) Leave 2 layers until dry. Feeling of strong tightening. Rinse off with warm, then cool water. Lubricate the skin with moisturizer. IF YOUR SKIN IS DRY, PREVENTION-PRODUCED, add 1 tablespoon of sour cream or cream to the foam. Before applying the mask to your face, try on delicate skin for silkiness, smoothness and shine. Mix 1 tbsp. cocoa with 1 egg, add half a glass of kefir, apply to clean, slightly dried hair, and leave for 1-2 hours, rinse with lukewarm water - the hair is just super! Film mask for cleansing pores with activated carbon: 0.5 tsp. gelatin; 1 tsp milk (water); 0.5 tablets of activated carbon; Hard brush (synthetic); Grind the coal tablet, mix with gelatin, and add milk (water). Stir thoroughly, nothing should dissolve. Place in the microwave for 15 seconds. We take it out and wait for it to cool slightly. It is better to apply to steamed skin after a bath. Using a hard brush, we first “drive” the contents of the mask into the pores, and then apply a thin layer on top. Wait for it to dry completely (~ 10-15 minutes). It is necessary to take into account that such a mask cannot be used if you have rosacea. Cuperosis is a vascular disease of the skin, in which spider veins and networks of dilated capillaries appear on it. Mask against hair loss with cedar and rosemary Strengthens hair very well. For this mask you will need a tablespoon of honey, an egg yolk, a little olive oil, three drops of rosemary oil and three drops of cedarwood oil. Rosemary and cedar oils need to be dissolved in honey, and then add the yolk and olive oil to the mixture. The mixture should be homogeneous and not very thick so that it can be easily applied to the hair. Apply the mask to clean hair, cover your head with film, wrap it in a towel or scarf, leave for about half an hour and rinse. And another tip for these masks: if masks with oils are difficult to wash off, you can use baby soap or wash your hair with an inexpensive shampoo for oily hair. It washes off very well - tested You can prevent acne on your face, as well as remove existing ones, if you regularly make this homemade blue clay mask recipe 2 times a week: Add 1 teaspoon of lemon juice, 1 teaspoon of tincture to 1 tablespoon of blue clay powder calendula, and so much boiled water that when mixed you get a mass as thick as sour cream. Apply the mask in an even layer on your face for 10 minutes, then rinse with cool water. MANDARNINE REJUVENANT for daily use in the off-season. Do not use in hot summer months. Grind the skins of tangerines (others are not suitable), put them in a glass container, compact them, pour mineral water 2-3 cm above the skins. Leave for a day in a dark, cool place. Strain and discard the crusts. You can: 1-store in the refrigerator and wipe your face with it every morning. 2- freeze in an ice tray and wipe your face with ice. BUT BE SURE TO LET THE INSTRUCTION DRY ON YOUR FACE, DO NOT WASH AWAY UNTIL THE EVENING!!!! Having dried on the face, youthful gives a wonderful color to the skin - healthy and pink, imperceptibly tightens pores and loose skin, serves as good protection against temperature changes, wind, frost. Nourishes, vitaminizes and tones the skin. An excellent base for makeup. For beautiful long strong nails Half a teaspoon of ground red pepper, half a teaspoon of any hand cream, 20 drops of water. Warm it up a little. Leave it on your nails for 15-20 minutes and then wash it off without soap. Do it no more than once a month. Masks for making hair silky and shiny Step 1. Mix a teaspoon of vinegar and a teaspoon of glycerin. Stir the mixture until a homogeneous mass is obtained. Step 2. Add the beaten egg to the mixture. Stir. Step 3. Add 2 tablespoons of castor oil to the resulting mass. Mix thoroughly. Step 4. Apply the mask over the entire length of your hair. Put on a plastic cap and wrap your head with a towel. Leave the mask on your hair for 2 hours. Afterwards, wash your hair using shampoo. After washing, use a herbal decoction rinse. Treatment cycle: The mask should be done 2 times a week. Cycle duration is 1 month. Afterwards, you can make masks for prevention – once every 2 weeks. Result: Hair takes on a healthy look. They become smooth. Holds styling well. Whiten your teeth without harming them? Recipe for teeth whitening and treatment according to Neumyvakin. ………………………………………………………………. It helps with almost any gum disease, and at the same time almost instantly whitens teeth, dissolves tartar, and heals small wounds in the mouth. from periodontal disease, inflammation of the gums, from blackness at the roots of the teeth, from tartar and any painful condition in the mouth, as well as from bad breath. You need to make a simple paste: 0.5 tsp. baking soda, add 10-20 drops of hydrogen peroxide (pharmacy) and a few drops of lemon. The pasta is ready! How to use: Dip a cotton swab into the paste and rub the teeth and gums outside and inside with this paste. Lemon neutralizes soda and gives freshness, soda cleans teeth from plaque, and peroxide disinfects and whitens. After such cleaning, I feel like a queen: my teeth are so clean that they shine like pearls, and the light scent of lemon gives me a joyful mood. You can preventively rinse your mouth with a solution of hydrogen peroxide: 1-3 tsp. peroxide in 50 ml of warm water for all painful conditions in the mouth. But it's not tasty! But this is very useful... then the teeth whitening effect is permanent, and they remain white, even if you no longer brush them with a cotton swab. But to consolidate the whitening effect, you need to do this REGULARLY! Also, for those who decide to brush their teeth with the Neumyvakin-style toothpaste, I advise you to remember - after brushing your teeth, do not rinse with anything for 15 minutes, do not eat or drink anything. I wipe off the soda remaining on my teeth with a cotton swab, wipe my tongue with a dry cotton swab, and then “collect” everything with saliva and spit it out. Externally, I wash off my lips and around them with water. That's probably all.
Taken here
https://9514089.vkrugudruzei.ru/x/blog?postid=c0370a1666704794899591777c471c7a
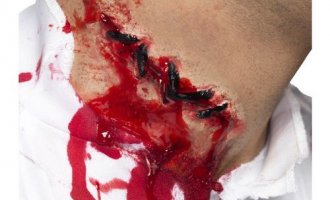
Artificial scars at home - step-by-step instructions
There are quite a few ways to create an artificial scar on the face. But most non-professional artists prefer more affordable products to real makeup. For example, ordinary decorative cosmetics, without which no modern girl’s makeup can do.
Main stages:
- Even out your complexion using a light-colored foundation. It is better to take tones of an unnatural gray-beige color, which will give the whole image a sickly look.
- Using light strokes, apply gray shadows to the site of the future scar and blend well. This technique will help create volume to our scar.
- Using a dark red lip pencil, we draw the contours of the future scar. How it will look on your face depends entirely on your imagination. Let us only note that torn scars look much more realistic and frightening.
- Fill in the finished contours with the same lip pencil.
- On top of the sketch, apply several layers of medical glue or collodion, which can be purchased at the pharmacy.
On a note! Instead of medical glue, you can use regular PVA. But keep in mind that it is more difficult to work with, and the effect may be short-lived. - Let the liquid dry for 5 minutes and apply transparent powder on top.
- Let's add volume to the scar using liquid face corrector.
- Using a thin brush and matte pink lipstick, carefully add color to the scar.
Rybak has a scar on his face from a violin, and Tikhanovich has a scar on his hand from an electric guitar!

ON THE HAND
Alexander Tikhanovich
Even before “Verasov”, Tikhanovich worked part-time in one of the capital’s clubs. Sang and played electric guitar at dances. There the musician received his mark.
— I was playing the guitar, and then I touched the iron microphone stand with my hand, and I started shaking. It turned out that the sound engineers mixed up the plus and minus when connecting the wires,” says Alexander Grigorievich. “The finger of my right hand was literally soldered to the string. The musicians kicked the guitar out of their hands, but the burn scar on their index finger remained.
The finger of Tikhanovich’s right hand was literally soldered to the string. Because of her and the scar
Photo: Dmitry BRUSHKO
Hermann
The singer remembers his beloved dog Jesse, a German shepherd, by the scar on his left arm. When Herman was 15 years old, he and Jesse went swimming in the river.
“I didn’t know that dogs don’t slow down in water when they swim.” So she slashed me right on the biceps with her claws,” says the singer.
Herman has a scar right on his bicep
ON THE FACE
Vladimir Pugach
Volodya has had the scar since he was three years old. Once, a grandmother locked her restless grandson in a room so she could chat calmly with her friends. He didn’t want to sit alone. And, accelerating across the room, he flew through the glass of the door. He cut his back, arms, face...
“My grandmother almost had a heart attack.” She was in such shock that she grabbed the belt and started chasing me,” Pugach laughs. — Since then I have a mark of 10 stitches on my face. Last year I already celebrated my 30th anniversary.
The leader of the group "J:MORS" has a scar on his face - a fond memory of his grandmother
Sasha Rybak
Belarusian Norwegian Sasha Rybak has been playing the violin since he was six years old. During this time, the singer became so close to her that even at his concerts he simultaneously plays and performs acrobatic tricks.
Rybak’s violin left its mark not only in the history of the Eurovision Song Contest, but also on the performer’s face, or, to be more precise, on his chin.
“Literally all violinists have this scar,” the singer’s father, Igor Rybak, tells Komsomolskaya Pravda. - Sasha has it too. The violin is pressed with the chin all the time. That's why stubble doesn't grow there.
Because of the violin, Rybak does not grow stubble on his chin
Vera Karetnikova
The singer speaks about her scar on her forehead with a certain tenderness and trepidation. Karetnikova even gave him a name - crescent. Same rounded shape.
Vera has been walking with him almost since birth. When she was one year old and had just learned to stand on her feet, she was running around the apartment and ran into a cast-iron radiator with her forehead.
“My parents took me to the hospital that same day. Doctors advised not to stitch up the cut forehead. Otherwise there will be a big scar from the stitches. Like, let it heal on its own,” the singer tells Komsomolskaya Pravda. “I don’t have a complex about him at all.” Yes, and he’s not that noticeable.
Singer Vera Karetnikova affectionately calls her scar on her forehead a crescent moon.
Nikolay Agurbash
Today Nikolai Georgievich speaks about his scar with a bit of irony. They say that a 10 cm stripe near the right eye is evidence that he will not be a welder in this life.
— While I was studying, I lived in a dormitory. And one day he got involved in a serious fight, and he himself was the initiator. My companion ran away as soon as the chaos began,” recalls Agurbash. “I broke the jaw of one of them, and they broke the stool on my head and cut my face with a knife.
Then an investigator came to Kolya’s hospital and even wanted to open a criminal case against him!
“I had to take my documents from school and run to the army,” the millionaire laughs. “Many times they suggested removing it, but I believe that scars do not spoil men.”
Nikolai Agurbash has a scar from a knife
ON THE FOOT
Anna Bondarchuk
The circus performer and TV presenter has...a hole in her leg!
-When I was a teenager, I went to a construction site with a group of people. We played catch up there. I stumbled and fell from the second floor of a residential building under construction directly onto iron reinforcement,” says Bondarchuk.
After falling from the second floor, at the site of Bondarchuk’s future scar, even the bone was immediately visible
Sasha Pavlova
At the age of 18, the TV presenter underwent surgery on the hip of her right leg. After a fracture in childhood, the bones did not heal well. A long scar of 30 centimeters remained as a souvenir! After five years in Holland, Pavlova tried to get rid of him several times. This is understandable; there is no need for a successful fashion model and a leading scar on the body.
I had surgery, laser correction three times, and applied silicone creams, but the scar still remained. And in the sun it even intensified, filling with a red-burgundy color.
— This spring I got a tattoo on my scar. “I decorated it with multi-colored stars,” Pavlova admits.
By the way, the TV personality also has a scar on her face.
— I kept piercing my right eyebrow, I wanted to wear a piercing, but it still didn’t take root. Today this desire has disappeared, but the scar remains,” the TV presenter confesses.
TV presenter Sasha Pavlova has a scar from surgery on her left leg
Pavlova tried several times to get rid of it using various methods...
...and ended up getting a tattoo on the scar
WHAT ABOUT THEM?
Russian stars try not to talk about their injuries again. And don’t talk at all! Their scars only become known from the paparazzi, who were lucky enough to photograph one or another exposed part of the body.
It turned out that Anna Semenovich has a scar right on her chest! Where the singer burned her assets, she does not want to share with the press.
Mikhail Muromov has 12 scars on his face alone. In his youth, the performer of the sensational “Apples in the Snow” was repeatedly exposed in crime.
Sex diva Anfisa Chekhova has two scars, as if from the claws of some animal, on her left hand.
Another TV presenter, Tina Kandelaki, hid her scar on her left hand (from an accident in Nice) for several years. She wore gloves. Today Kandelaki tattooed him - a five-level squiggle.
In March of this year, singer Zara appeared with a scar on her chest in the armpit area. In the crowd they say traces of plastic surgery.
Of the obvious scars, singer Maxim has one above her left eyebrow. As a child, the artist hit the table.
In March of this year, singer Zara showed off her scar at Yudashkin’s show
How to make a fake scar on your hands for Halloween
Another popular place to apply makeup to look like cut wounds and scars is on the hands. True, to create a frightening cut on your hand, you can’t do with just “decorative” and you need to use real makeup.
Necessary materials:
- makeup or palette of shadows and blush
- powder
- sculpture plasticine
- alcohol and cotton wool
- black eyeliner
- PVA glue
- nail file and brush
- hand cream
- red nail polish
Main stages:
- We degrease the place on the hand chosen for the scar with cotton wool and alcohol.
- Using a black pencil, draw the outline of the future scar.
- Roll a thin sausage out of plasticine and distribute it along the drawn contour. Using a nail file, make a deep cut with jagged edges. We remove uneven transitions with hand cream.
- We will treat the edges of the scar with PVA glue. This will smooth out the transition between leather and plasticine.
- Let the glue dry and powder the entire scar.
- Using shadows or makeup, paint the scar in dark red tones.
- The final touch is blood. Its role will be played by red nail polish, which needs to be poured deep into the wound.