Common mistakes
I can always tell the difference between expertly done highlighting and homemade highlighting. And all because when doing it on their own, most women make the same mistakes:
- Uneven distance from roots. The clarifier is usually applied 1-2 cm from the roots. With more modern techniques - ombre and shatush, this distance can be much greater. But it should always remain the same, otherwise the hair appears to grow unevenly.
- Wrong strand width. Bleached strands more than 5 mm wide look rough. And if they are too thin, and even thickly applied, then the effect of an uneven blonde is obtained. Moreover, the entire strand is never lightened completely - it is always “darned” with the sharp end of the comb.
- Uneven lightening. Most often it happens when the composition has been applied for too long. The chemical reaction from the moment the paint is diluted lasts up to 40 minutes. If you work slowly, then the strands that were dyed last simply do not have time to discolor to the desired degree.
- Yellowness after highlighting. There are many reasons why it appears: poor-quality paint, violation of dyeing technology, the original color is too dark, the reaction of the brightener with the previously applied pigment.
- Severely burned hair. Occurs if the percentage of oxidizing agent is chosen incorrectly or the composition remains on the hair longer than the time prescribed in the instructions. Lifeless tow on the head is formed if highlighting is done earlier than 2 weeks after perm or dyeing with ammonia paints.
But I’ll still give you a few secrets on how to do your own highlighting at home correctly. And it all starts with proper hair preparation.
What will you need for work?
As alternative techniques, you can try highlighting with a comb or elastic bands, as well as lightening with or without backcombing. To carry out the procedure at home you will need:
protective negligee or towel;- mixing container;
- plastic gloves;
- lightening powder or paint;
- oxidizer;
- flat brush with long synthetic fibers;
- plastic comb with a handle and long, sparse teeth;
- fine comb;
- hair bands.
At home, it is convenient to use not a paint brush, but an ordinary toothbrush . It allows you to carefully distribute the composition, coloring each hair.
It is advisable to equip the workplace with 2 mirrors that allow you to evaluate the view from the back of the head. Good lighting must be provided. If the hair is very thick, it is worth hiring an assistant who will help apply the composition to the occipital and crown area.
See how this can be done using an ordinary toothbrush:
Preparing for coloring
In order not to spoil your curls during highlighting, it is advisable not to wash your hair 1-2 days before the procedure. But it is important that during these days you do not apply hairspray or other styling products that may interact with the oxidizing agent. The natural layer of sebum will create a thin protective film that protects the hair shaft from severe damage.
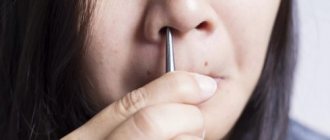
Allergy test
It is very important that the scalp is intact. With the correct dyeing technique, the lightening composition should not get on it and the hair root, but at home anything can happen. And if there are wounds, redness, etc. on the skin, then the oxidizing agent can cause severe irritation. If you are prone to allergic reactions and are wearing makeup for the first time, it is better to do a test first.
On very dark hair, highlights look unnatural and easily take on a yellow tint. The problem can be partially solved by first using a wash that will slightly lighten the entire head.
A wash is also needed when the hair has recently been dyed any dark or very bright color (red, eggplant, dark chocolate). It is safer for hair to apply it 2-3 days before highlighting.
When purchasing a clarifier, make sure that it is a high-quality product with a current expiration date in undamaged packaging.
It is important to choose the right percentage of oxidizing agent so as not to burn your hair. For light and blond hair, 6% is enough, from dark blond to chestnut – 9%, and dark brown-haired women and brunettes will have to use a 12% concentration, which greatly increases the risk of hair damage.
Required Attributes
Before starting the procedure, make sure you have everything you need on hand. When the first stroke has already been made, you need to work quickly and carefully. You cannot be distracted, let alone waste time looking for missing accessories.
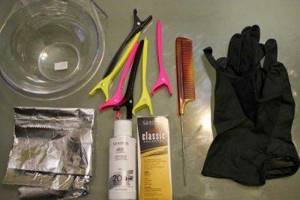
What you might need:
- drape to protect clothing;
- rubber gloves to protect hands;
- plastic bowl for paint;
- brush for applying the composition;
- hair clips;
- foil for wrapping strands;
- comb with a long tail;
- brightening composition;
- restorative balm;
- 1-2 terry towels.
Important! Some types of highlighting may require additional accessories. In addition, you need to worry in advance about the place where you will highlight, because persistent dyes can easily stain everything around, and then it’s not easy to clean. Therefore, the floor should be covered with oilcloth or newspaper; it is better to sit on a chair without a back, which also needs to be covered with something. Well, remove all objects (curtains, tablecloths, etc.) away.
Various highlighting techniques
I will tell you in detail how to do hair highlighting at home using the example of the classical technique. More modern techniques differ from it only in some subtleties. Therefore, anyone who masters this technology can easily perform more modern variations of this coloring: Californian, balayage, shatush.
Classic
Classic highlighting is popularly called highlighting on foil. It is very important to cut it in advance into strips approximately 3 cm wide and a couple of centimeters longer than the length of the strands to be dyed.
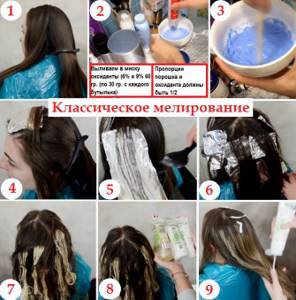
Next step by step you need to do the following:
- cover your neck and shoulders with a cape, put on protective gloves;
- Comb your hair thoroughly, and be sure to comb short hair at the roots;
- separate the bangs and the occipital area with partings;
- secure excess hair with clips;
- dilute the brightening composition according to the instructions;
- Take a strand of the required width at the top of your head;
- place foil under the strand and darn with the tip of a comb;
- remove excess hairs and apply a lightening compound to the remaining ones;
- wrap the dyed strand in foil and secure it on your head;
- paint the occipital area in this way, then the sides and lastly the bangs;
- keep the paint for the required time, periodically checking the degree of lightening;
- remove the foil, thoroughly rinse off the remaining composition under running water;
- apply a restoring balm, after 3-5 minutes wash your hair again, dry and style.
Depending on the length and thickness of the hair, this procedure takes up to an hour and a half in the salon. When highlighting at home, you must also try to fit within this time, otherwise you can seriously burn your hair.
Simplified
A simplified option, which is great for short haircuts and hair up to 15 cm long (for example, a classic bob), is highlighting on a cap. For this you will need a cap with holes (disposable from cellophane or reusable silicone) and a hair hook or comb with a metal knitting needle at the end. They can be bought in specialized stores.
- This highlighting is done in an open way, so no foil is needed. The cap is placed on previously combed hair and thin strands are pulled out through the holes with a knitting needle or crochet. Their frequency and thickness can be adjusted at will.
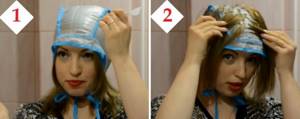
- When the entire head is prepared, dilute the bleach and apply it to the strands sticking out from under the cap. After waiting the required time, the composition is washed off without removing the cap.
- Then remove the cap, apply a restoring balm, and after 3-5 minutes wash the hair again. That's it, the procedure is finished, you can dry and style your hair.

A cap for short hair is also convenient for coloring. Not only a lightening compound can be applied to elongated strands, but also permanent dyes of selected shades, thus creating interesting transitions. With the right combination of colors, you can get a brilliant result, no worse than an expensive salon one.
Special
The essence of California highlighting is to create the effect of sun-bleached hair (you can read more about California highlighting here). In this case, only light lightening of randomly taken strands is performed.
Remember that California highlights look beautiful only on light hair - up to a medium brown shade. On dark hair, instead of the effect of natural burnout, it will create the impression of faded lifeless hair, and if you overexpose the dye, you can get bright yellow spots on your head.
With some skills, you can try to do more complex highlighting techniques at home yourself - ombre and shatush, which allow you to partially lighten dark hair using a gentle method and create fashionable, stylish looks. They are suitable for straight or wavy shoulder length hair. Read about ombre here, and about shatush here.
Possible mistakes: how to avoid and correct them?
When highlighting yourself, mistakes are possible that affect the final appearance of the hairstyle and the condition of the hair. The most common disadvantages of home lightening include:
uneven color;- too noticeable roots (how to do root highlighting of hair at home)?;
- dull, brittle, split ends;
- noticeable yellow tint of bleached strands.
The cause of the defects may be incorrect exposure time, too aggressive dye composition, unsuccessful shade of dye, poor hair condition before the procedure, careless application of the composition.
Most errors can be corrected without resorting to re-highlighting:
- Toning with a corrector with a purple undertone or washing your hair with a tinted shampoo of the appropriate shade will help remove yellowness.
- Toning with gentle ammonia-free paint will help correct unsuccessful shades. The tone is selected depending on the color type. A wide range of tinting paints are offered by professional brands.
- Glossing or lamination with a colorless corrector mixed with an activator cream will help make your curls more vibrant, elastic and shiny. The procedure strengthens the strands and protects them from damage.
Tips for highlighting at home
For home highlighting, it is important what length your hair is. If they are short or medium, then it will be easy for you to create blonde or colored strands yourself. But highlighting long hair is difficult to do at home - you can simply ruin your hairstyle.
You must also consider your original hair color. I'll give you some tips.
The original color matters
| Color | Things to consider |
| For dark hair (more details here) | When highlighting yourself, all errors are noticeable. Yellowness often appears in the strands. Therefore, I recommend lightening by no more than 3-4 tones. The most suitable techniques are those in which the color intensifies from the roots to the tips. Chaotic lightening of the strands looks good. |
| For blonde hair (read here) | You cannot mix cold and warm colors. The most voluminous looks are golden blonde with honey notes and ash blonde with streaks of beige, eggplant, nut, and cherry tones. On short hair, contrasting highlights look good, emphasizing the graphic nature of the haircut. Ammonia-free paints are preferred. |
| For redheads (full information here) | Any lightening will give a reddish tint, but will visually add volume. If you have snow-white skin, shades of white in your hair are contraindicated. The most advantageous option is strands that shimmer with gold, colors of wheat and honey, shades of ocher and dark chestnut. Red color with brown eyes can be shaded with chocolate and coffee tones on narrow strands. Acceptable techniques are the effect of burnt hair, the play of dark and light highlights, California highlighting. |
| For gray hair (more details here) | Pre-pigmentation is required, especially if the hair is dark. The shades should be in harmony with the base color. Techniques for lightening or darkening the root zone with a spread of darker color along the length of the hair are acceptable. |
| For fair-haired ones (read here) | I recommend lightening or darkening by no more than 3-4 tones. Golden, red, honey, reddish, dark chocolate, coffee and black strands best enliven the image. The shades should be muted and unsaturated, otherwise you will resemble a motley bird. Zonal highlighting looks beneficial. |
| For painted ones (read the article here) | Usually performed using gentle techniques - through a cap, coloring, Californian or Venetian lightening. If the goal is to bring out black or another dark color, a wash will be required before highlighting. You can also do frequent highlighting with a repeat procedure after 2-3 weeks, but then there is a risk of hair damage and the appearance of yellow and unevenly colored strands. |
Taking into account the length of the hair
There are features of working with long and short hair. They also need to be taken into account.
| For short | For long | |||
| What do you need | Peculiarities | What do you need | Peculiarities | |
| Highlighting through a cap |
|
With a cap it is convenient to regulate the intensity of highlighting and work in techniques that do not require painting the root zone. | – | Not applicable. Long strands are difficult to pull through the slits, and the cap cannot be removed after the procedure. |
| On foil |
| On short strands, the foil does not adhere well, so the method is not used. Medium-length hair is combed, secured with clips at the temples and back of the head, and the bangs are separated. The strands are coated with a coloring compound, wrapped in foil and secured with a clamp. (read more about highlighting for short hair here) |
| When highlighting, follow the sequence of crown-back-of-the-right and left sides-bangs. Cover 3-4 strands with the coloring compound, wrap them in foil and bend it on the sides. (read more about highlighting for long hair here) |
| On the square | ||
| What do you need | Peculiarities | |
| Highlighting through a cap |
| Suitable for medium length and short bobs. Thin strands are crocheted through the slits in the cap and coated with a coloring compound. The cap is convenient for highlighting only the upper or lower layers of the hairstyle, or for lightening thin strands throughout the head. |
| On foil |
| Hair is divided into zones - crown, back of head, right, left sides, bangs. In each zone, carefully select 3-4 strands and place a strip of foil under them. Dye the strands and wrap them in foil, bending it on the sides. It is important to maintain the correct distance between them. Read more about highlighting on bobs here. |
Possible benefits of using a hair donut to create hairstyles
A donut is essentially a large, bulky foam rubber band. It has some stretch, making it suitable for hair of any thickness. Let's consider the main advantages that are typical for beautiful and stylish hairstyles based on a donut:
Such styling looks very elegant and decorative. Gives volume to hair. They are easy to do and any girl can create them on her own without visiting a stylist. This is very convenient - you don’t need to think about what hairstyle to do in the morning - with the help of a donut, creating it will be simple and quick. And it will also come in handy for a festive occasion - with its help you can create many elegant styling options.
The bagel securely fixes the hair. The strands will not get into your eyes and interfere. Hairstyles have a flawless, neat appearance. The bagel suits both long and short hair. Straight or curly hair - it doesn't matter either
It doesn’t matter how thick your hair is, the hairstyle will look great on any hair. The speed of creating such a hairstyle is simply amazing: in a matter of minutes a girl with absolutely any hair length can create it for herself.
Except, of course, very short ones. Even if you don't have time to run to the store for a bagel, there is always the opportunity to sacrifice a sock and make an impromptu bagel out of its elastic band. The result will be indistinguishable, as if you were using a real factory device from the store. Decorated with elegant decor, the hairstyle is perfect for elegant events. Including such important ones as a wedding or anniversary.
In the video - hairstyles with a hair donut:
Bug fixes and maintenance
If, despite all your efforts, you still make mistakes and are not too happy with the results you got at home, you have two options - seek professional help or try to correct them yourself. The first is preferable, but sometimes it is simply not necessary.
Light yellowness can be quickly removed by tinting or using “silver shampoos”.
Professional or homemade whitening masks, which can be used 1-2 times a week, have a good effect. A tinting spray will help not only hide color defects, but also improve the condition of your hair.
It’s worse when the distance from the root is unequal. You can't do this without outside help. For example, in such cases I have to tint the necessary areas and make sure that the degree of lightening along the entire length of the strand matches. So in this case, I recommend going to the salon.
Do not try to completely cover up unsuccessful highlights yourself. Lightened hair has a looser structure than undyed hair, and after 2-3 washes it will appear again. A good hairdresser will offer alternative methods, for example, coloring or going blonde.
Highlighting without a cap and foil: is it possible?
The classic technology for highlighting short and medium hair suggests using a plastic or rubber cap with holes (how to do highlighting through a cap at home?). You can buy it or make it yourself using a regular shower accessory.
Thin strands are removed using a hook, after which a coloring composition is applied to them.
Foil is placed under each curl; after spreading the paint, it is rolled up and folded (how to do highlighting on foil yourself?).
Without air access, the depigmentation process is more intense, and the hair quickly lightens.
However, experienced colorists are not limited to the classic method , using other available means or even doing without them. Among their advantages:
- ease of use;
- the possibility of dyeing even very long hair, for which the cap method is not suitable;
- the absence of foil makes the procedure less traumatic;
- original technologies allow you to create smooth color transitions or highlight the roots more clearly, which is important for some types of highlighting.
When trying new techniques, do not lighten your hair too much. It is quite enough to change the color by 3-4 tones. For girls accustomed to classic highlighting technology, alternative methods may not seem very convenient. However, with careful distribution of the composition, correct selection of shade and observance of the exposure time, the procedure will be successful.
Before you start work, you should go to the salon and update your haircut . Some experts recommend not shortening your hair too much, as re-correction may be required after bleaching.
Alternative methods are ideal for highlighting with the effect of natural faded hair: Californian, Venetian, French. The technique is also used for shatush, which involves a smooth transition from darkened roots to light ends.
Attention! Coloring without foil is not suitable for those who dream of maximum contrast highlighting with clearly defined strands.
Care and prevention
Even if you manage not to burn your hair, provide it with more thorough care after highlighting: give up straightening irons and curling irons, pamper yourself with masks more often, protect from the harmful effects of the sun and wind. By the way, you can use the masks I have tested for damaged hair, there are recipes here.
Severely damaged hair can be provided with professional help: shielding, biolamination or Botox. But even after this, you must continue to regularly care for your strands - this is only an emergency measure that allows you to instantly restore lost shine and elasticity.
Have you tried highlighting at home? You can share your experience or ask questions in the comments. Let's discuss it together.